Aug 20, 2015
Before Android Studio incorporated JUnit4, Google’s implementation was an odd mix of standard and Android specific unit tests. The current version of JUnit4 is a much more vanilla implementation of the JUnit standard, see http://junit.org for more information or https://github.com/junit-team/junit for the source code. The current recommended version of JUnit we’re loading in the build.gradle file is 4.12.
1. Android Assertions
In our Hello, World example we used the assertEquals assertion, but there are other assertions we can use in JUnit 4.12.
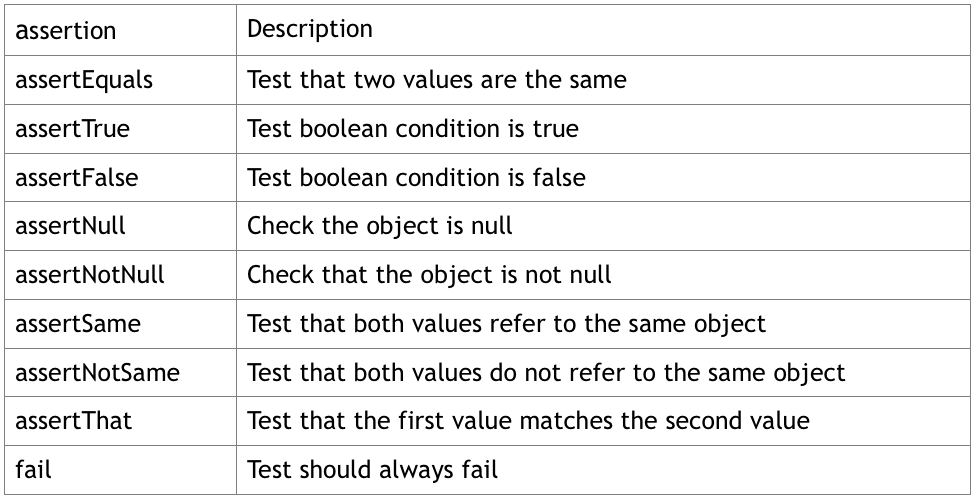
There are also many other asserts that you can use if you add Hamcrest, assertj or any of the many other assert libraries. But for the moment let’s start with the basic JUnit assertions.
assertTrue and assertFalse, when you’re looking for a true from a boolean condition and a false, for example assertTrue (5 < 6)and assertFalse (5>6)
assertNull and assertNotNull checks to see if an object is null e.g. assertNull(Calculator) or assertNotNull(Calculator)
assertSame and assertNotSame checks the two objects are references to the same object for assertSame or not for assertNotSame. This is not the same as equals which compares the values of the two objects and not the object itself.
assertThat can be used like assertEquals where instead of saying we could now sayassertEquals(mCalculator.add(3, 4),7,0) we can say assertThat(mCalculator.add(3, 4), is(7))
fail is simply a failing test, for code that never should have been reached or to tell you here be dragons.
2. Command Line
Unit tests can be run from the command line using the following command
gradlew test --continue
The test task runs the unit tests and continue tells gradlew not to stop if any of the unit tests fail.
First time you run a unit test you may run it from the command line using the gradlew test --continue command so that you can see what’s happening, or alternatively open the gradle console in Android Studio. Otherwise you may end up wondering why nothing is happening as Android Studio downloads all the necessary files to run unit tests.
Command line execution of the tests is also very useful if you’re using a continuous integration build tool such as Jenkins.
3. Junit Options
jUnit4 has the following annotations
@Before
@After
@Test
@BeforeClass
@AfterClass
@Test(timeout=ms)
@Test is used to annotate any test method, see Listing 1. @Test(timeout=ms) is a slight wrinkle on the standard annotation, it simply says give up if the test is taking longer than the defined timeout given in milliseconds.
Listing 1: @Test method
Before and After are used for any setup and teardown functions that you’re going to need. for example Before could include code to write to log files or creating objects to be used in the test or perhaps opening the database and then seeding the database with test data. After is typically used to reverse any of those Before changes, such as deleting the test rows in the database etc. see Listing 2.
Listing 2: @Before and @After annotations
Before and After are called before every test, but if you want to make the setup changes only once before all the tests and once after all the tests then you should use @BeforeClass and @AfterClass. Note that setUp and tearDown methods now have to be declared as public static. The Calculator also has to be defined as static, see Listing 3 as there is now only one instance of the Calculator instead of one for each test.
Listing 3: Using BeforeClass instead of Before
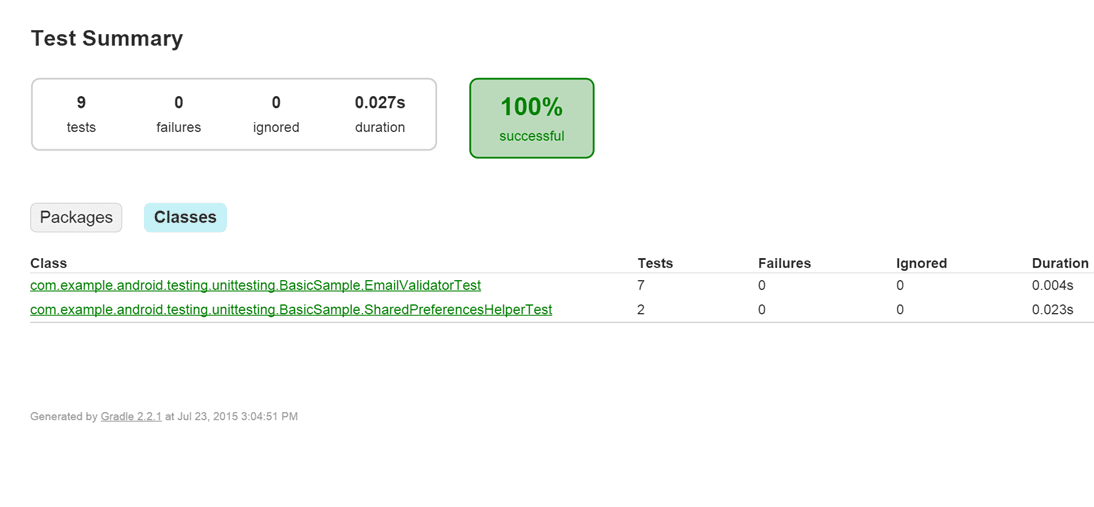
Figure 1: HTML reporting
4. Grouping Tests
As your unit tests grow it’s not a bad idea to group them as small, medium or large tests based on how long they’re going to take. Writing and executing unit tests should be lightning fast when you’re coding, but there may be more comprehensive tests that you might want to run once a day or when the code is checked in.
Figure 2 is taken from an old Google testing blog, see http://googletesting.blogspot.com/2010/12/test-sizes, which does a good job of showing when you should be grouping your tests into Medium or Large tests so they don’t slow down the development process.

Figure 2: Grouping Unit tests into categories
Small tests would be normal method based unit tests with mocked out database or network access. Because Espresso tests need an emulator or device to run they would automatically be considered Medium or Large tests.
Listing 4, shows the normal way you would annotate whether a test is a small or medium test.
Listing 4: Classic Unit Testing Grouping
Unfortunately unit testing support isn’t perfect yet in Android Studio and there’s no way to tell Studio to only execute the small or medium suite of tests in the build.gradle file. Until that changes for the moment the best workaround is to put the size in the test method name, see Listing 5. Gradle will let you use * to help define what tests you want to run. We can run only the small tests from the command line using the command gradlew testDebug --tests *Small* or for the medium size tests use gradlew testDebug --tests *Medium*.
Listing 5: Grouping Tests
The XML output from the initial gradlew command is shown in Listing 6, which shows only the small tests ran.
Listing 6: XML output showing for small test run.
5. Parameterized Tests
If we want to test our calculator we’re going to have to do a lot more testing than adding, subtracting, multiplying and dividing combinations of the numbers 3 and 4. Listing 7 has a few more tests to give us a little more confidence on our implementation. Run the tests and they should all pass.
Listing 7: Adding more test conditions
If you’re writing unit tests, my guess is you are always looking for ways to write better code and the code Listing 7 smells. All that hard coding doesn’t look right, even if it’s test code. We can use jUnit’s parameterized tests to tidy this up.
Refactor your code to add parameterized tests as follows
Add
@RunWith(Parameterized.class)at the top of the class to tell the compiler that we are using parameters for our testingAdd the import statement,
import static org.junit.runners.Parameterized.Parameters;Create your collections of tests parameters, in this case operandOne, operandTwo and the expectedResult
Add the constructor for the class
Use the parameters to feed your tests
The complete code is shown in Listing 8. We’ve converted the code to work only with integers for simplicity sake
When the code runs we get the following results in the statistics frame, see figure 3.
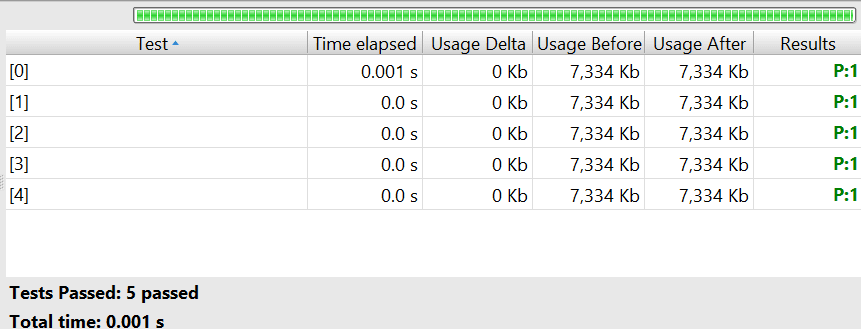
Figure 3: Parameterized test results.
Note a complete set of these testing blogs have been compiled together into an Agile Android mini-book, published by Apress and available from Amazon
This is Part 2 of 6, the remaining blogs can be found below.
Part 1 – Agile Android Testing
Part 2 – Android Unit Testing
Part 3 – Hamcrest, JaCoCo, Mockito, and Jenkins for Android
