Customer service call centers represent one of the most labor-intensive operations in modern telecommunications. Every day, agents field countless questions about billing, service activations, plan changes, and technical issues. What if you could build an intelligent AI agent capable of handling these interactions automatically while maintaining the nuanced understanding that customers expect?
OpenAI’s Agent Builder platform provides the tools to create this kind of solution. By combining fine-tuned models, database connectivity through Model Context Protocol (MCP) servers, and file storage for reference documents, you can construct a call center agent that handles real customer inquiries. This tutorial walks you through building a complete call center assistant for a fictional mobile phone company called R-Mobile.
As usual, you can follow along with the video or read the written tutorial below.
The Plan
To create our Call Center Agent, we are going to leverage a couple of techniques and technologies.
Fine Tuning: Creating a custom model using our call center scripts
MCP Server: The USB for AI—to connect to customer databases
File Storage: Creating a library of company info for the LLM to draw from
Agent Builder: A node-based workflow builder that eliminates a lot of the coding necessary to build complex applications
Once we have our fine tuned model and MCP Server set up, we can basically connect the dots and start testing. Before we truly get started, let’s take a look at the architecture of an OpenAI Agent workflow.
Understanding the Call Center Agent Architecture

The Agent Builder is OpenAI’s platform for creating task-driven AI agents that can reason, use tools, and take real actions. It provides a drag-and-drop interface composed of interconnected nodes that define your agent’s workflow. The interface includes start and end nodes, agent nodes for specific tasks, logic nodes for conditional processing using while loops and if-then-else clauses, and guardrail nodes that protect against hallucinations, private information disclosure, and prompt injection attacks.

For this tutorial, we’re going to create a imaginary business and its call center. We chose the ChatGPT suggestions R-Mobile and the tagline: Our bars are low, but our standards are lower.

For our R-Mobile call center, the architecture follows a triage pattern. When a customer call comes in, a guardrail first screens for prompt injection attempts. Then a triage agent analyzes the customer’s request and routes it to one of three specialized sub-agents. The first sub-agent connects to a customer database to handle account-specific queries. The second uses a fine-tuned ChatGPT model trained on technical support questions. The third accesses file storage containing FAQs and plan brochures for general information requests.
This modular approach ensures that each type of customer inquiry gets routed to the most appropriate resource, mimicking how a real call center would escalate different issues to specialized departments.
Preparing Our Sub-Agents
Our 3 sub-agents will utilize many of the software tools that LLMs have available, from vector storage, model fine tuning (custom weights) and MCP (LLM native data connection). We’ll start with our Technical Support agent.
Creating Customer Personas for Training
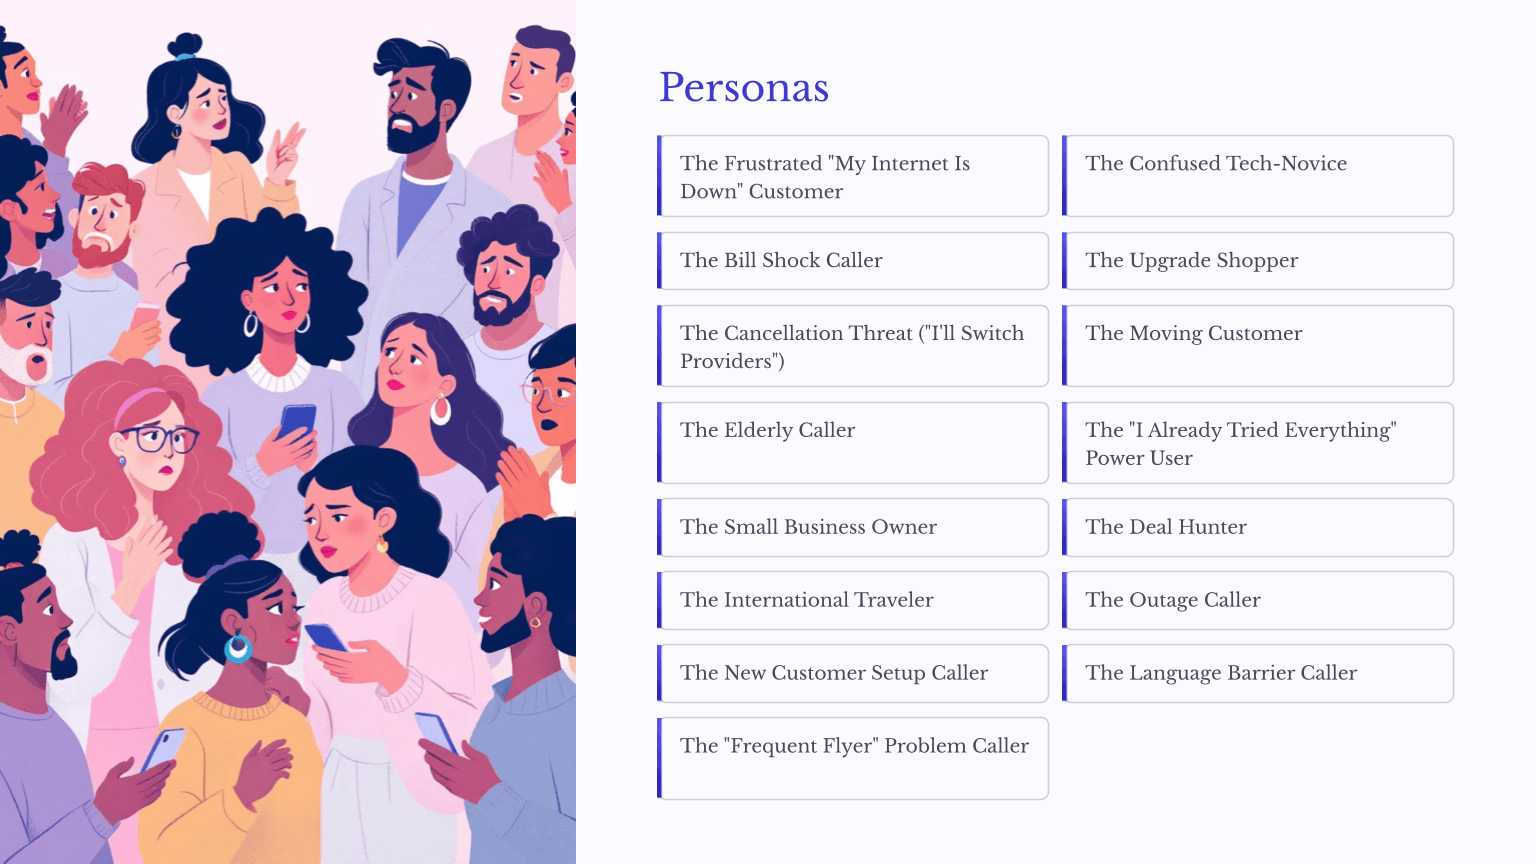
Before building any call center system, you need to understand who will be calling and what they need. Since we don’t have access to real historical call data, ChatGPT can generate realistic customer personas that represent the diversity of callers a telecommunications company encounters. Here’s what we output for our training data.
Personas
The Frustrated "My Internet Is Down" Customer
The Confused Tech-Novice
The Bill Shock Caller
The Upgrade Shopper
The Cancellation Threat ("I'll Switch Providers")
The Moving Customer
The Elderly Caller
The "I Already Tried Everything" Power User
The Small Business Owner
The Deal Hunter
The International Traveler
The Outage Caller
The New Customer Setup Caller
The Language Barrier Caller
The "Frequent Flyer" Problem Caller
The generated personas span a wide range of customer types including the frustrated “my internet is down” customer, the international traveler needing roaming information, elderly callers who need extra patience, small business owners with complex account needs, and customers threatening to cancel service. We also leveraged ChatGPT to create conversation scripts for each persona, which we use for fine-tuning our technical support model.
These personas ensure your agent can handle the full spectrum of customer interactions rather than just the most common scenarios. Your business may already have call logs to pull from, or you may have personas outlined. Either way, you can use ChatGPT to fill in the missing half, or generate test data if necessary. We’ll go into more detail later about generating this data for yourself if you need to.
Fine-Tuning the Technical Support Model
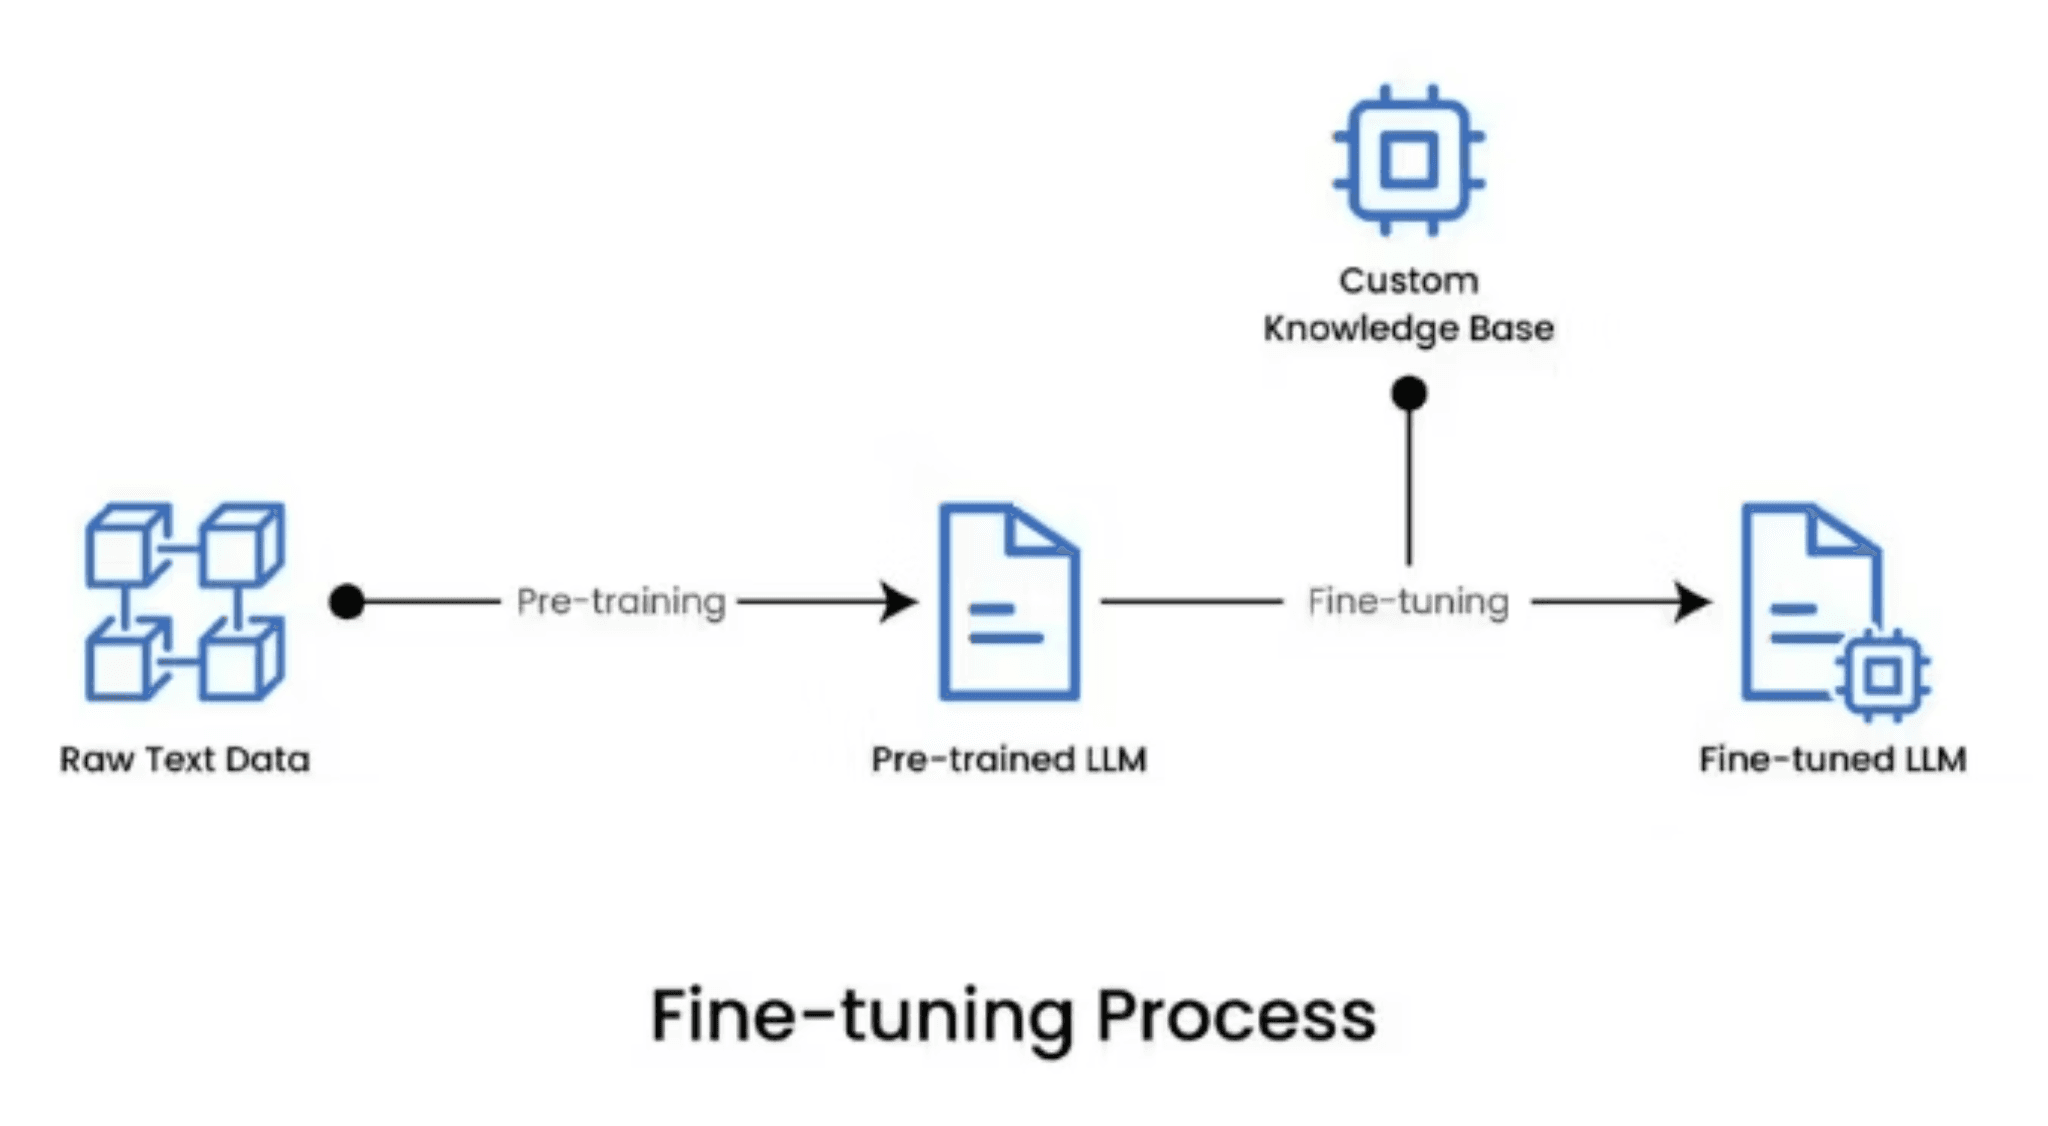
ChatGPT’s base models don’t know anything specific about your business. Fine-tuning creates a customized model that answers questions with your company’s specific information rather than generic responses. For R-Mobile, this means training the model on questions like business hours, store locations, plan details, and common troubleshooting procedures.
The training data must follow a specific JSON format with paired user questions and assistant responses:
Each question-answer pair occupies a single line in what’s called a JSONL (JSON Lines) file. While the minimum requirement is 15 examples, aim for 100 to 200 questions for production-quality results.
To convert a standard JSON array into JSONL format, you can use this Python script:
This script reads your JSON array, iterates through each entry, and writes it as a compressed single line to the output file. The JSONL format is required because it allows the training pipeline to process examples one at a time without loading the entire file into memory.
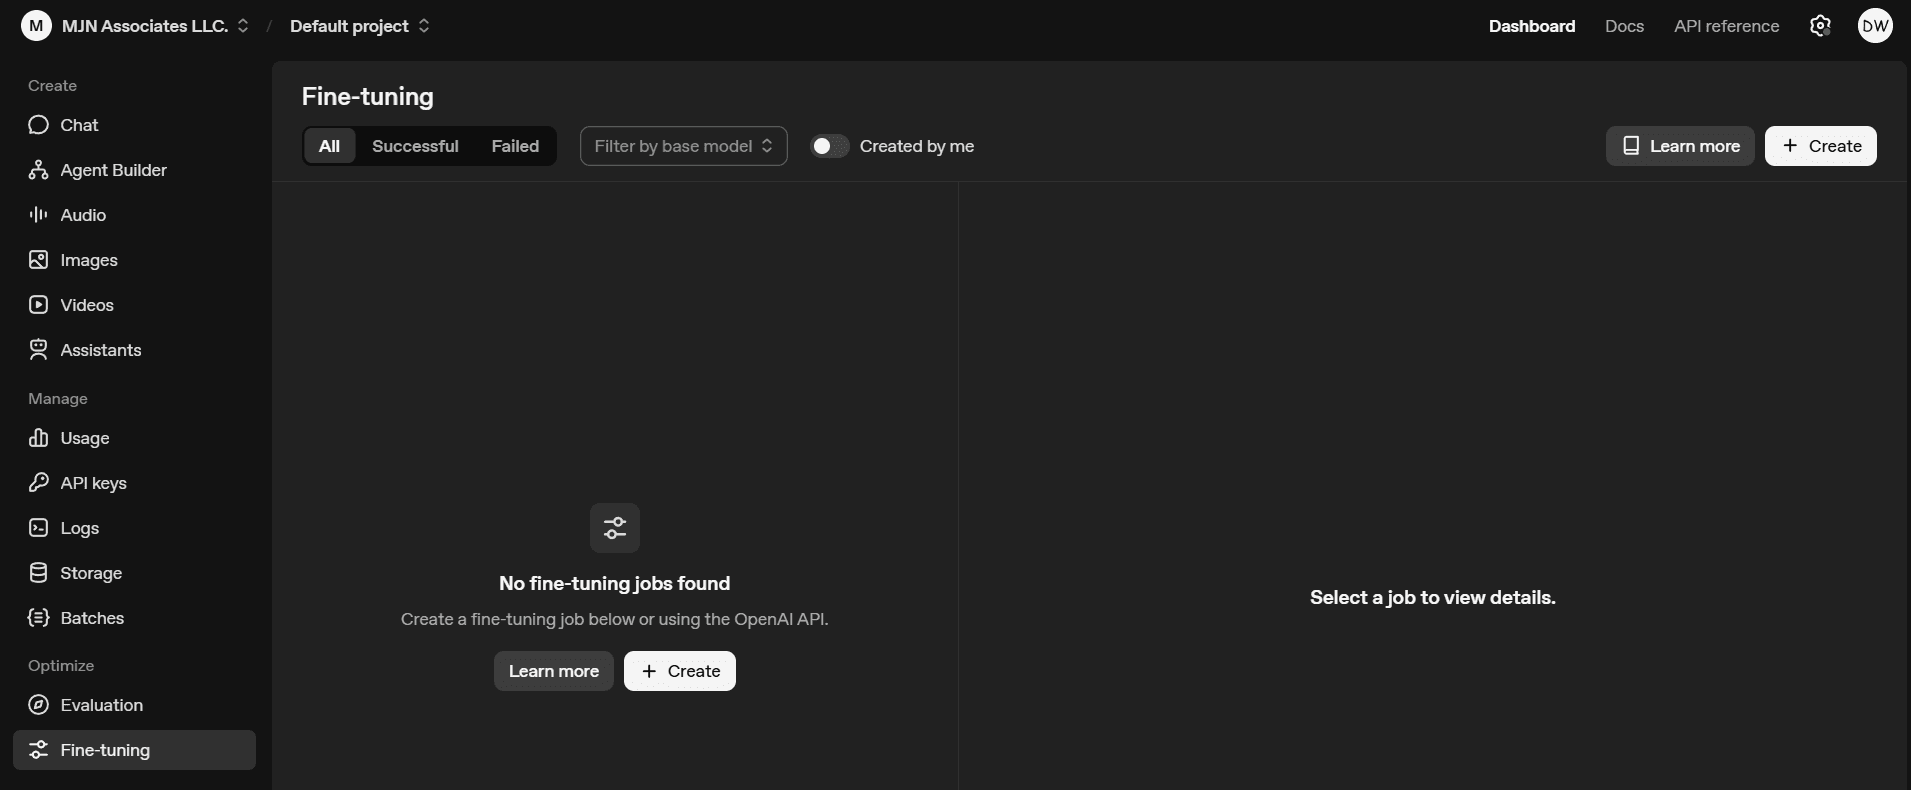
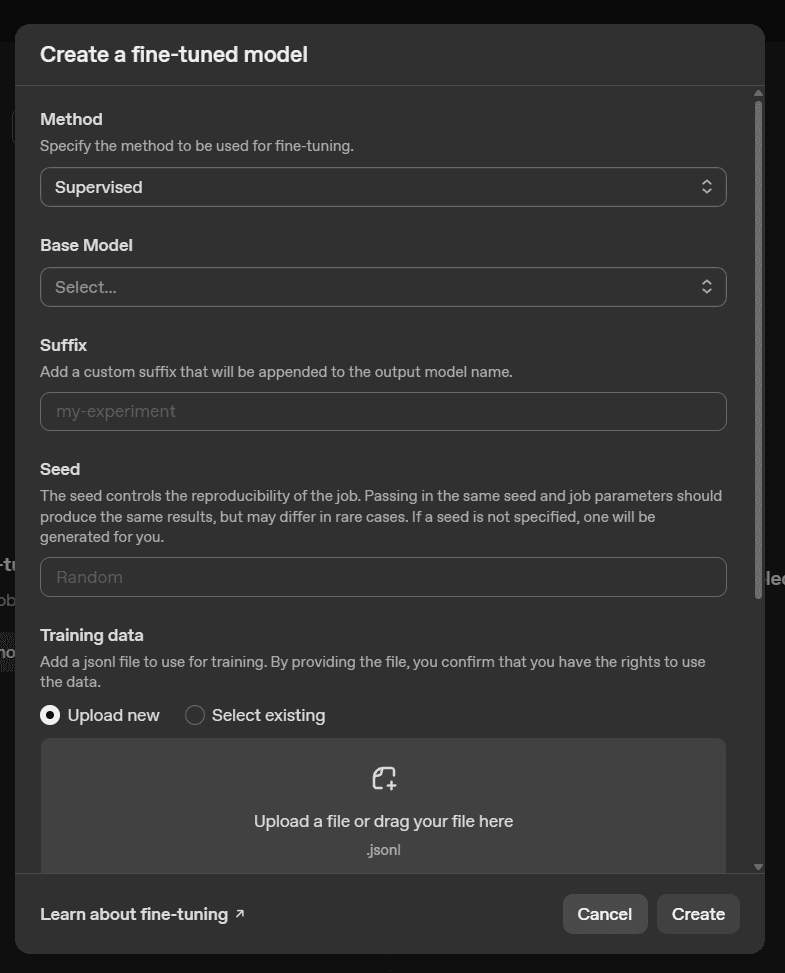
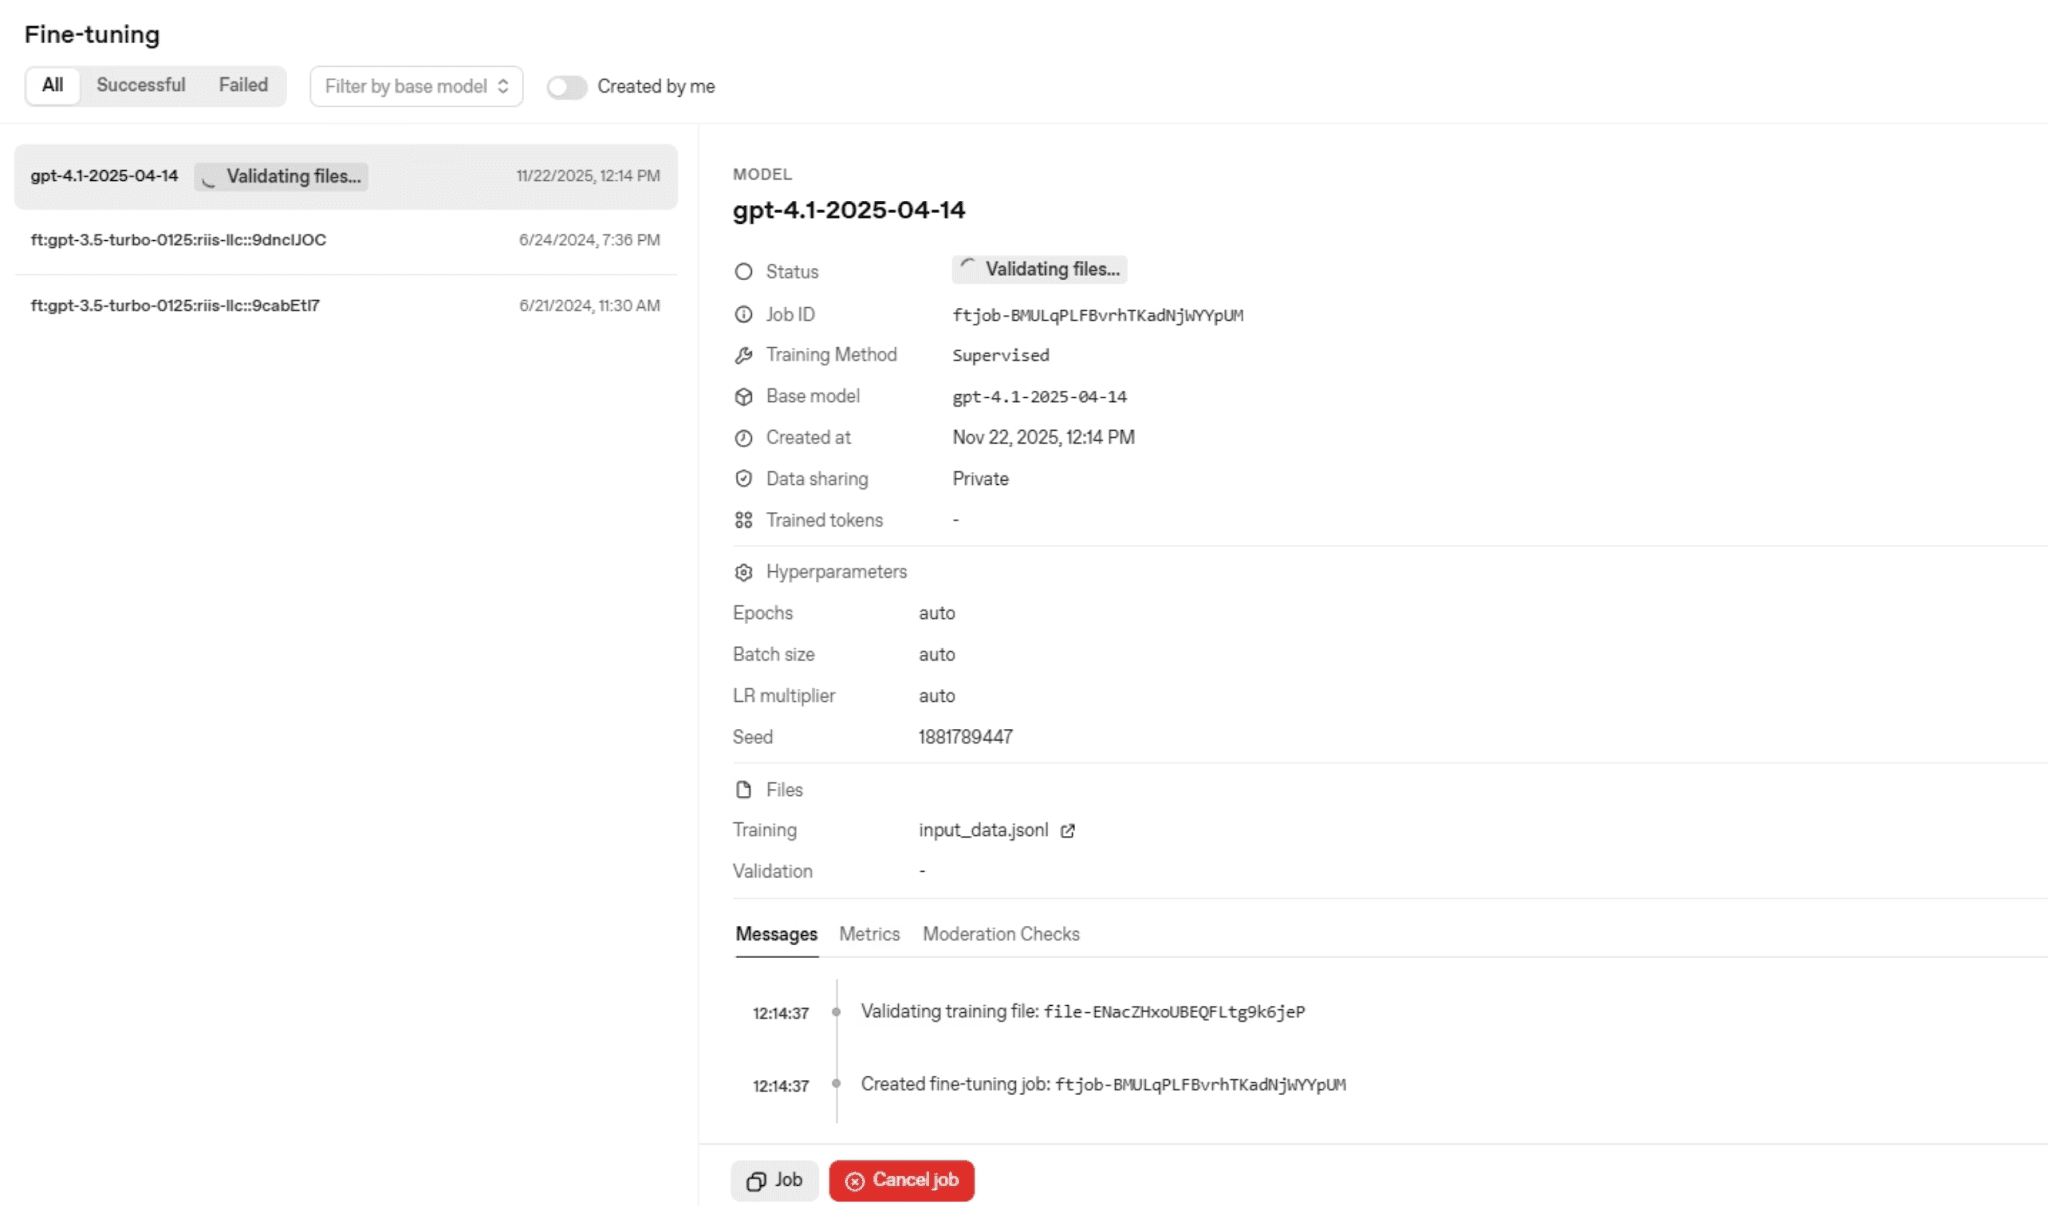
Navigate to the OpenAI Playground, click on Fine Tuning, and upload your JSONL file. Currently, fine-tuning works with GPT-4 models.
The training process for 100 questions typically takes about 30 minutes. Once complete, note your model’s name from the left panel as you’ll reference it when building your agent.
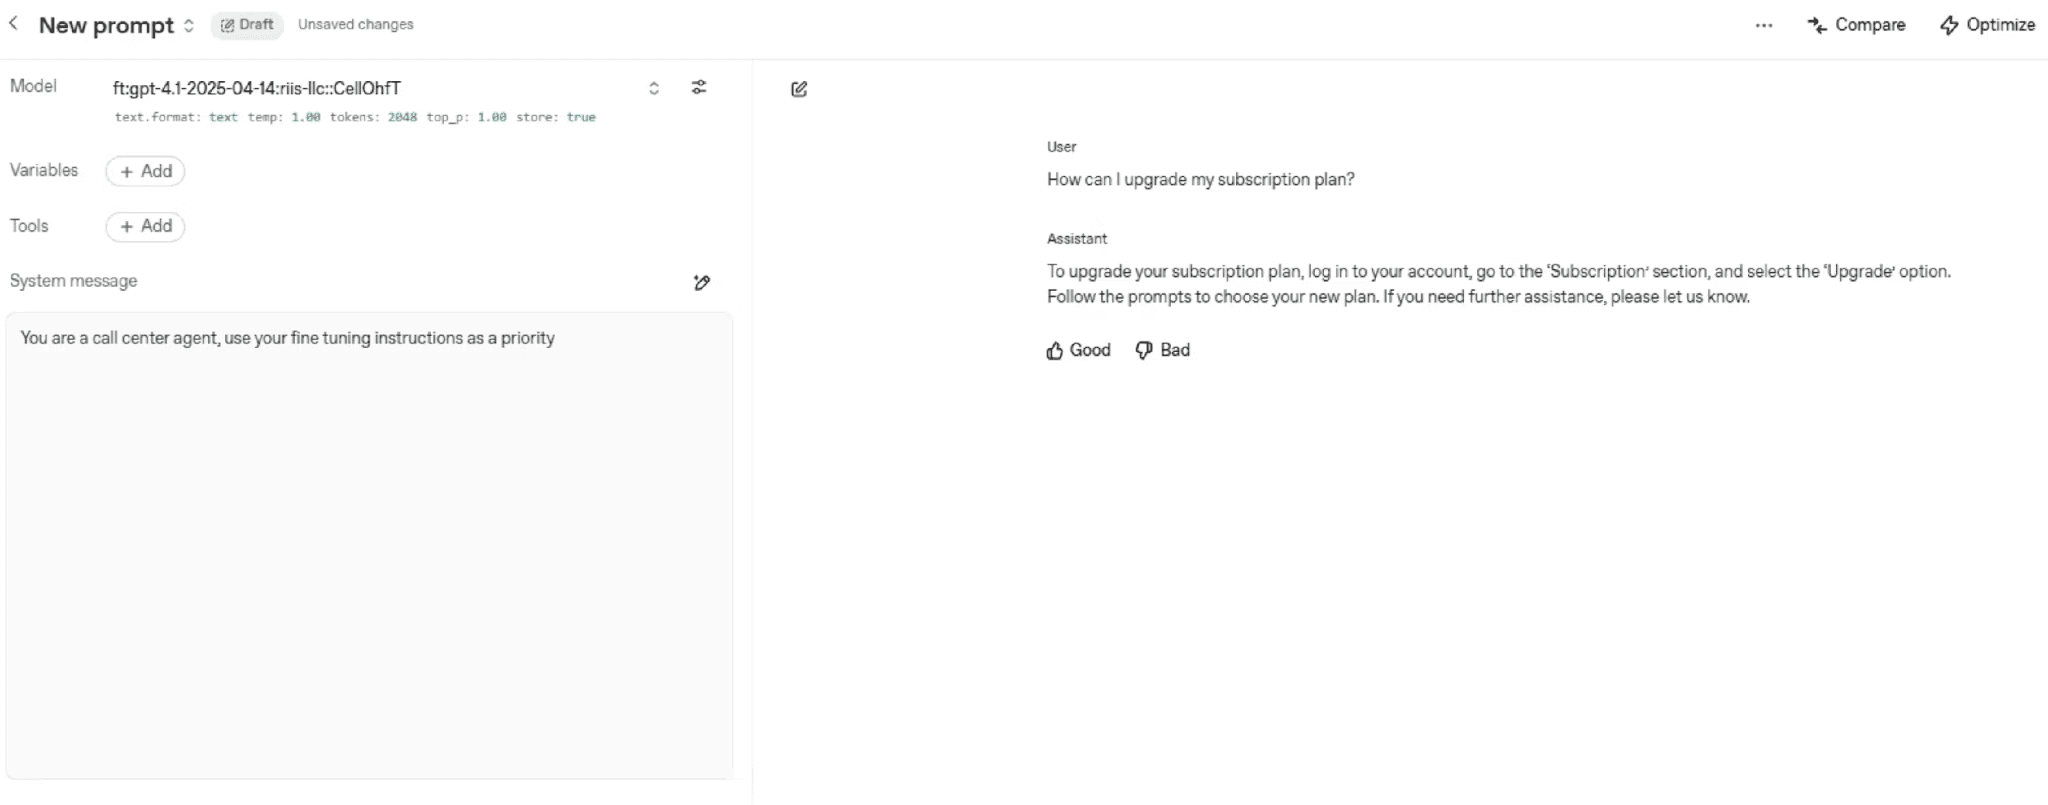
Click on Chat on the left hand navigation in the Playground so we can chat with our new fine-tuned model.
Now we can move onto providing additional support documentation for our agent to reference through ChatGPT’s vector-based file storage system and the customer database using MCP.
Building the Agent in Agent Builder
We’re going to take a brief detour from building out our sub-agents to test our first one in the Agent Builder.

Open the Agent Builder in the OpenAI Playground and begin constructing your workflow. Drag a start node and an agent node onto the design canvas. Name your agent “R-Mobile Agent” and provide instructions such as: “You are a call center agent for a telephone company. Use your fine tuning as a priority in answering customer questions.”
Connect your agent to the fine-tuned model you created earlier. This configuration ensures that when customers ask technical support questions, the agent draws from your carefully curated knowledge base rather than generic internet information.
Test your agent directly in the Agent Builder by clicking the arrow to run it. Ask one of the questions from your training data to verify the fine-tuning works correctly.
Running Your Agent Locally
If you want to run the agent locally, export the code by clicking Code in the top right, selecting Agents SDK, and choosing Python.
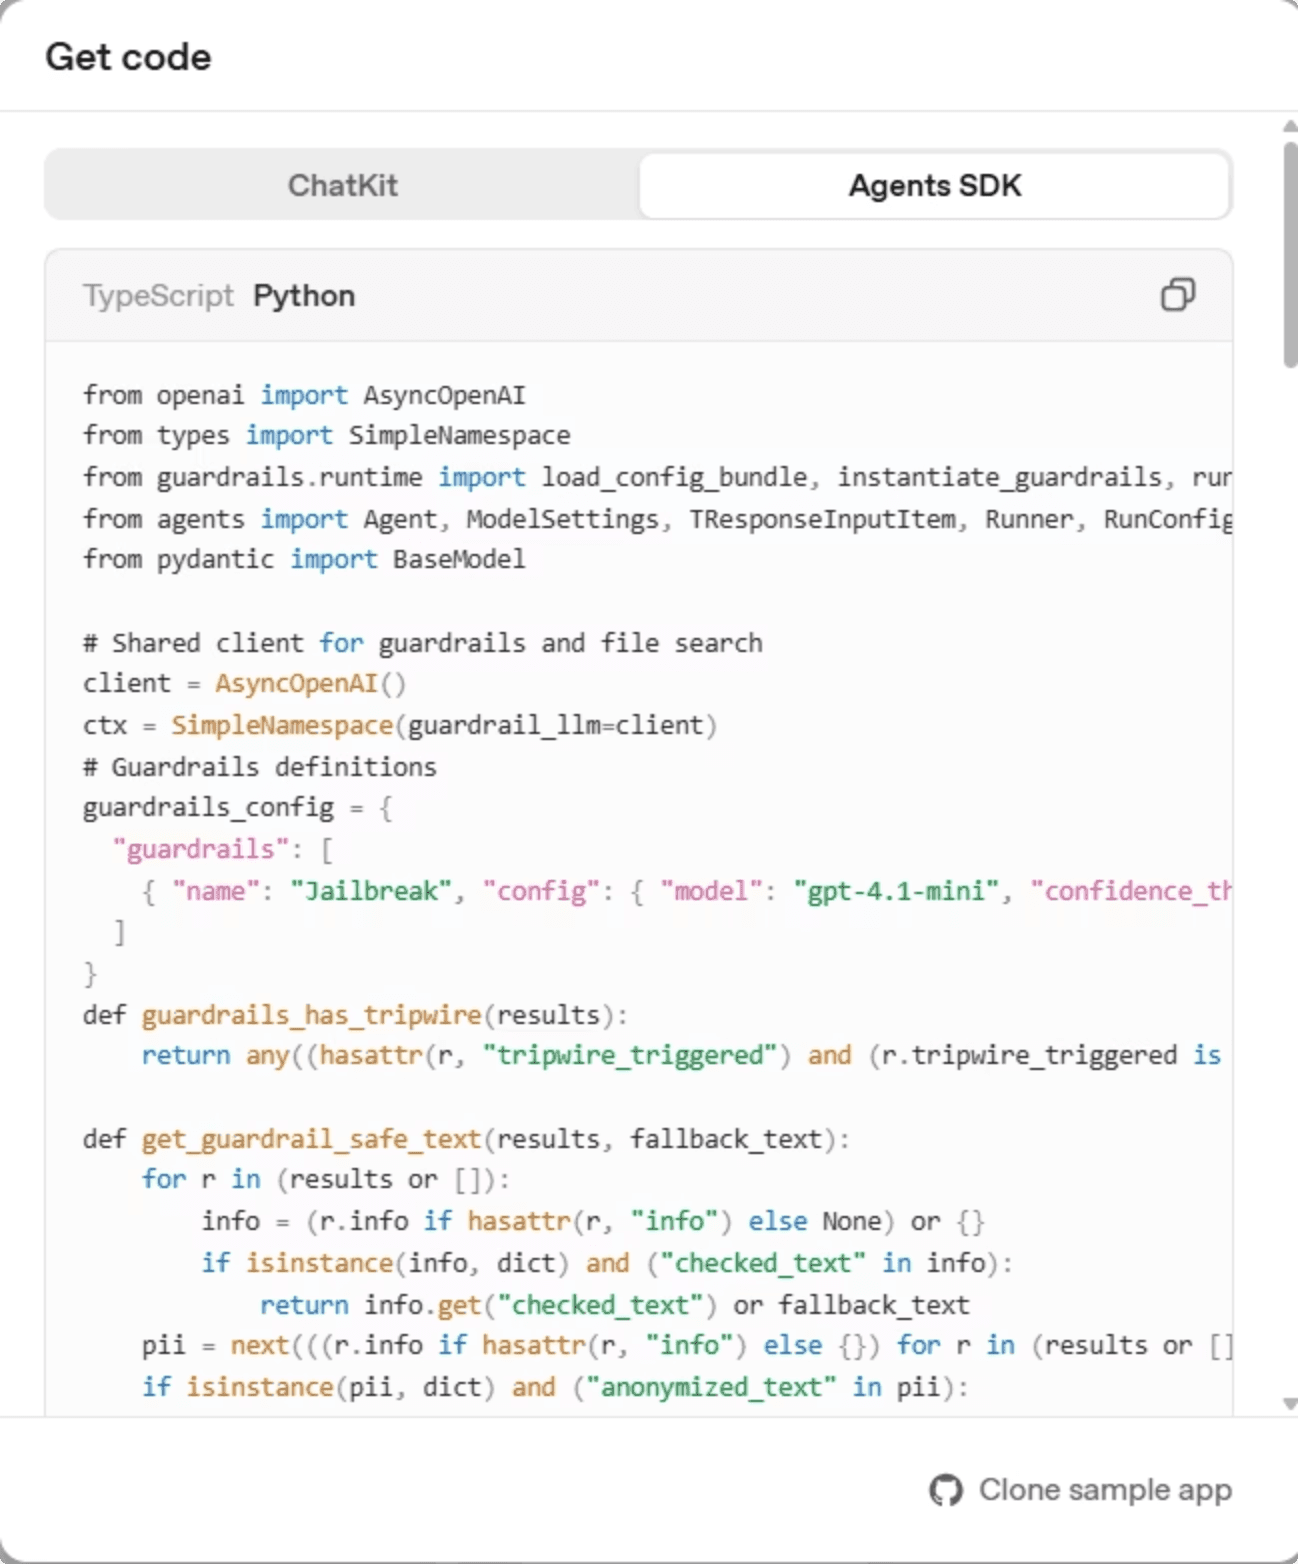
Cut an paste the code into a new file titled sample_agent.py in your favorite IDE (we use VSCode). Add your OpenAI API key to a .env file in the directory. Copy our test_workflow.py file from the Github Repo for this tutorial.
To run your agent from the command line, export the workflow code from Agent Builder and set up your environment. The workflow code defines your agent configuration:
This code creates an agent instance with your fine-tuned model and appropriate generation settings. The model string references your specific fine-tuned model identifier.
Create a test script to verify local execution:
Add your OpenAI API key to an environment file.
Run this command in the terminal in the project directory:
That’s it. You are now running the agent locally.
Troubleshooting
One of the best things about the OpenAI ecosystem is that stack tracing is getting really mature and fares better than most other AI platforms. If you want to test your model in the Agent workflow, click on the Evaluate tab in the top right.
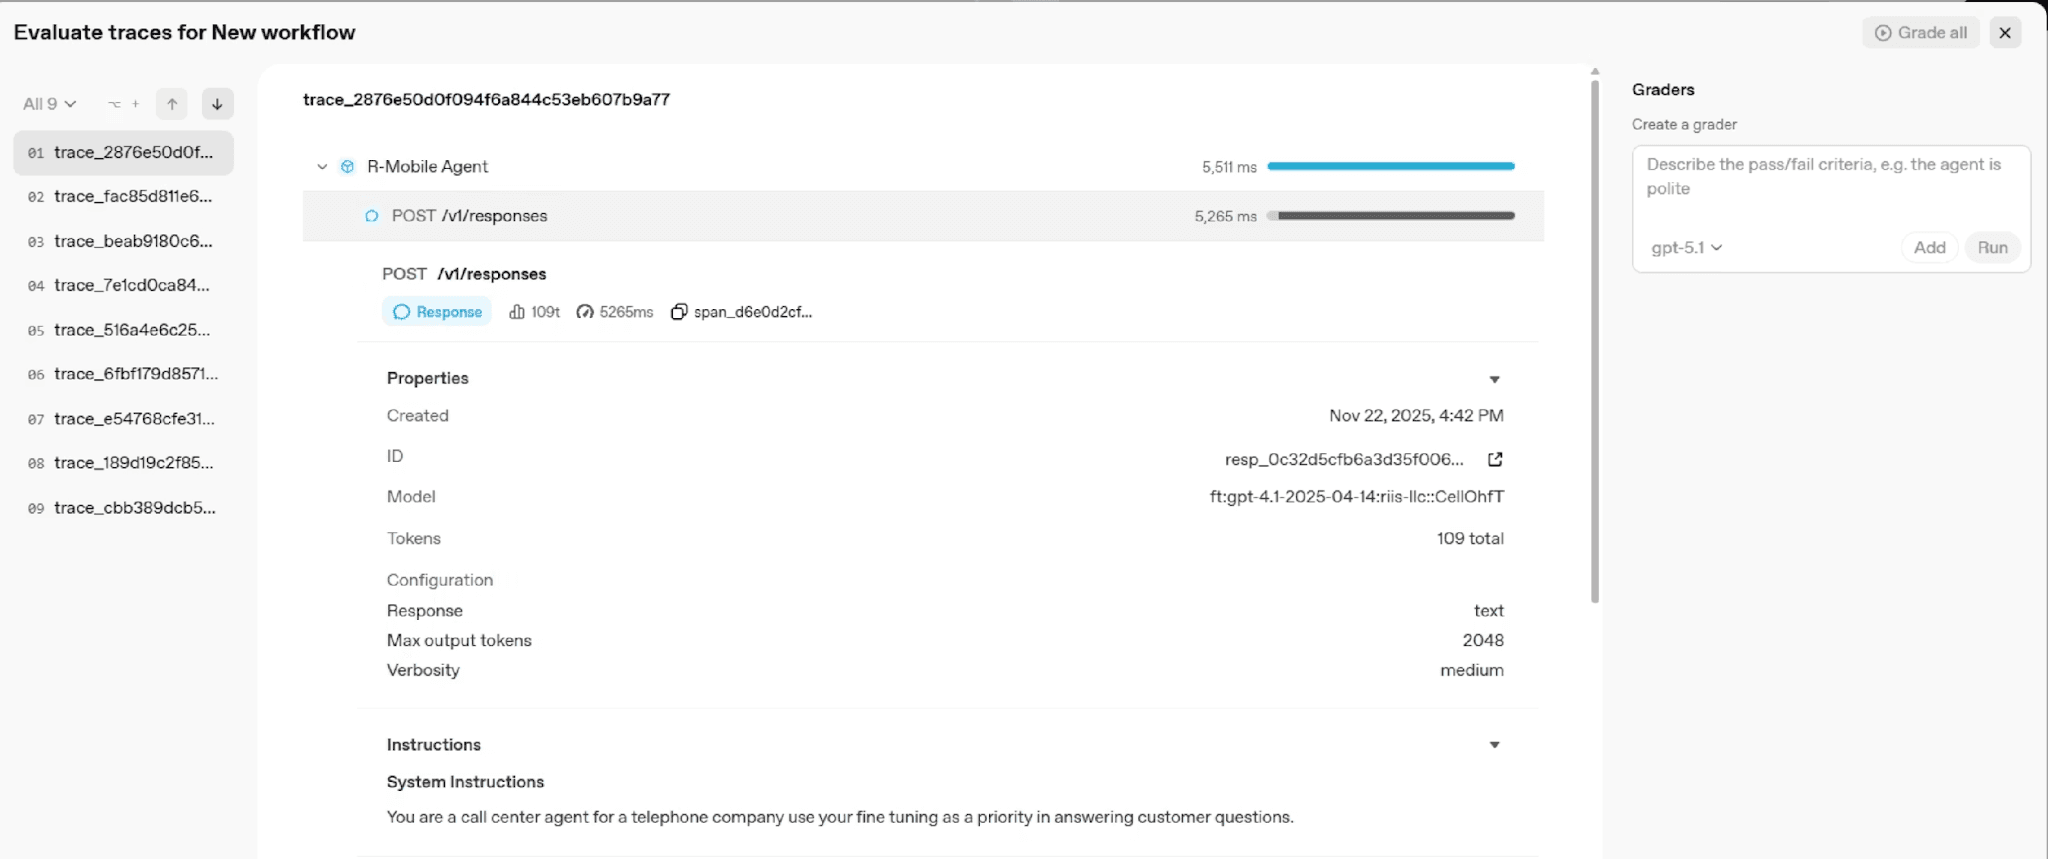
This is an excellent tool to test whether or not your model is producing the right answer. You can even use another model to grade your models output, which is useful, especially as you scale up.
Guardrails

To protect your agent from malicious inputs, drag a guardrail node onto the canvas and connect it before your main agent. Enable the jailbreak protection option to prevent users from manipulating your agent into ignoring its instructions or revealing sensitive information.
Connecting to Customer Data with MCP
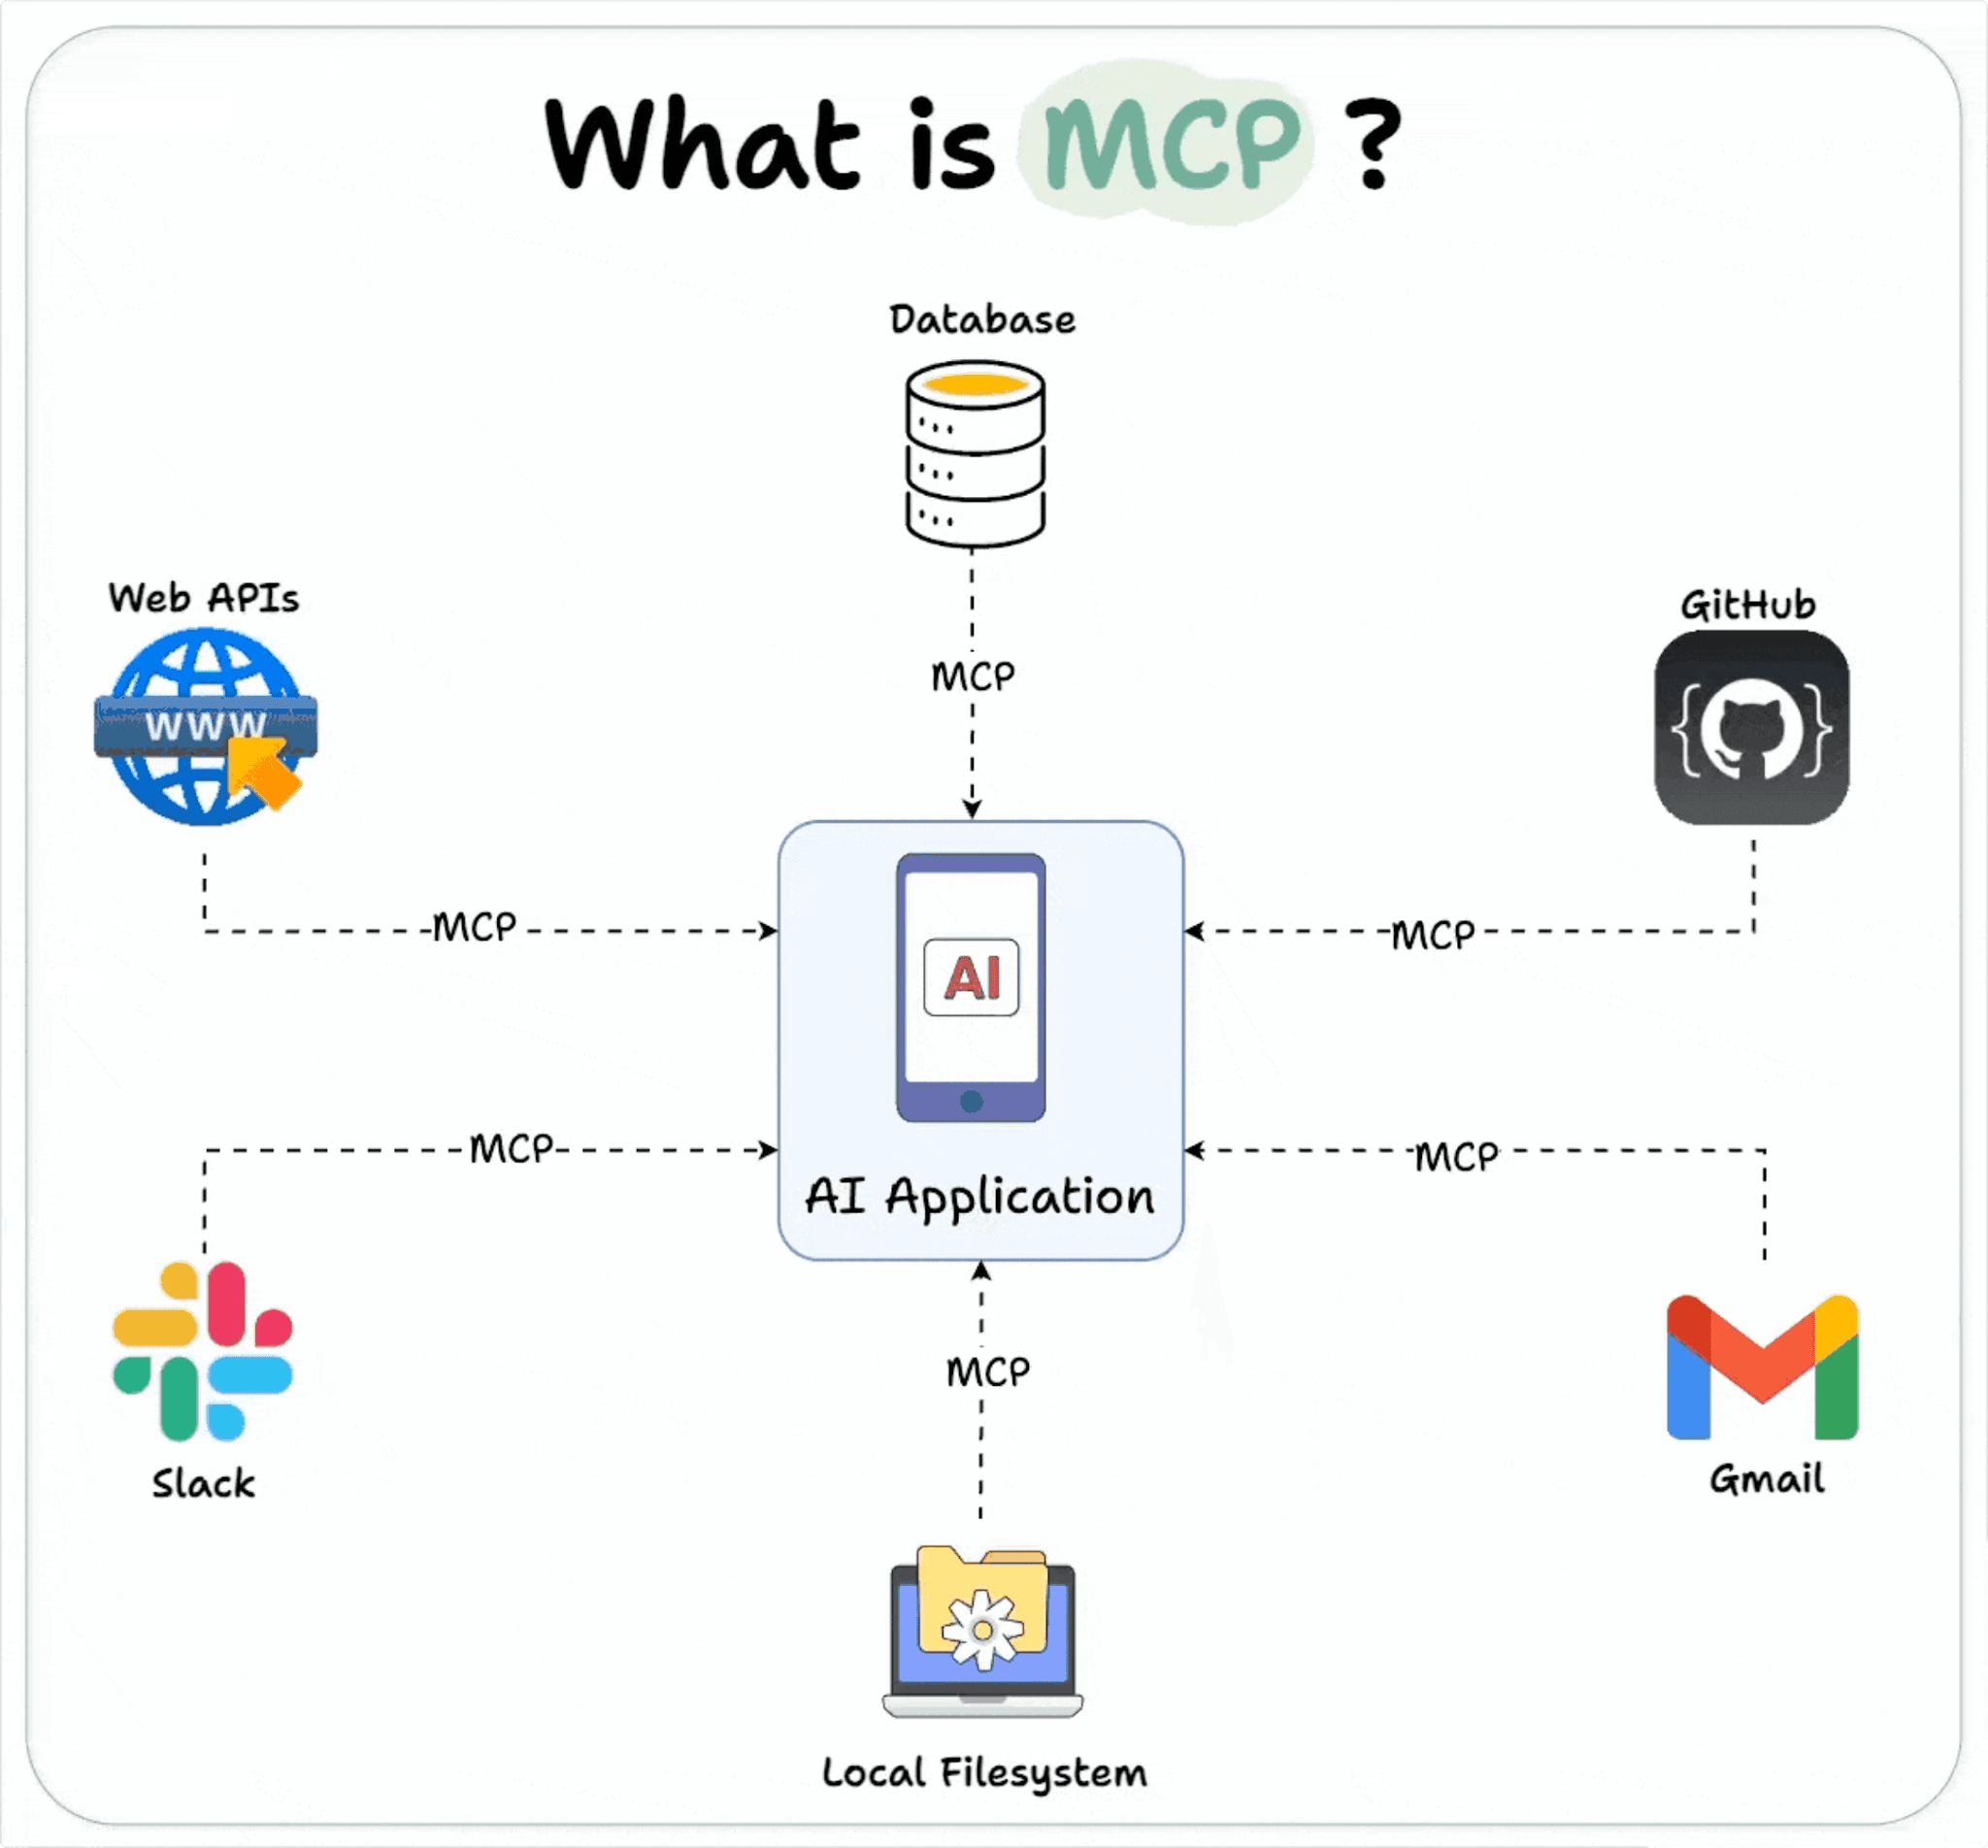
Many customer questions require account-specific information: “What was my last call?”, “How much data have I used?”, or “When is my bill due?” Answering these requires connecting your agent to a customer database through a Model Context Protocol (MCP) server.
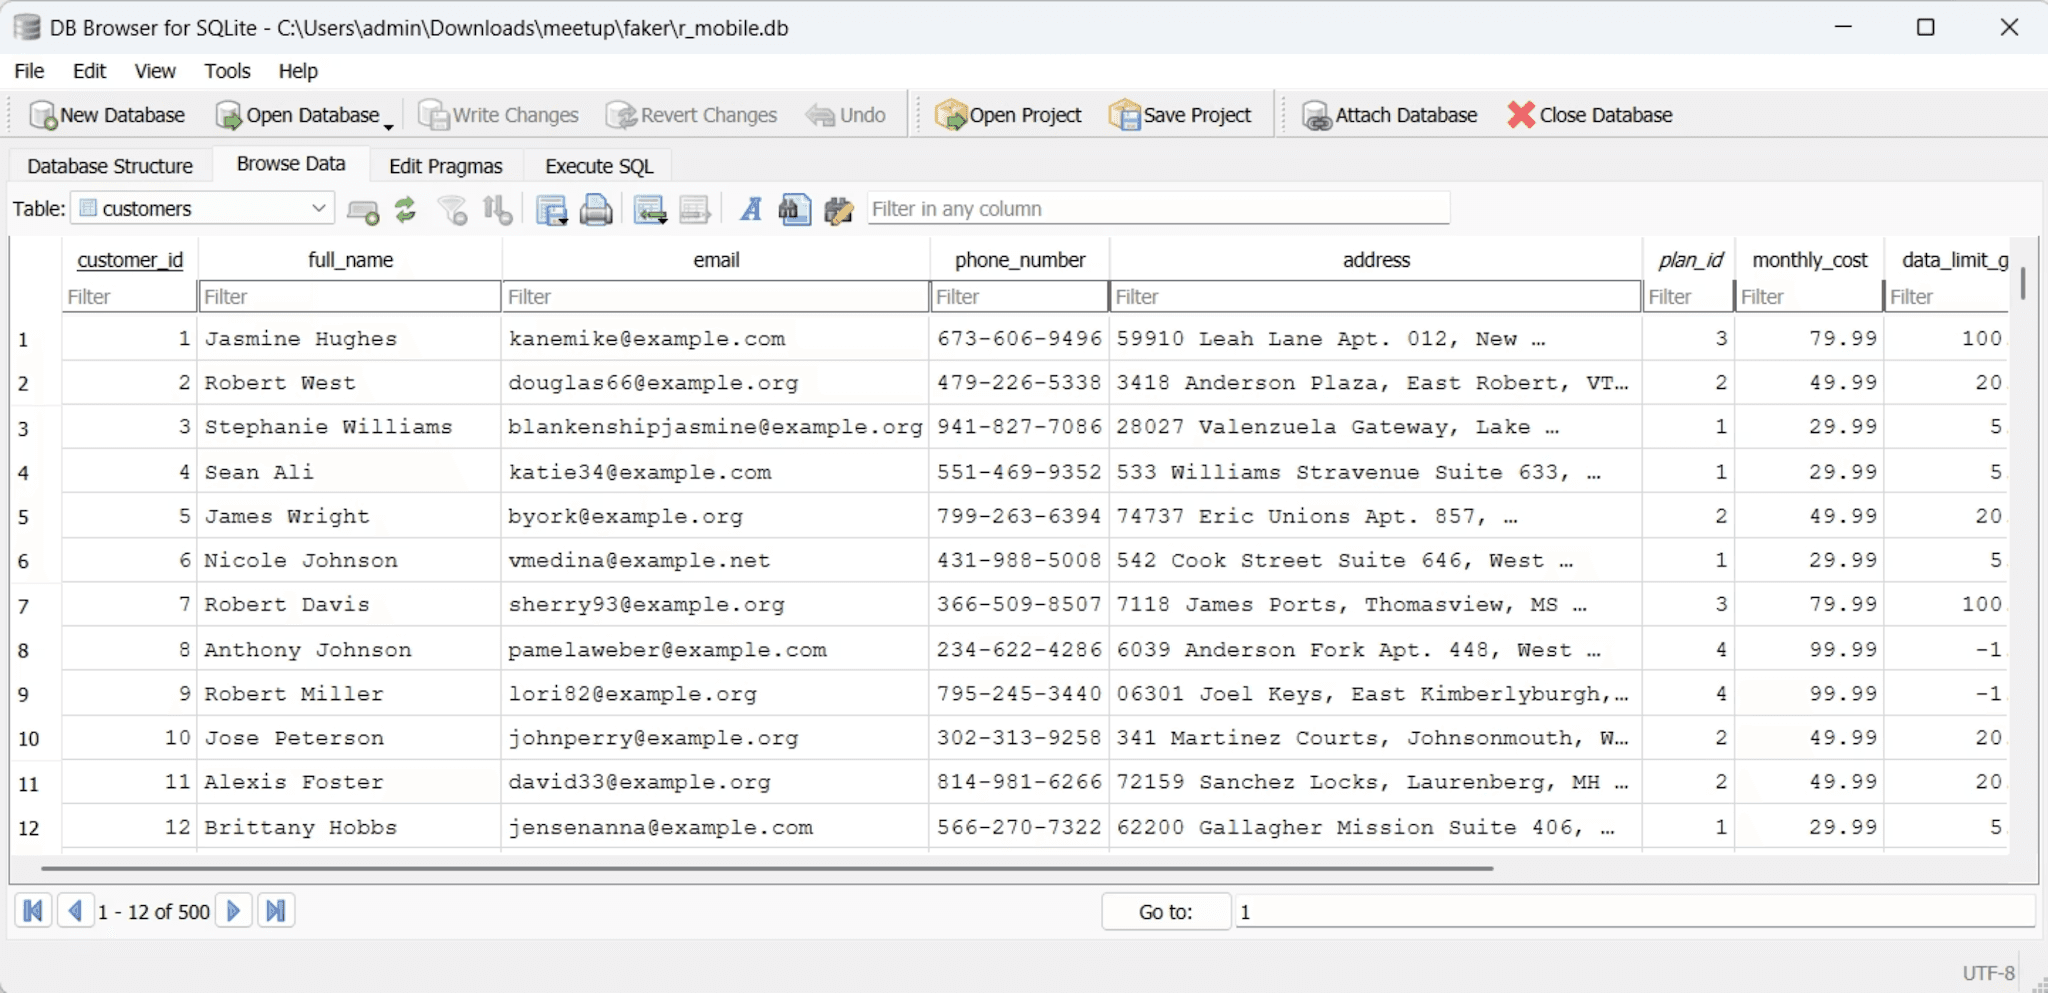
If you don’t have data to start with, we’ll have to generate some. First, generate synthetic customer data using Python’s Faker library. The provided repository includes scripts in the faker folder that create realistic customer records with phone plans, usage statistics, and call histories stored in CSV files.
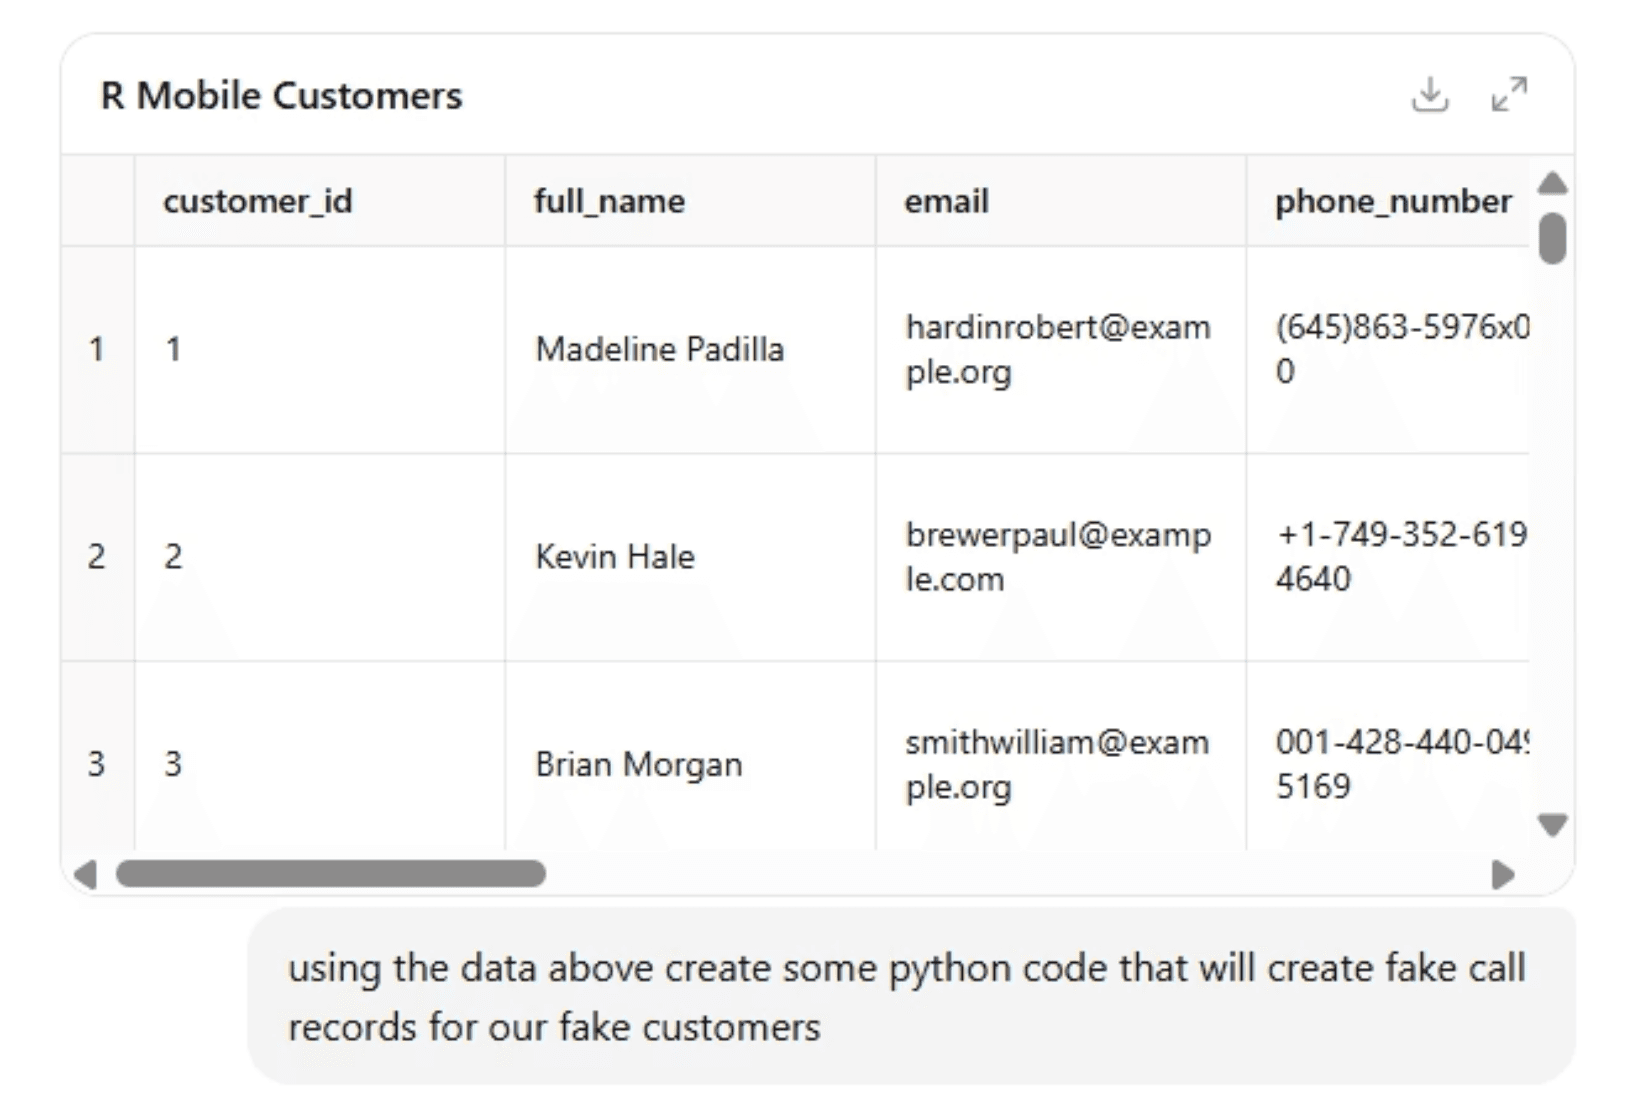
Convert these spreadsheets into a SQLite database that your MCP server can query. The MCP server acts as a bridge, translating natural language requests from your agent into SQL queries and returning the results in a format the agent understands.
Install the MCP Python libraries and start your server:
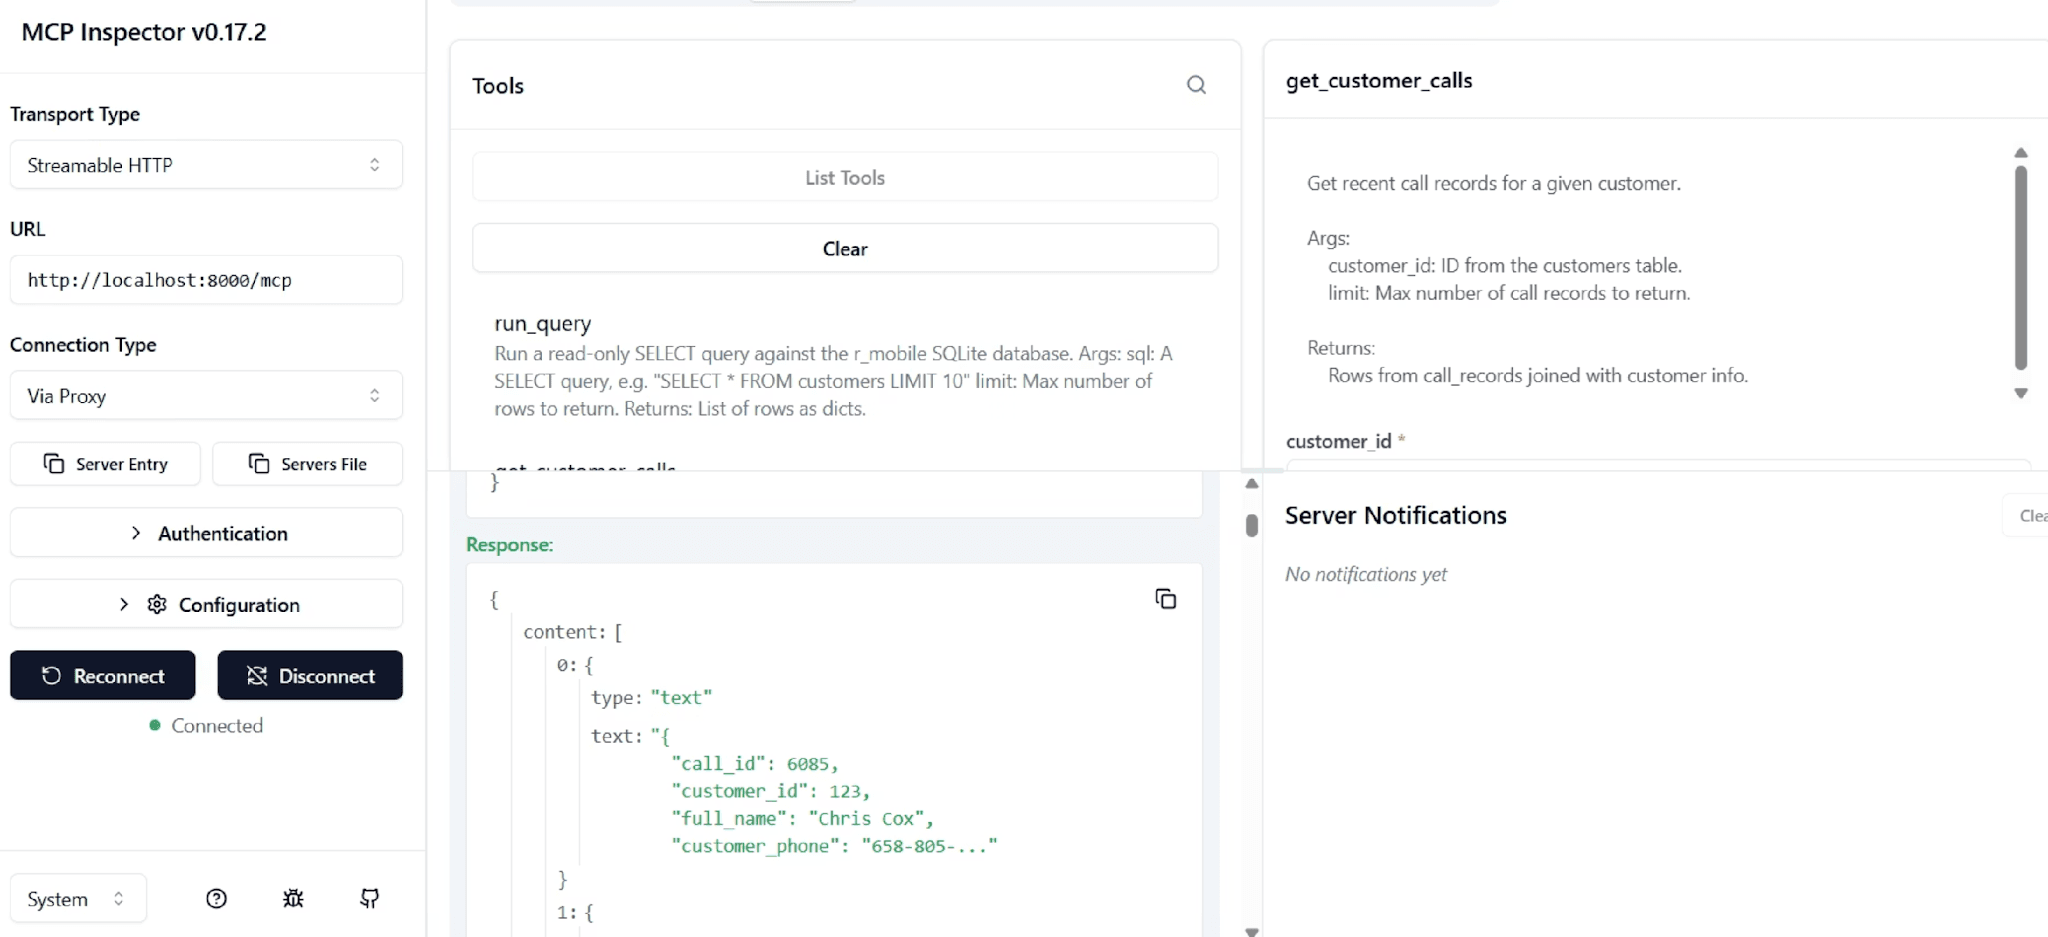
Verify your MCP server works correctly using the MCP Inspector tool:
The inspector lets you connect to your MCP server, view available tools, and test queries like “get customer calls” to ensure everything communicates properly.
Exposing Local Services with Ngrok
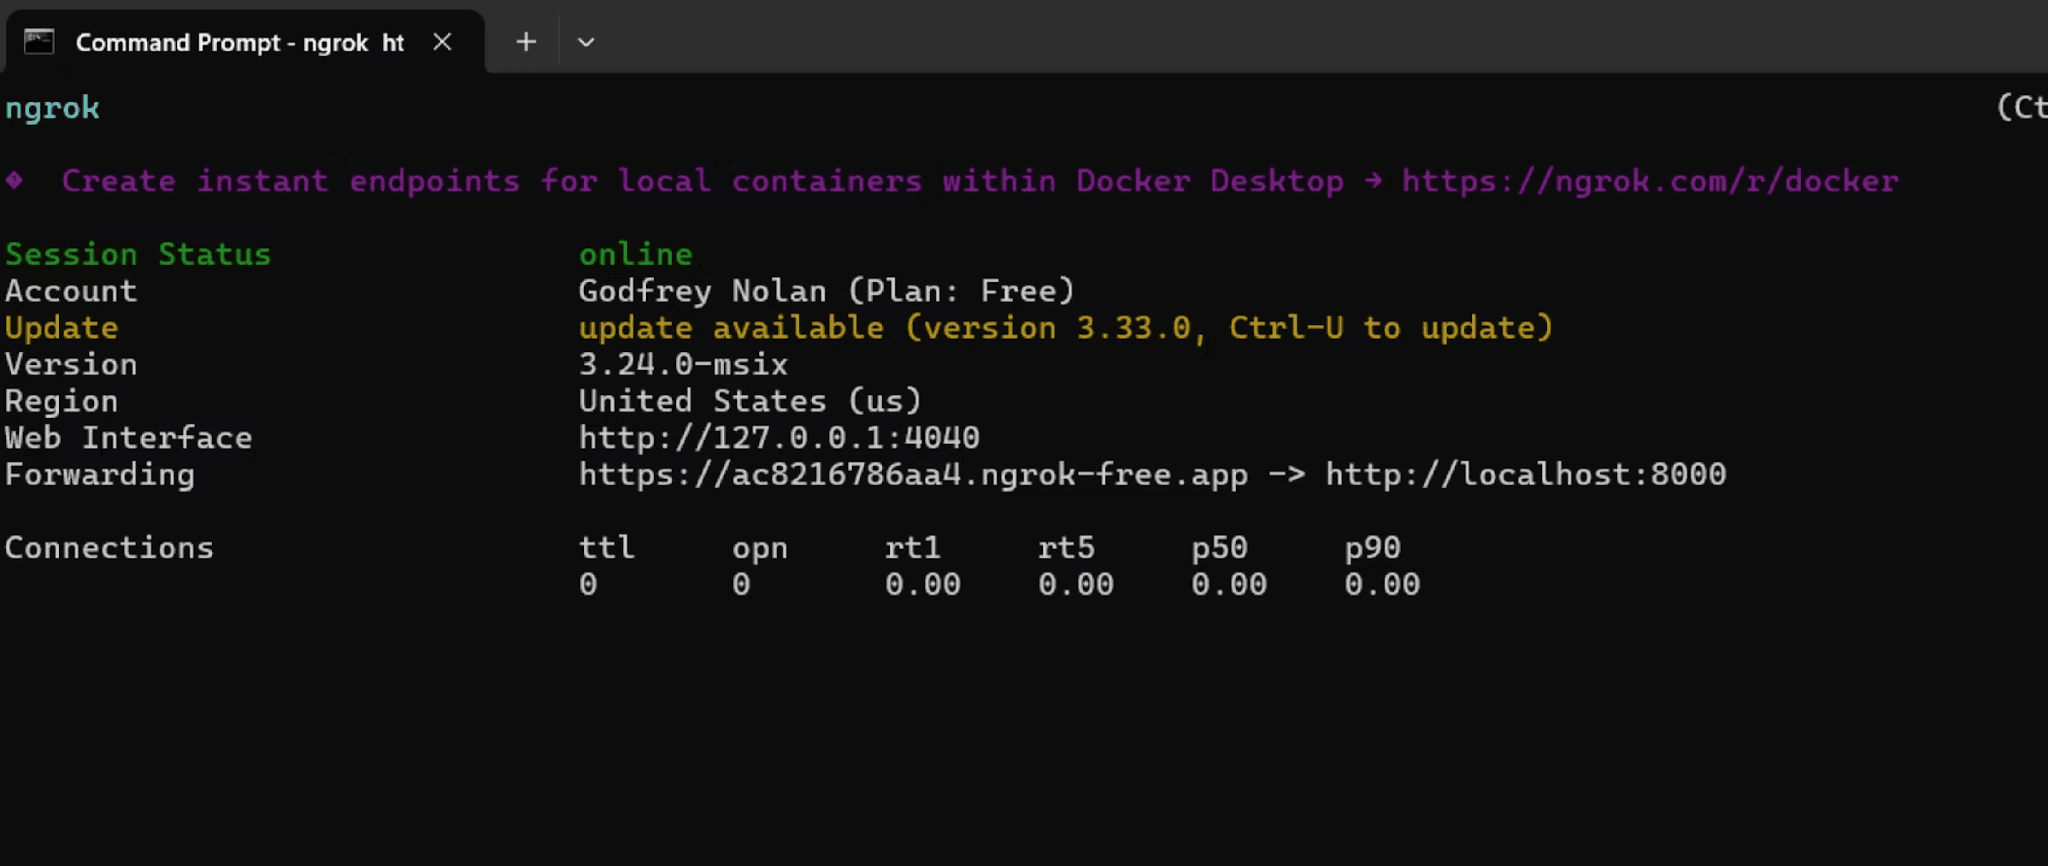
The Agent Builder runs in OpenAI’s cloud but needs to reach your local MCP server. Ngrok creates a secure tunnel that gives your localhost a public web address accessible from anywhere.
Install Ngrok, authenticate with your account, and run it to expose your MCP server:
Ngrok provides a forwarding URL that you’ll use when configuring the MCP connection in Agent Builder.
In the Playground, add a new MCP server connection using this public URL. Since our example server doesn’t implement authentication, select “none” for the authentication type.
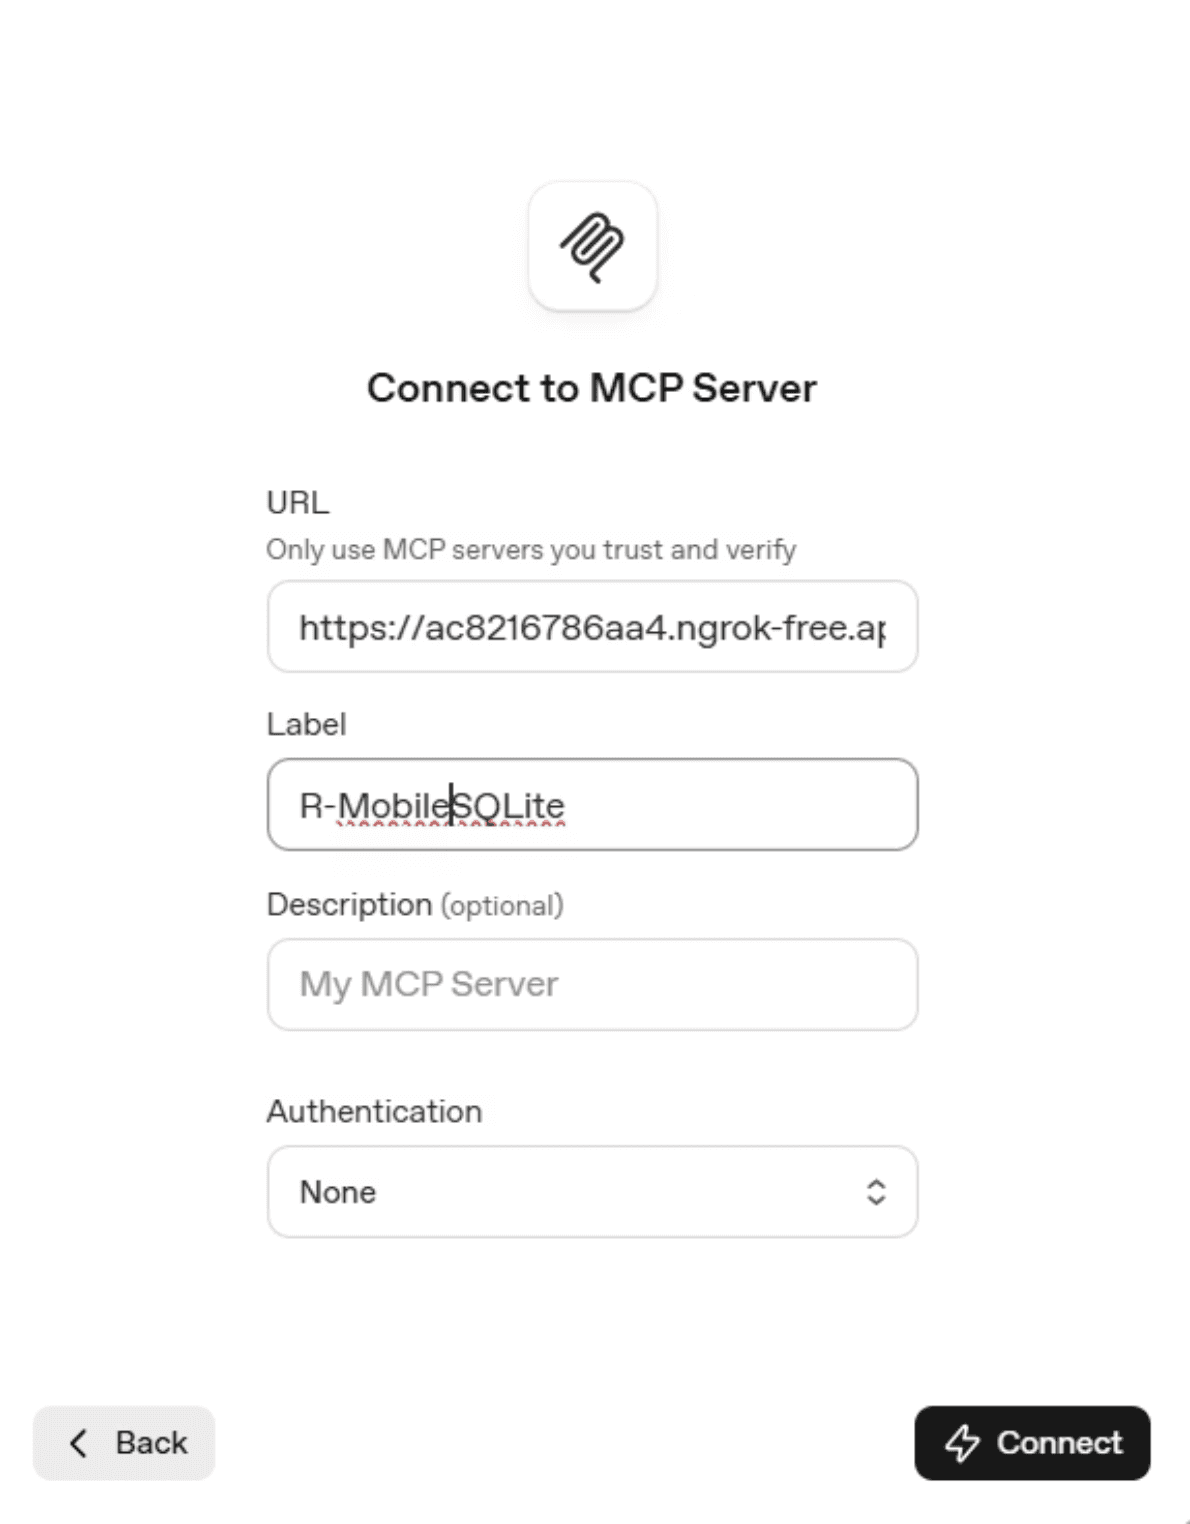
After connecting, you’ll see the list of available tools auto-generated from your MCP server code. Set the approval mode to “never require approval” so the agent can query the database without manual intervention for each request.
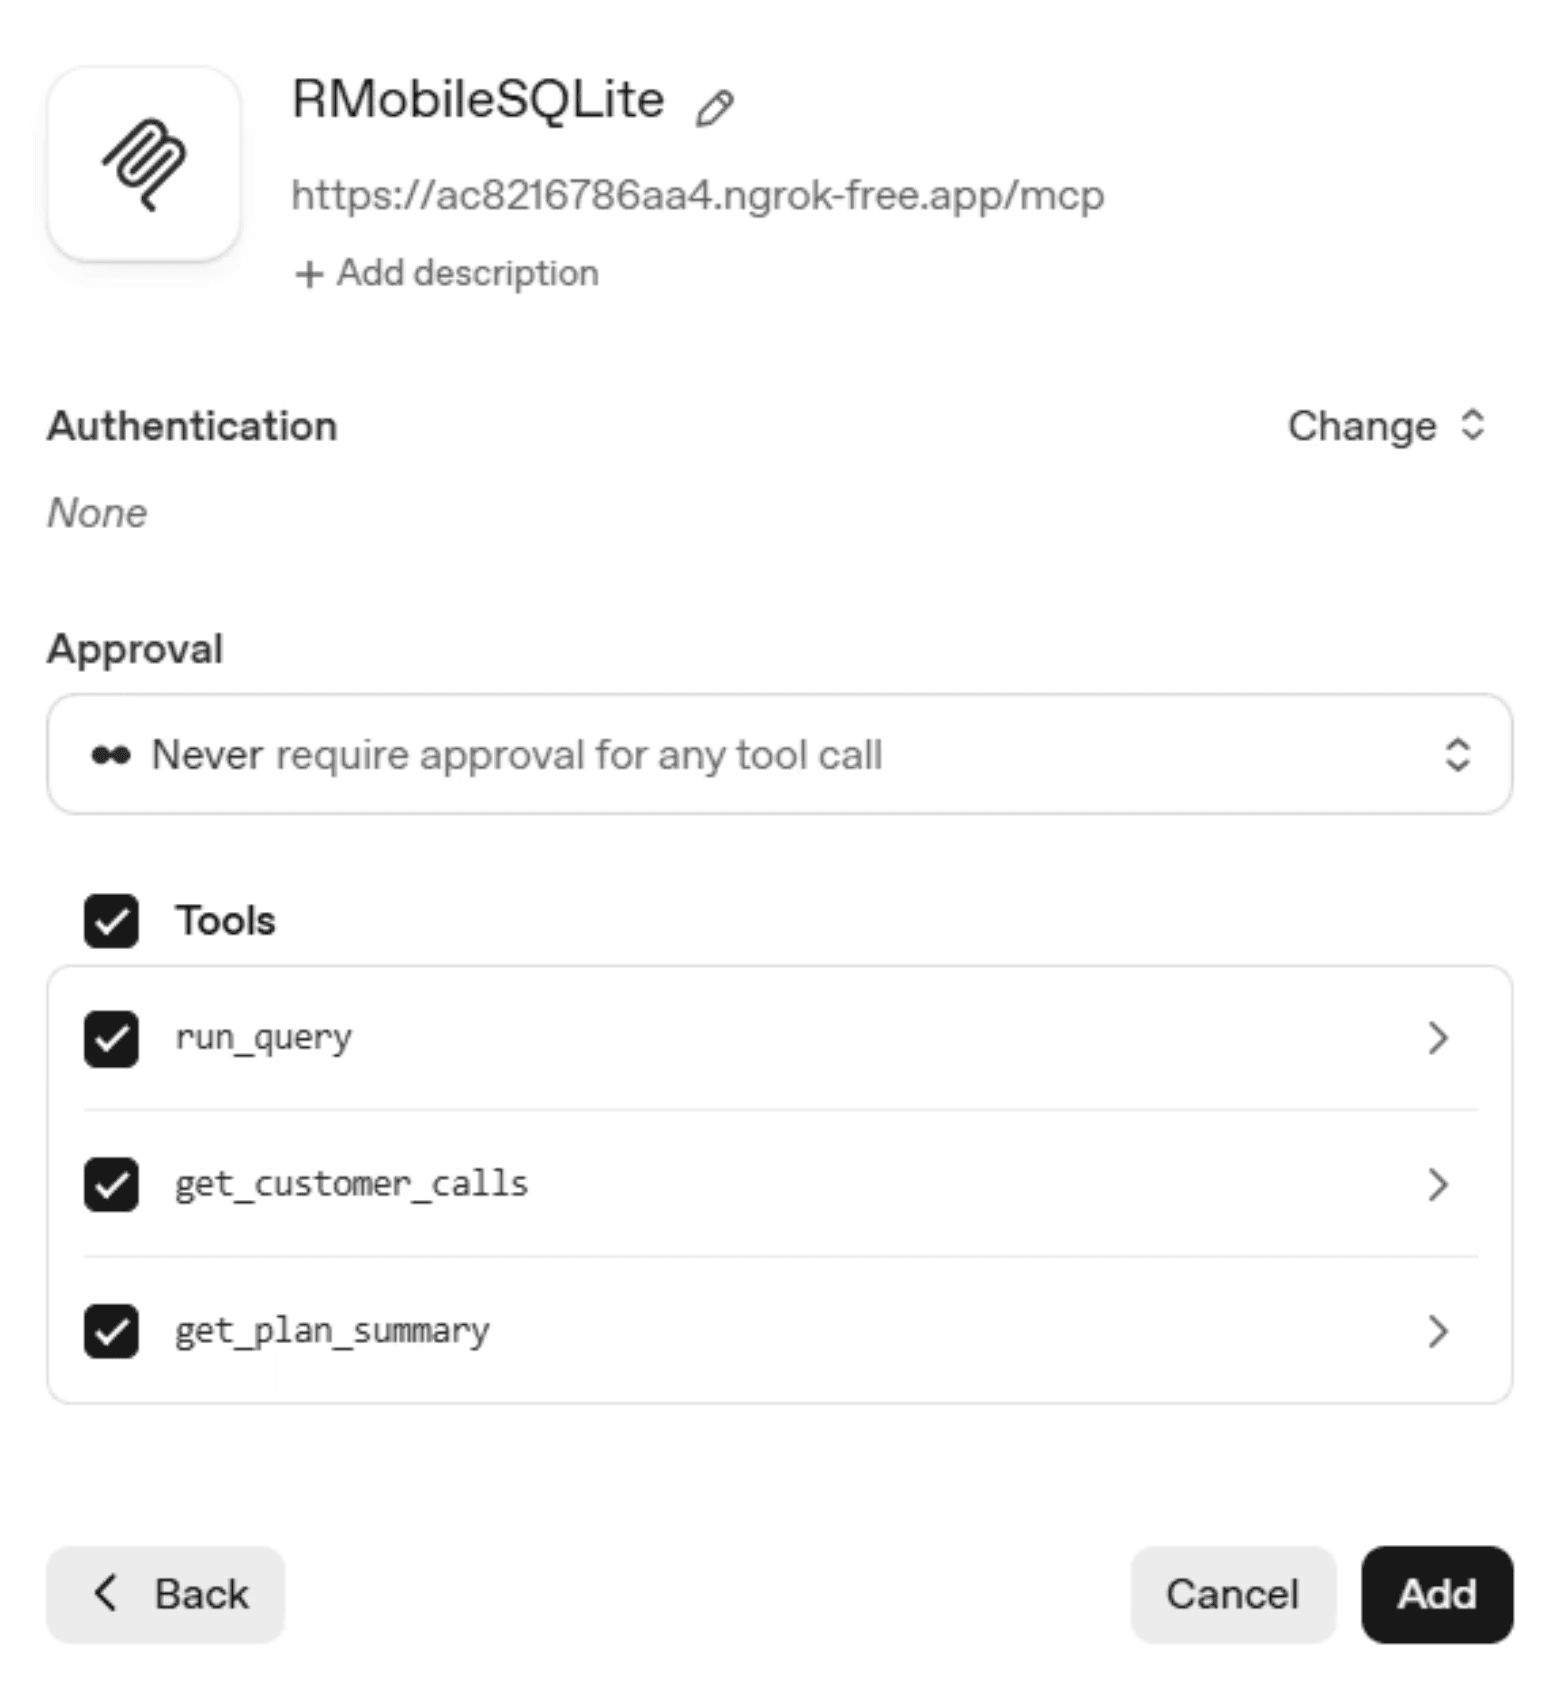
Important security note: The example implementation is read-only to mitigate known MCP security concerns. Before adding write capabilities to any production system, implement proper authentication and SQL injection protection.
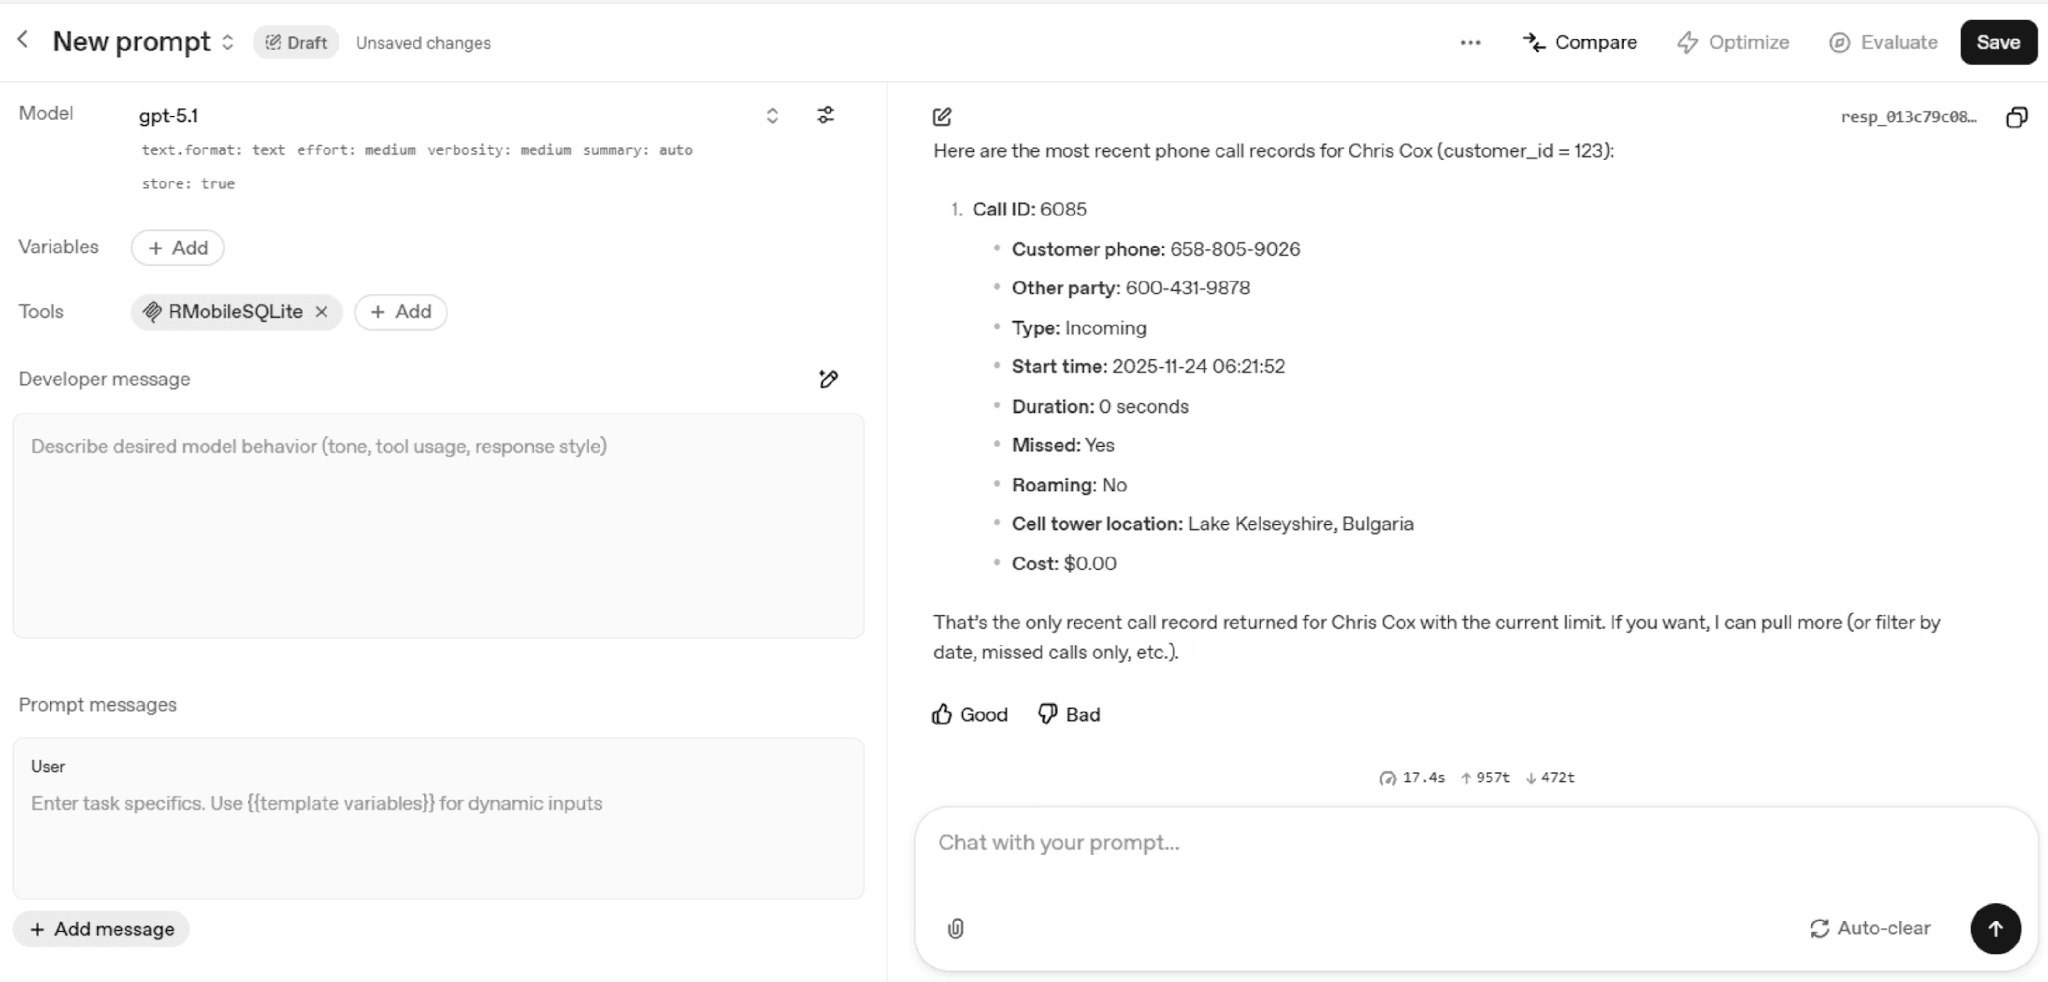
Now we can ask our database things directly. In this example we put in a prompt asking for all the records related to Chris Cox.
With our MCP-based agent working, let’s move onto our Plan Information sub-agent, which will leverage the file storage feature from OpenAI.
Adding File Storage for Reference Documents
Some customer inquiries need access to static reference materials like plan brochures, FAQs, and policy documents. OpenAI’s file storage feature lets you upload these documents for your agent to search. .
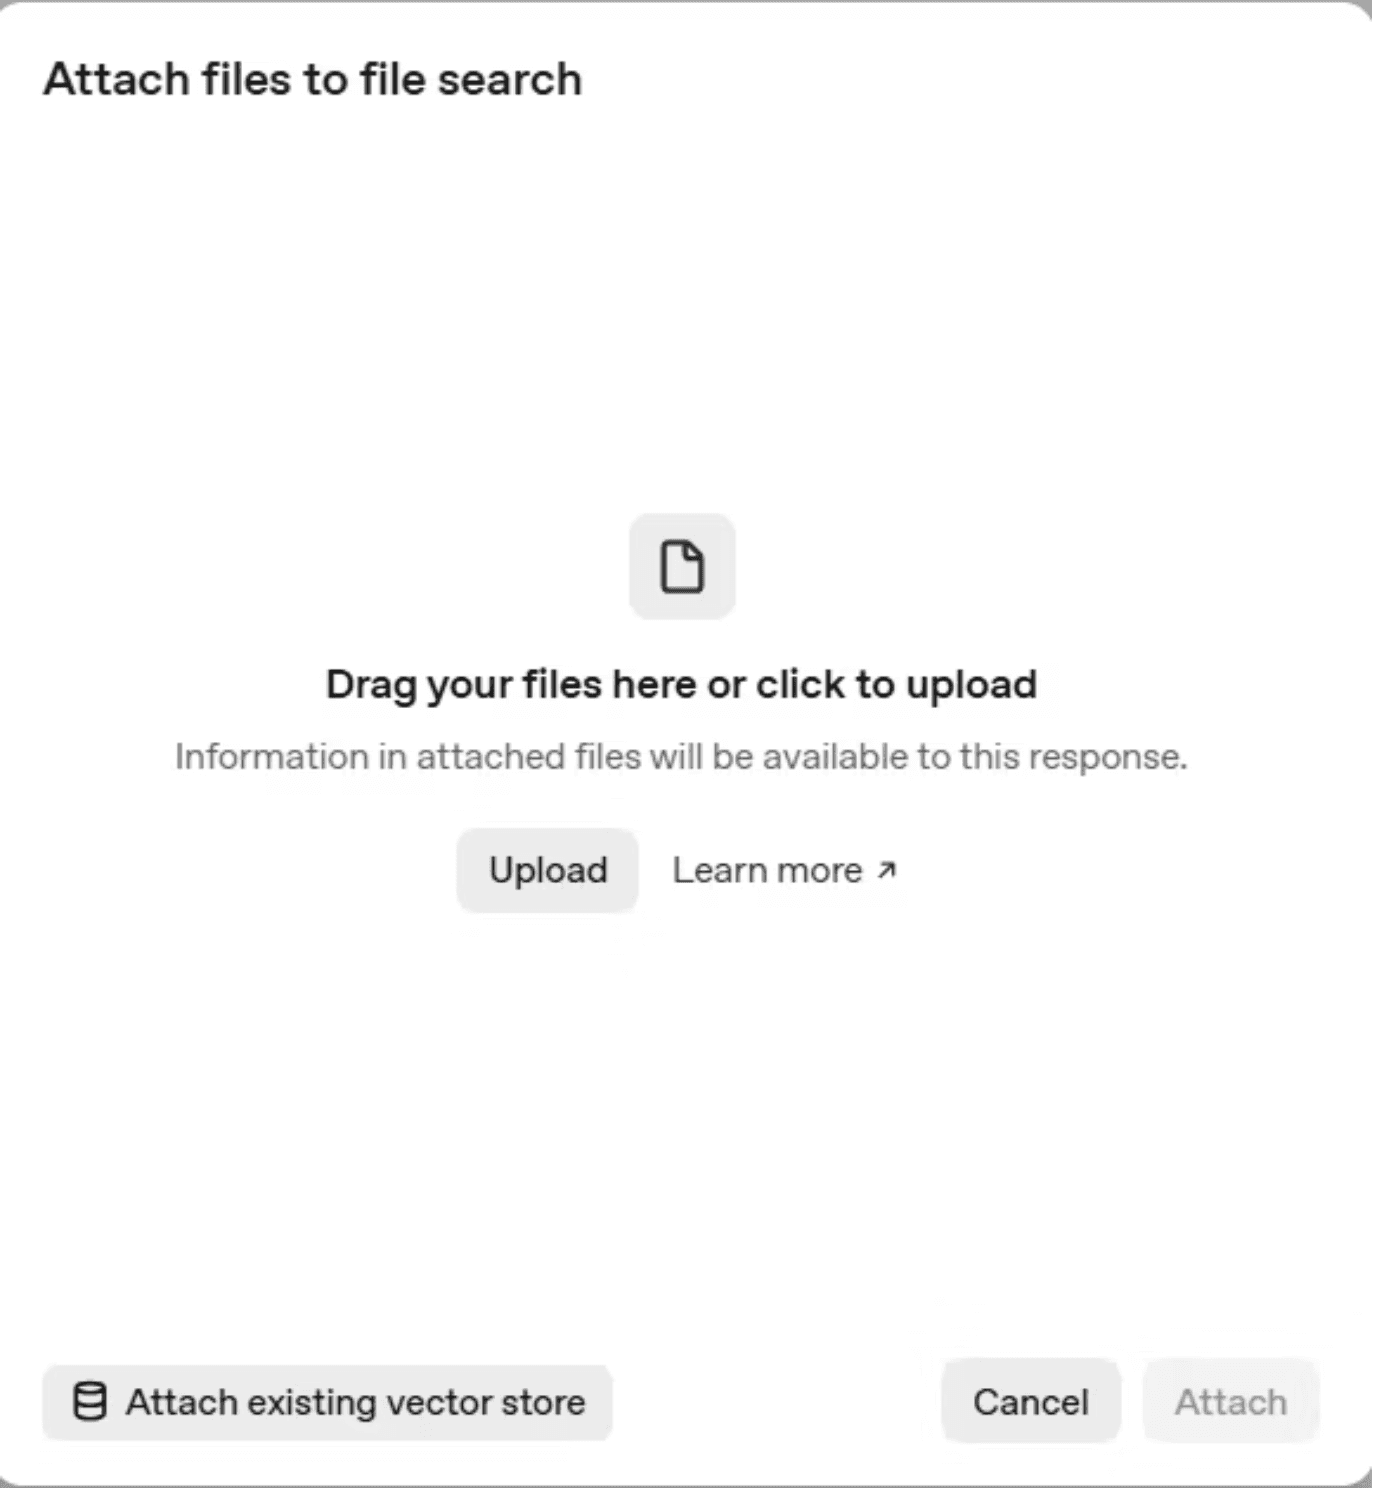
Save your plan information excel spreadsheet - generated by ChatGPT when it created our customer database - as a PDF. As yet file storage does not support Excel files directly. In the Playground, click File Storage in the right menu and upload your documents. You can include plan details, core values statements, product brochures, or frequently asked questions scraped from your website.
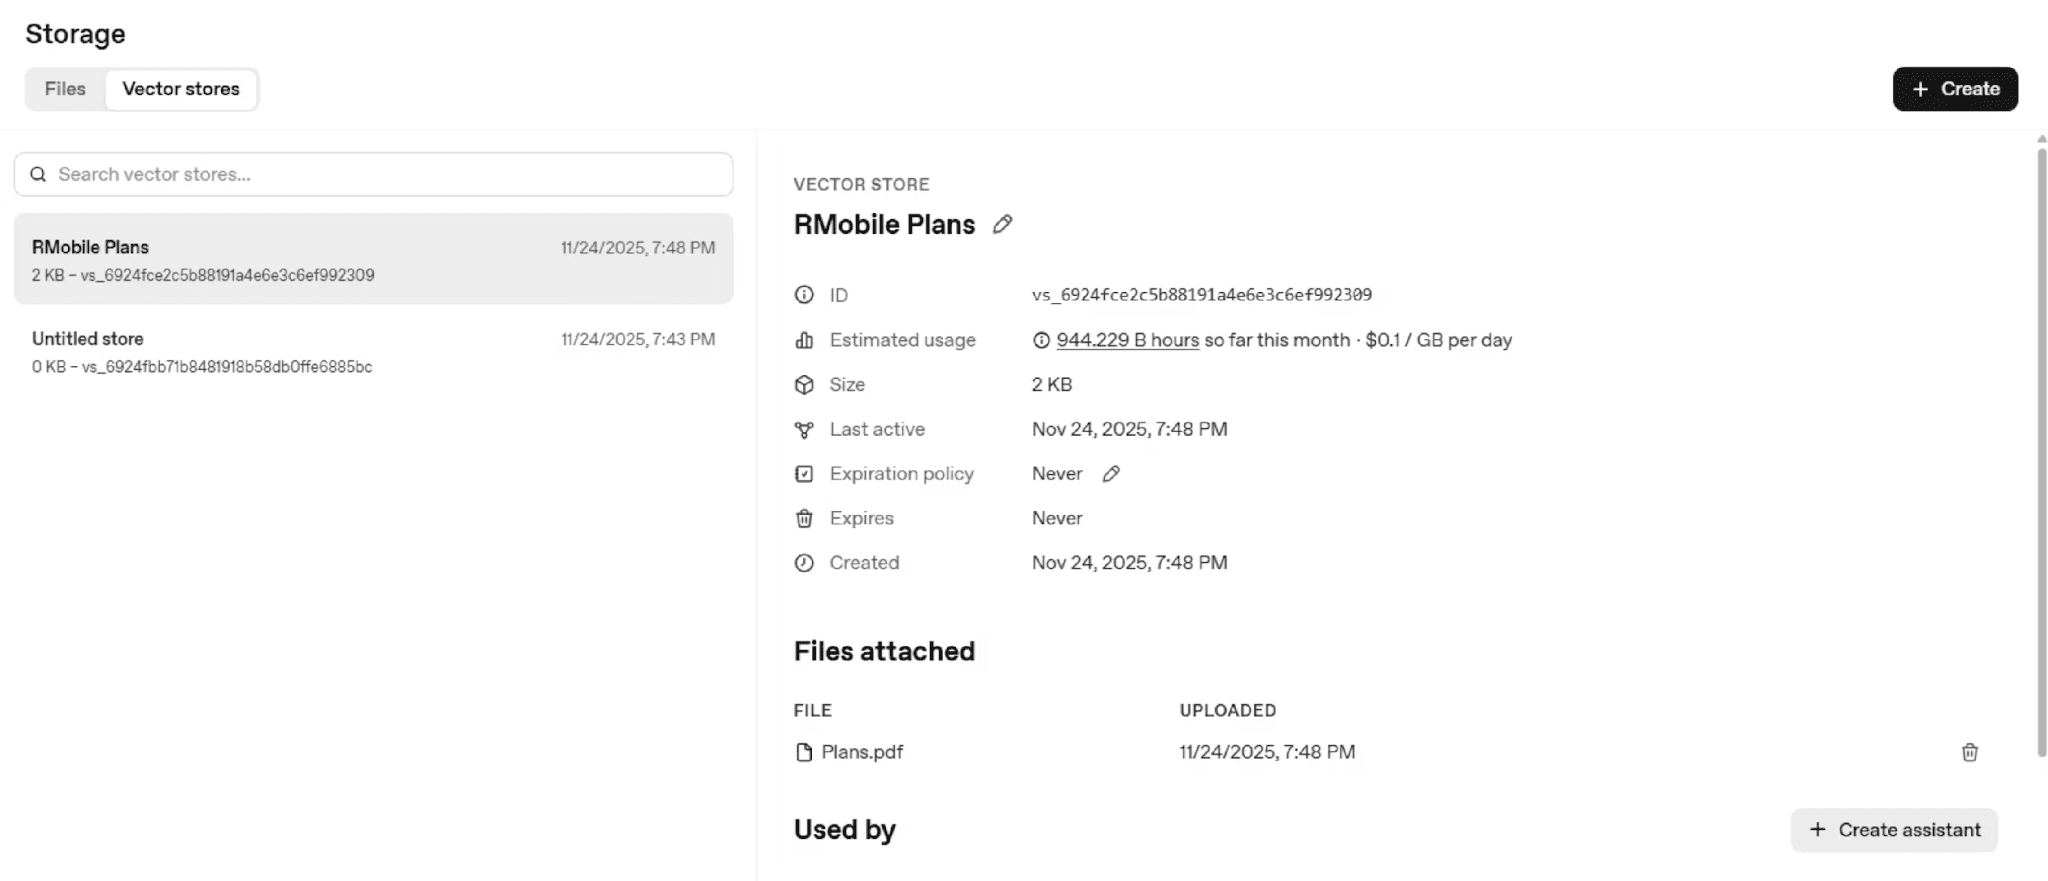
Create a dedicated sub-agent with access to this file storage for handling general information requests that don’t require database queries or technical troubleshooting.
Running the Complete Agent Locally
In the Agent Builder, the complete workflow should look something like this now. Let’s run that Chris Cox lookup prompt again, and additionally we will start asking for plan info and the other frequently asked questions that we seeded before.
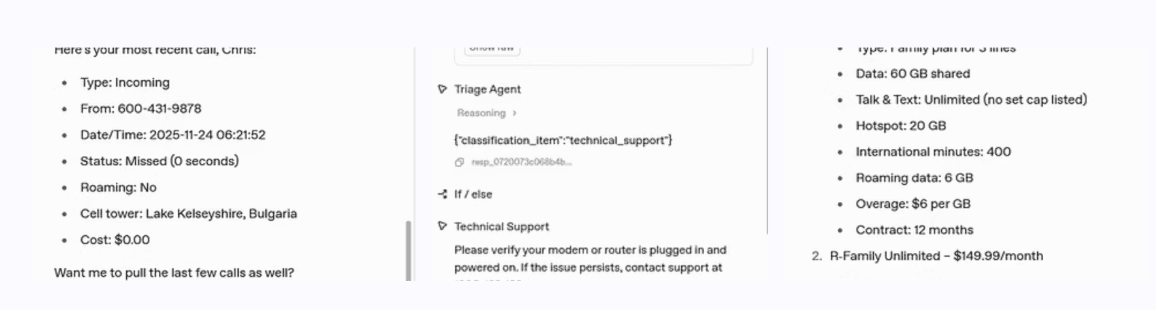
You’ll notice in this version, our sub-agents are being activated and addressing issues related to the specific account.
Deploying as a Chatbot
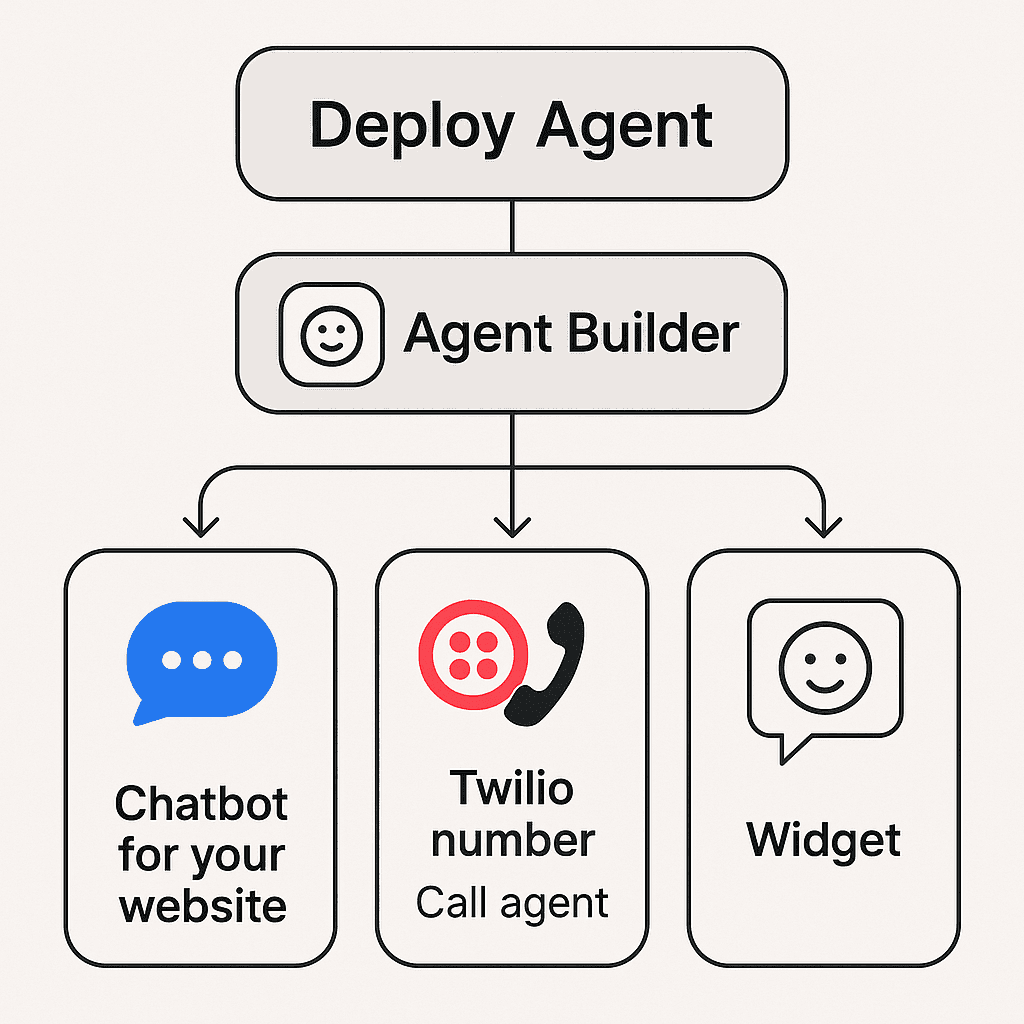
Command-line interaction works for testing, but customers need a friendlier interface. OpenAI provides a starter kit for deploying your agent as a web chatbot. Clone the ChatKit starter repository, configure it with your workflow ID (found in the Code tab of the Agent Builder) and OpenAI API key, then run the development server:
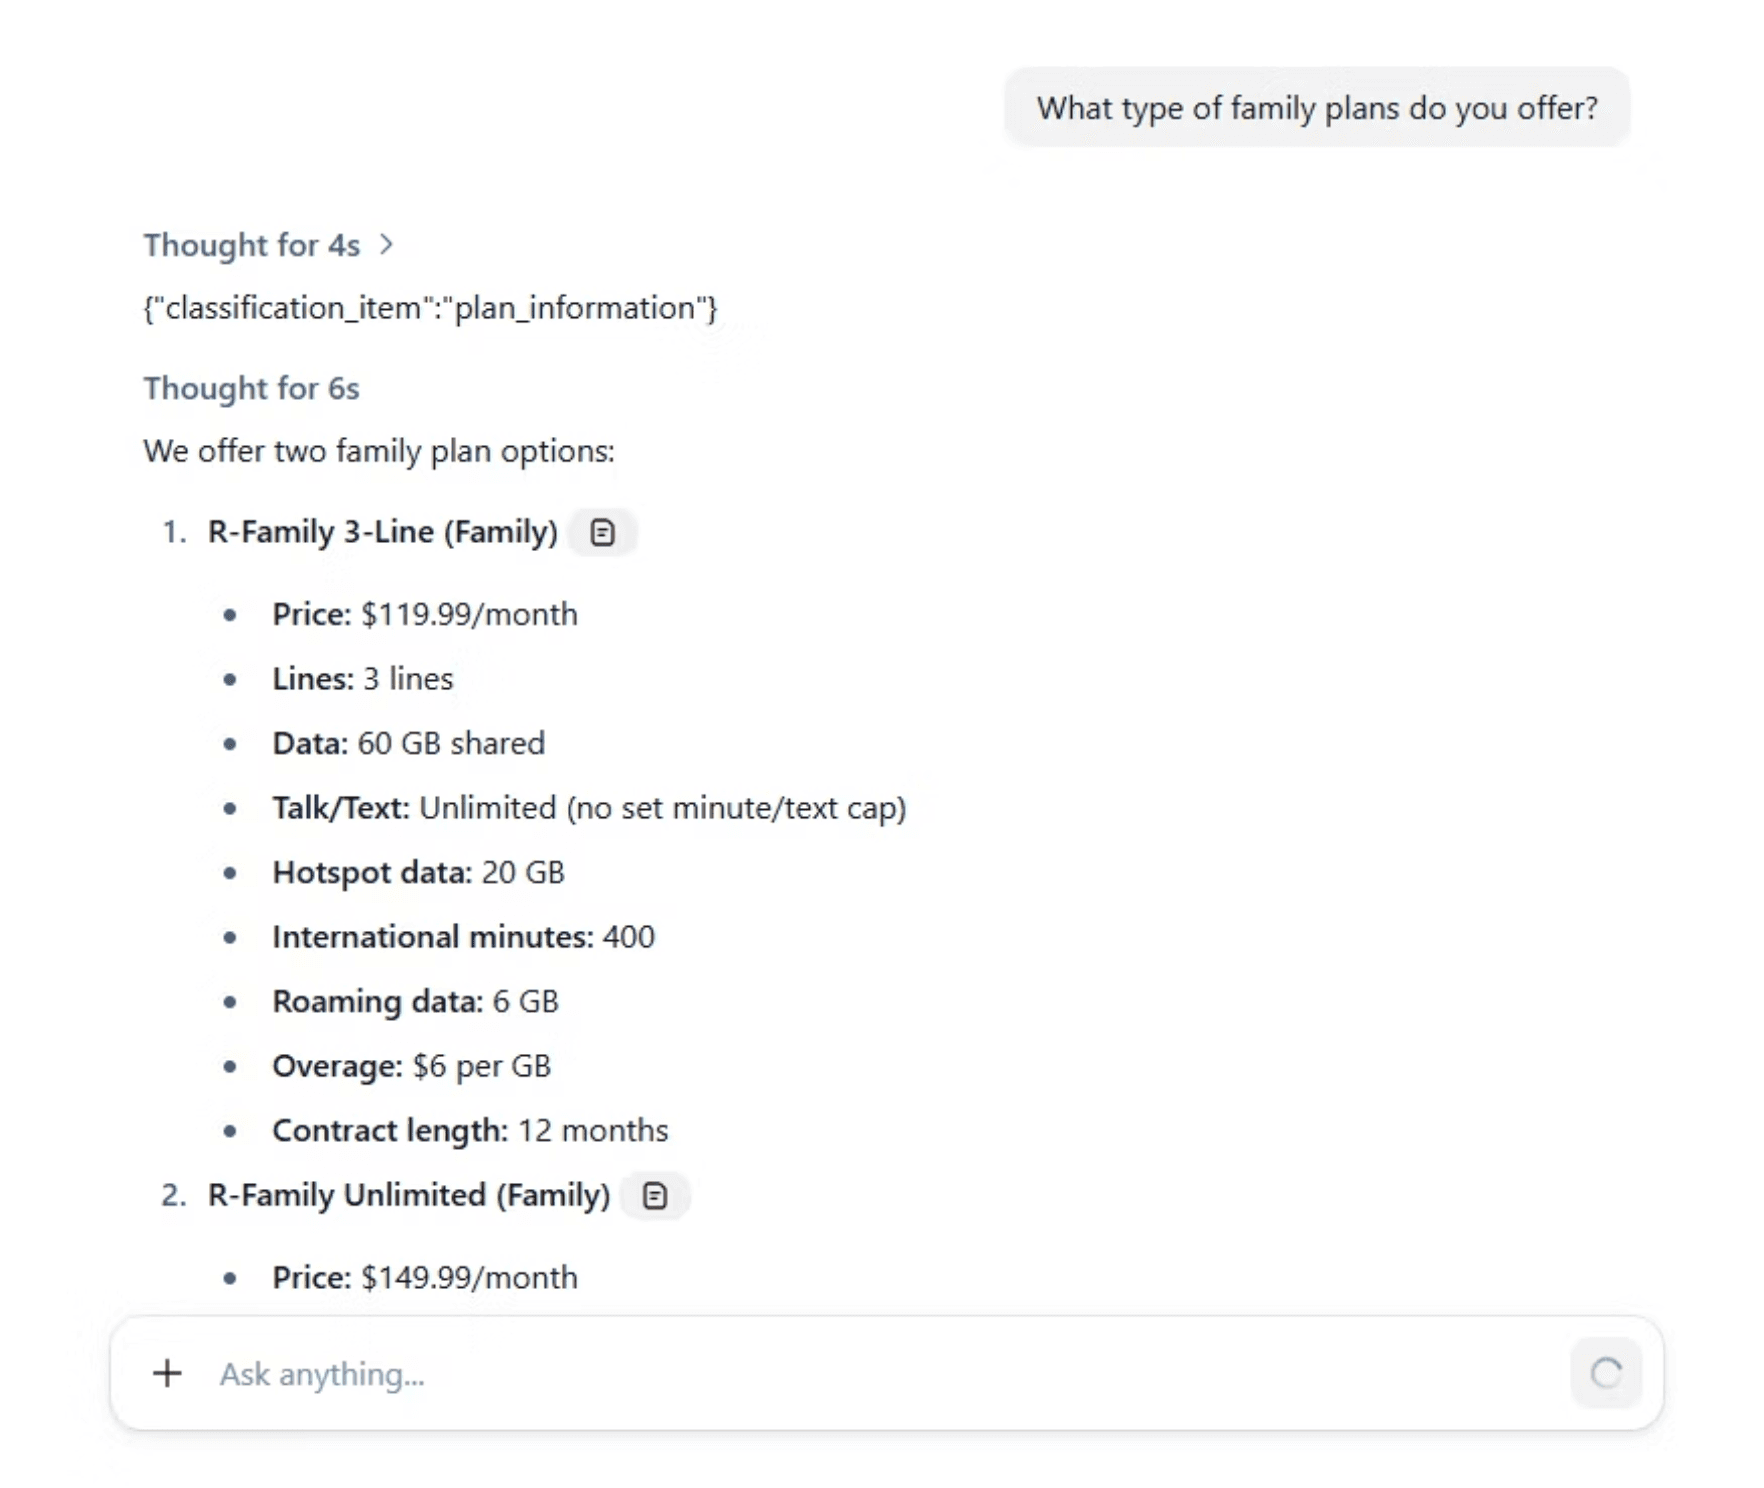
The chatbot interface lets you test conversational interactions like asking about family plans and seeing formatted responses in a familiar chat window.
Enabling Voice Interactions with Twilio
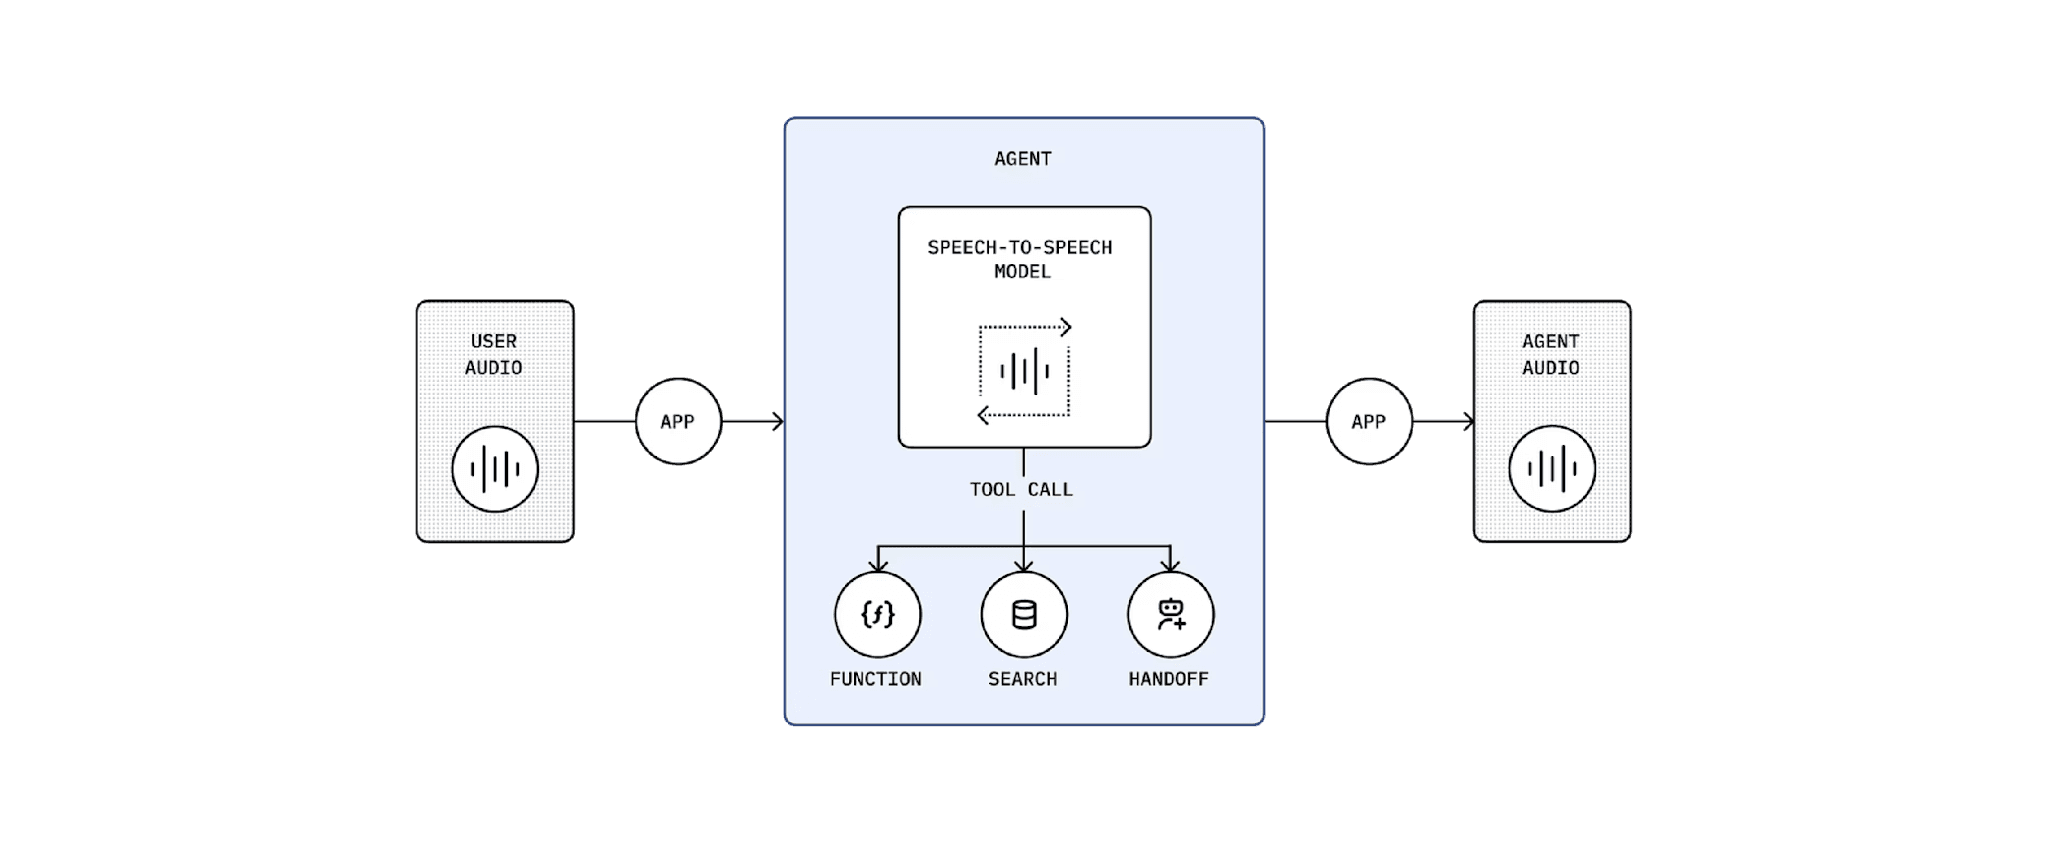
For a true call center replacement, customers need to talk to your agent by phone. The OpenAI real-time API combined with Twilio creates this capability. Twilio acts as a bridge, receiving phone calls and routing the audio to your agent through WebSocket connections.
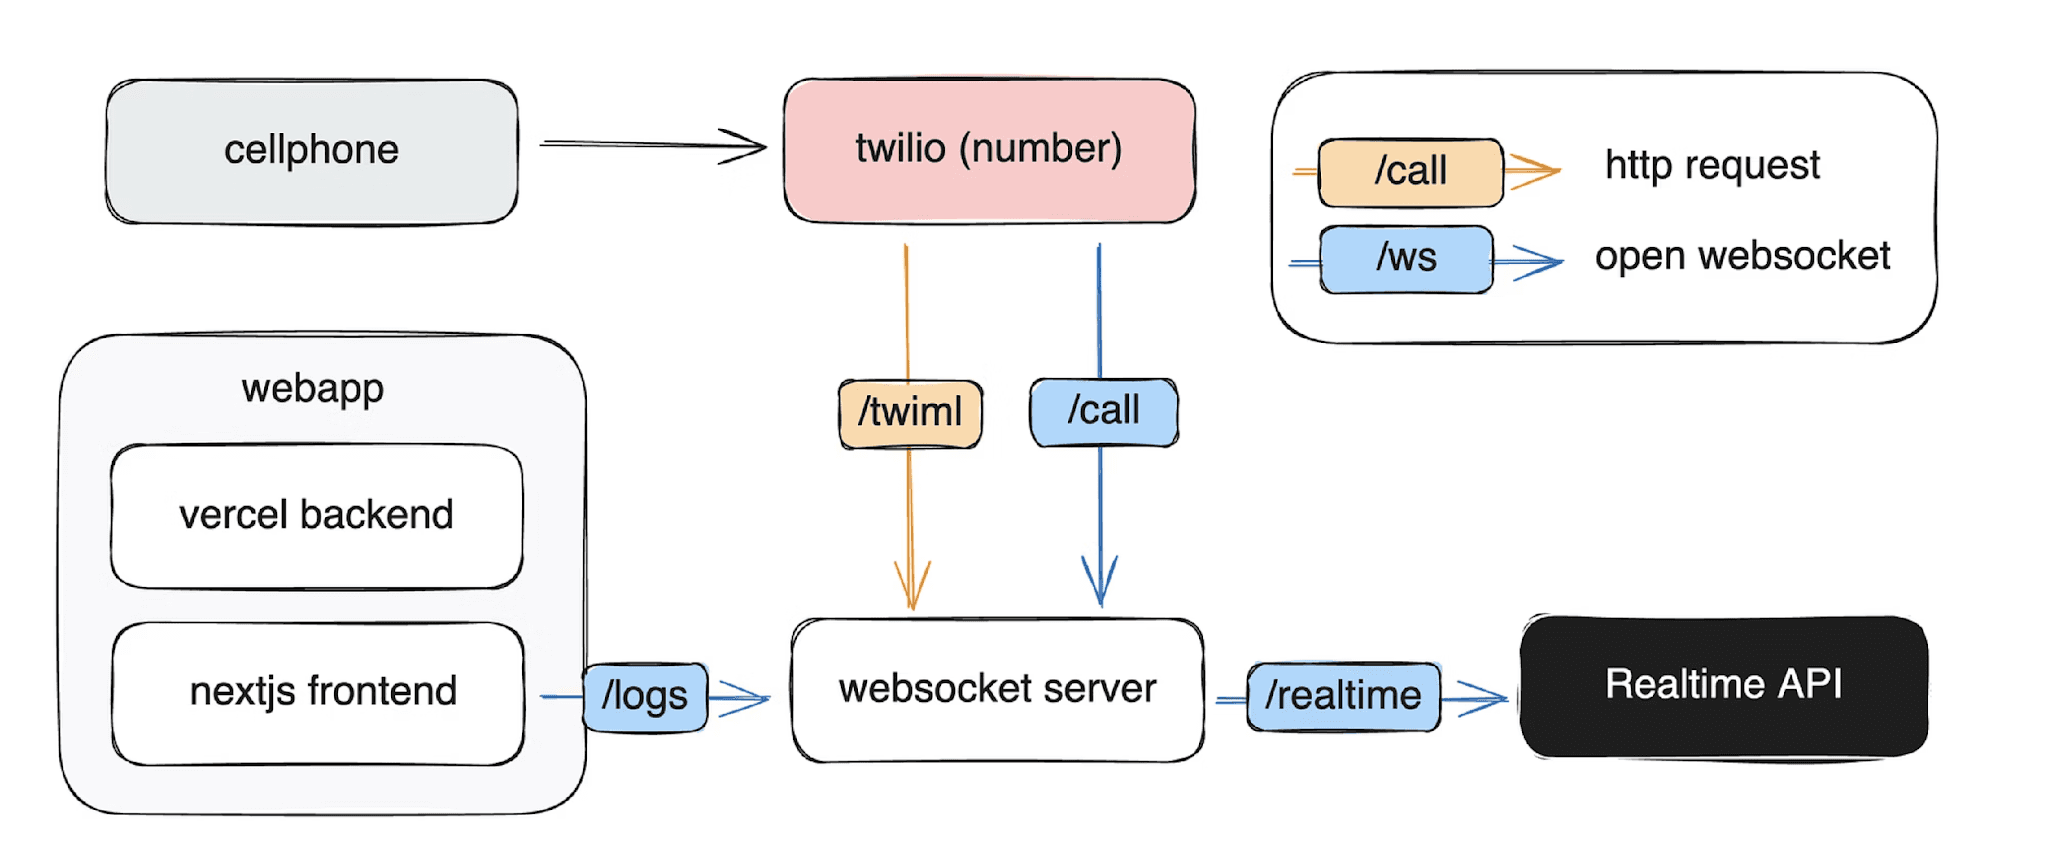
Clone the OpenAI Twilio demo repository and configure both the web app (for call management and transcripts) and WebSocket server (for real-time audio processing). Create a Twilio account, obtain your account credentials, and configure the environment variables for both components.
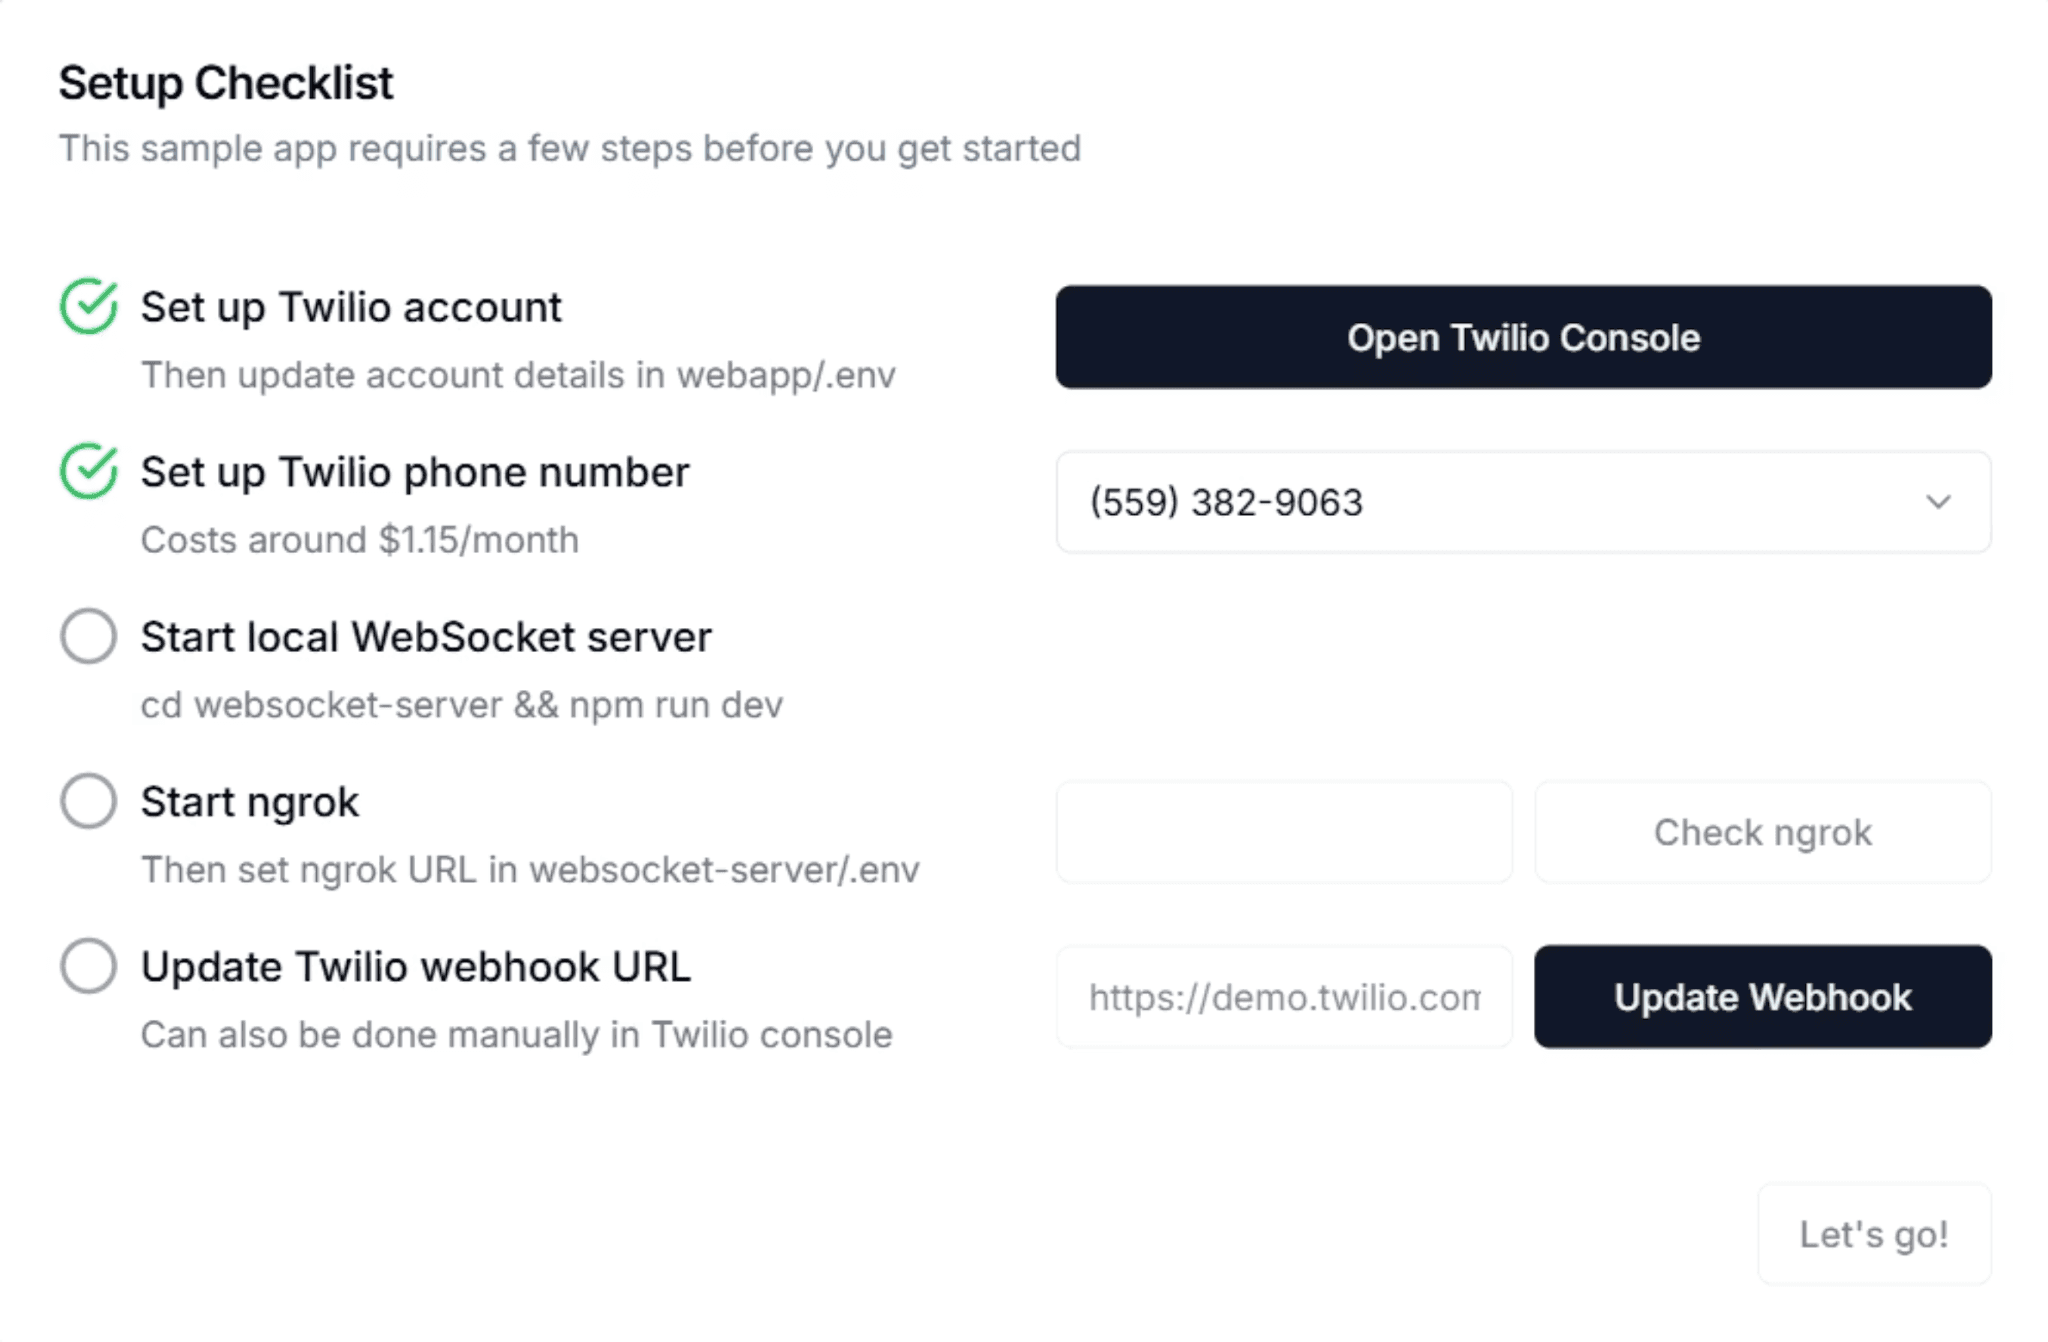
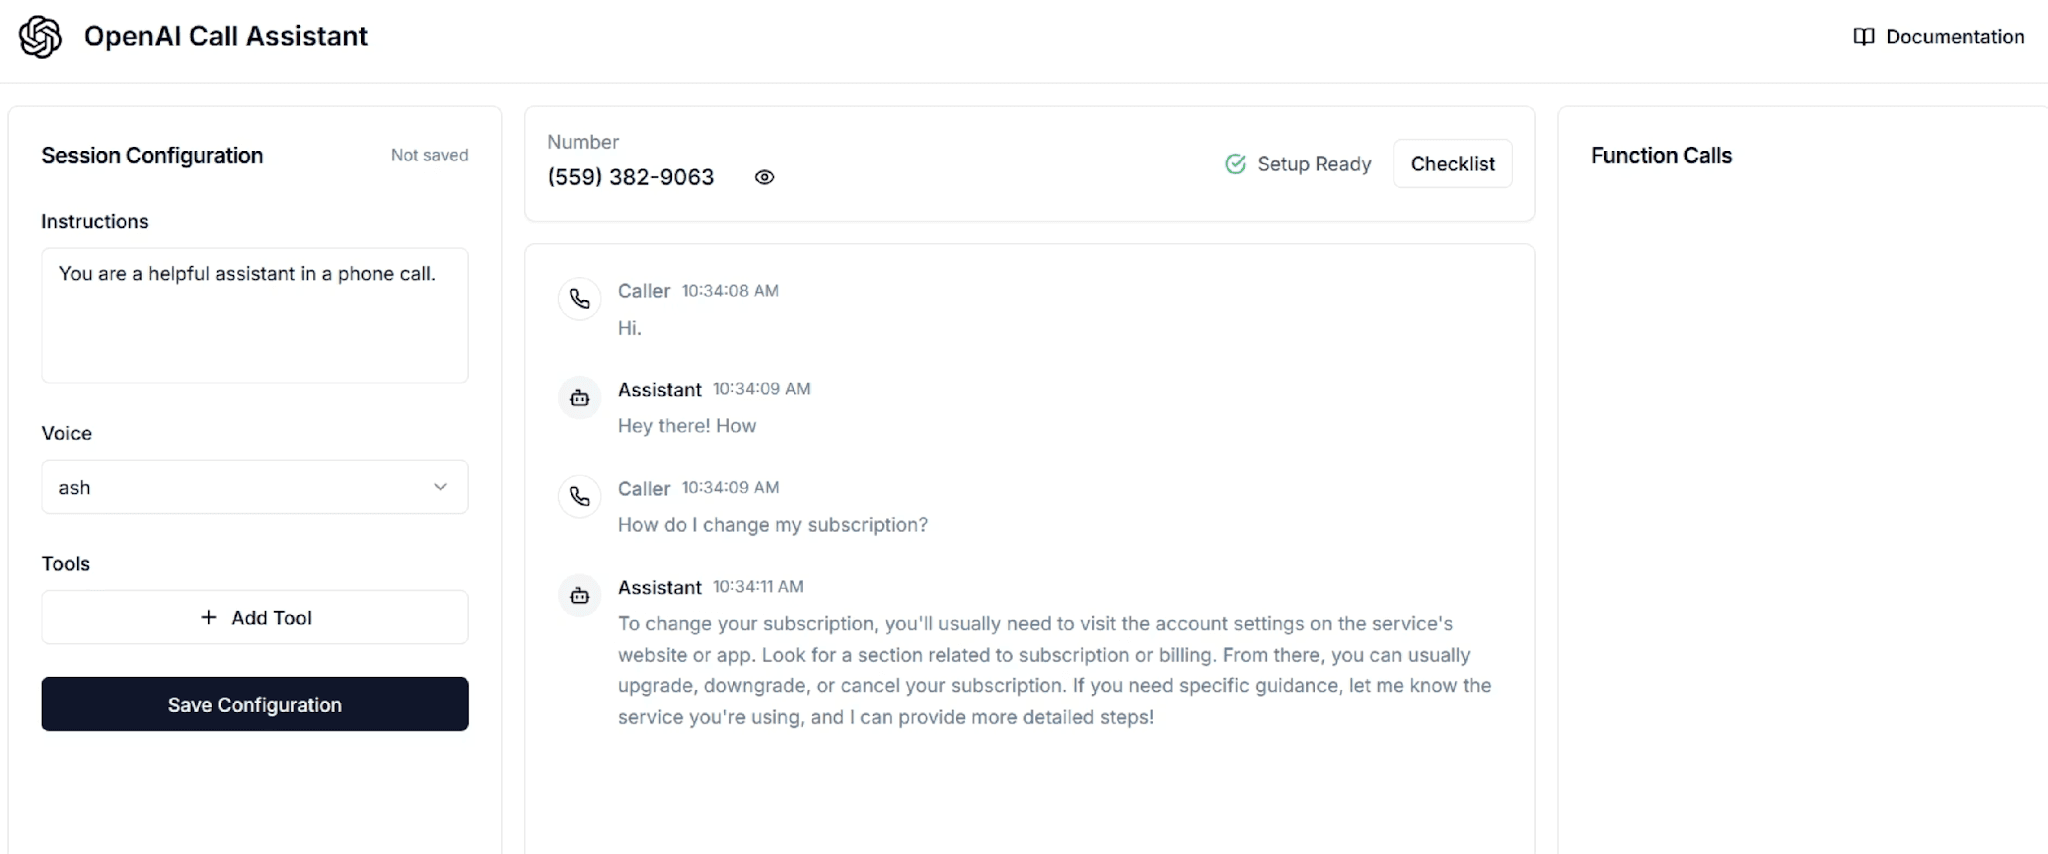
Use Ngrok again to expose your local WebSocket server, then follow the setup checklist in the demo application. Once configured, you’ll have a phone number that customers can call to interact with your AI agent using natural voice conversation.
Future Improvements and Best Practices
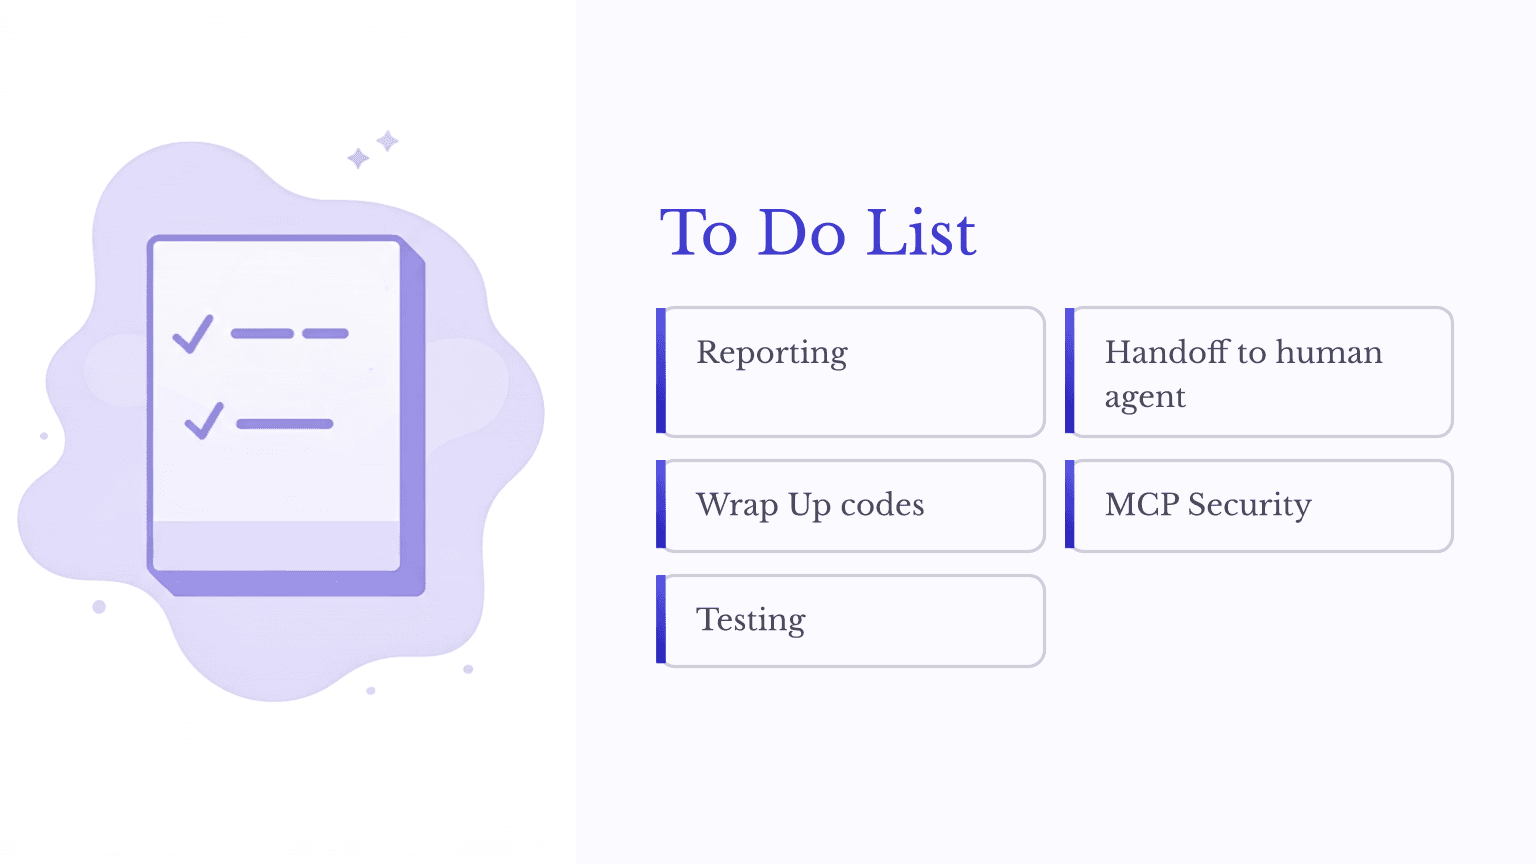
This tutorial covers building a functional prototype, but production deployment requires additional considerations. Every call center needs reporting metrics like first-call resolution rates, average handle time, and customer satisfaction scores. You’ll need to implement call logging and analytics to measure these KPIs.
Human escalation remains essential for complex issues the AI cannot handle. While Agent Builder supports human approval steps, seamlessly transferring an ongoing conversation to a human agent requires additional integration work.
Wrap-up codes that categorize each call’s outcome need database write capabilities, which means extending your MCP server with proper authentication and SQL injection protections before enabling any write operations.
The Agent Builder includes a robust evaluation platform under the Evaluations tab for testing your agent against sample conversations. Use this extensively to verify your agent behaves correctly across diverse scenarios before deployment. You can even configure another model to grade responses automatically, enabling regression testing across hundreds of test cases.
Conclusion
By completing this tutorial, you've learned how to fine-tune a model with company-specific knowledge, connect an agent to live customer data through MCP servers, set up file storage for reference documents, and deploy your agent as both a web chatbot and a voice-enabled phone system. You've also seen how guardrails protect against malicious inputs and how the Agent Builder's evaluation tools help you test and refine your agent's responses.
These building blocks extend far beyond call centers. The same patterns, apply to IT help desks, appointment scheduling systems, internal HR assistants, and countless other applications. Take what you've built here and adapt it: swap in your own training data, connect to your own databases or scheduling software, and experiment with different routing logic to match your specific use case. The foundation is in place. Now make it your own.
Additional Resources
https://platform.openai.com/docs/guides/model-optimization#fine-tune-a-model
https://github.com/openai/openai-realtime-twilio-demo
