
Introduction
The OpenAI API is deceptively easy to pick up. You send a prompt, you get a completion, and in ten minutes, you have a working chatbot. But the moment you try to build something real for your organization, four very specific gaps appear at once. The model has no access to your live data. It has never seen your documents. It knows nothing about your company. And it cannot answer in your product’s voice.
This tutorial covers the four OpenAI capabilities that close each of those gaps, and together they form the foundation of almost every production-grade OpenAI application being built today. We will walk through function calling to connect the model to external APIs and live data, embeddings and vector stores to make your own documents searchable, retrieval-augmented generation (RAG) to ground the model’s answers in your data at query time, and fine-tuning to control how the model writes and what it says. By the end, you will have working code for all four, and a clear sense of which technique fits which problem.
As usual, you can follow along with the video or the written tutorial below.
Which Tool for Which Job
Basic API usage gets you surprisingly far: sending prompts, receiving completions, experimenting in the playground. But the moment you try to build something real, four gaps appear immediately. Your model has no access to external data, no memory of your documents, no knowledge of your company’s specifics, and no way to answer questions in your product’s voice.
This tutorial covers the four capabilities that close those gaps. Together, they form the foundation of most production OpenAI applications being built today.
Function calling: connect the model to external APIs, databases, and live data sources using natural language
Embeddings and vector stores: convert documents into searchable numerical representations and store them for retrieval
Retrieval-augmented generation (RAG): inject relevant context from your own documents directly into the prompt at runtime to reduce hallucinations
Fine-tuning: retrain the top layer of the model on domain-specific question-and-answer pairs to control style, tone, and structured outputs
Each technique has a distinct use case. Embedded data and RAG is the right choice for large collections of unstructured documents. Fine-tuning suits repetitive, predictable Q&A like a customer service chatbot. Function calling handles any need to reach outside the model at query time. All four can be combined in a single production system.
Function Calling: Connecting the Model to the Outside World
GPT models are powerful reasoners, but they are frozen at their training cutoff. They cannot query a database, call a REST API, or look up a live data feed on their own. Function calling solves this limitation by letting you define a set of tools the model can invoke, described entirely in JSON. The model reads your tool definitions, decides which function to call based on the user’s natural language input, and returns the structured arguments needed to make that call.
What makes function calling feel unfamiliar at first is that it requires two separate round-trips to the model. Most API usage is a single request-response cycle. With function calling, you call the model once to find out which tool to use and with what arguments, execute that tool yourself in Python, and then call the model a second time with the tool’s output appended to the conversation. That second call produces the final natural-language answer you deliver to the end user.
The Five-Step Process
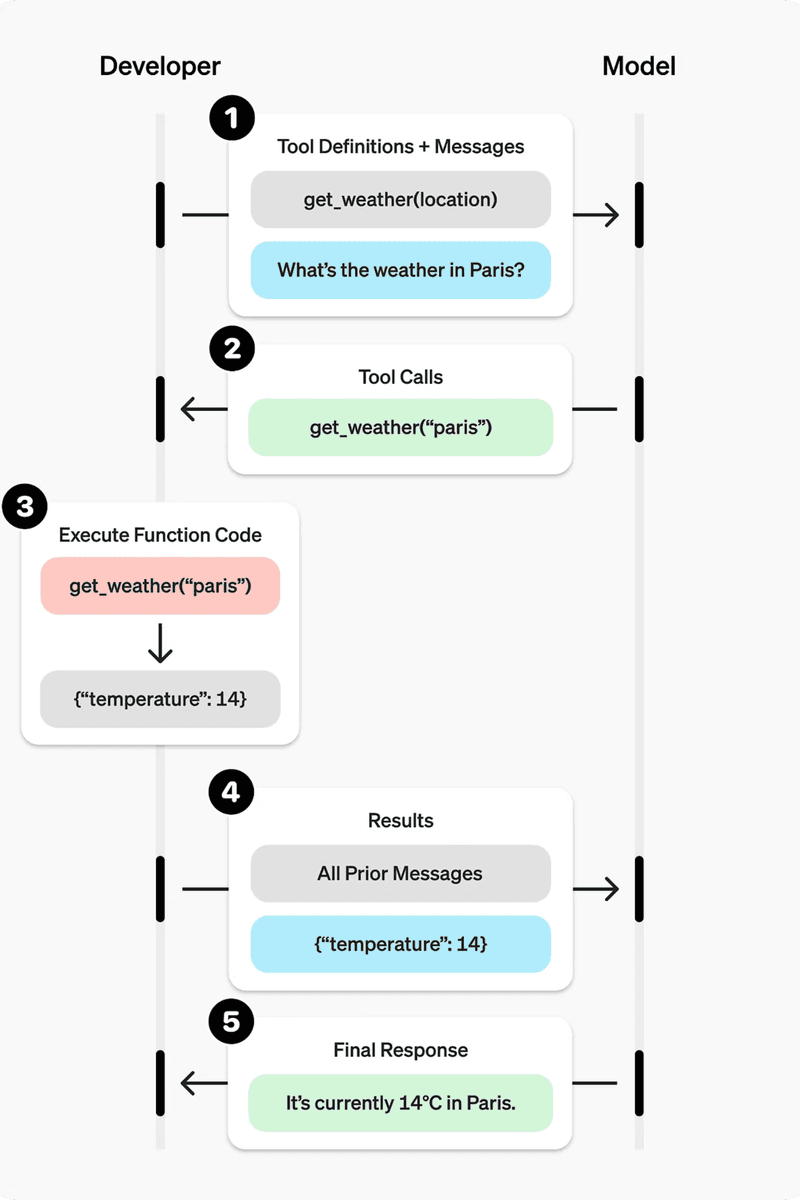
Define a list of callable tools and pass them to the model in your first request.
Receive a tool call response from the model: it names the function and provides the arguments.
Execute the function in your own code using those arguments.
Append the function’s output to the running input list.
Call the model a second time with the updated input list to get a natural-language response.
See the flowchart showing the five-step process of how a developer and ChatGPT model interact using function calling to answer a user query about the weather.
Defining a Tool
Each tool is a dictionary object with a type, a name, a description, and a parameters block that follows JSON Schema conventions. The description is important: the model uses it to decide whether this tool is appropriate for the user’s request. The parameters block declares what arguments the function expects, their types, and which are required.
The tool above declares a single required parameter, sign. In a real application, this function definition could point to a weather API, a SQL query, or any external service. The model never calls the function directly; it only produces the arguments. Your Python code handles the actual execution.
The Stub Function
For this example, the function itself is a simple stub that returns a fixed string. In production, this is where you would place your real API call, database query, or business logic.
The Full Two-Call Flow
The first call sends the user’s message and the tool definitions to the model. The model responds with a function_call item in its output, naming get_horoscope and providing the sign argument it extracted from natural language. You execute the function, then append a function_call_output entry to the input list before making the second call.
After the first call, you append the model’s output to input_list, loop over the output items to find any function_call entries, execute the matching function, and append the result.
The second call passes the enriched input_list back to the model. This time, the model has both the original question and the function’s output, so it can produce a coherent natural-language answer.
The output is a plain-English answer built from the function’s return value: “Aquarius: Next Tuesday you will befriend a baby otter.” The pattern scales directly to real use cases. Swap the stub for an HTTP request, a database call, or any Python logic, and the model gains the ability to answer questions it could never address from training data alone. With function calling in place, the next capability to add is a way to give the model memory of your own documents: that is where embeddings come in.
Embeddings: Turning Words into Searchable Numbers
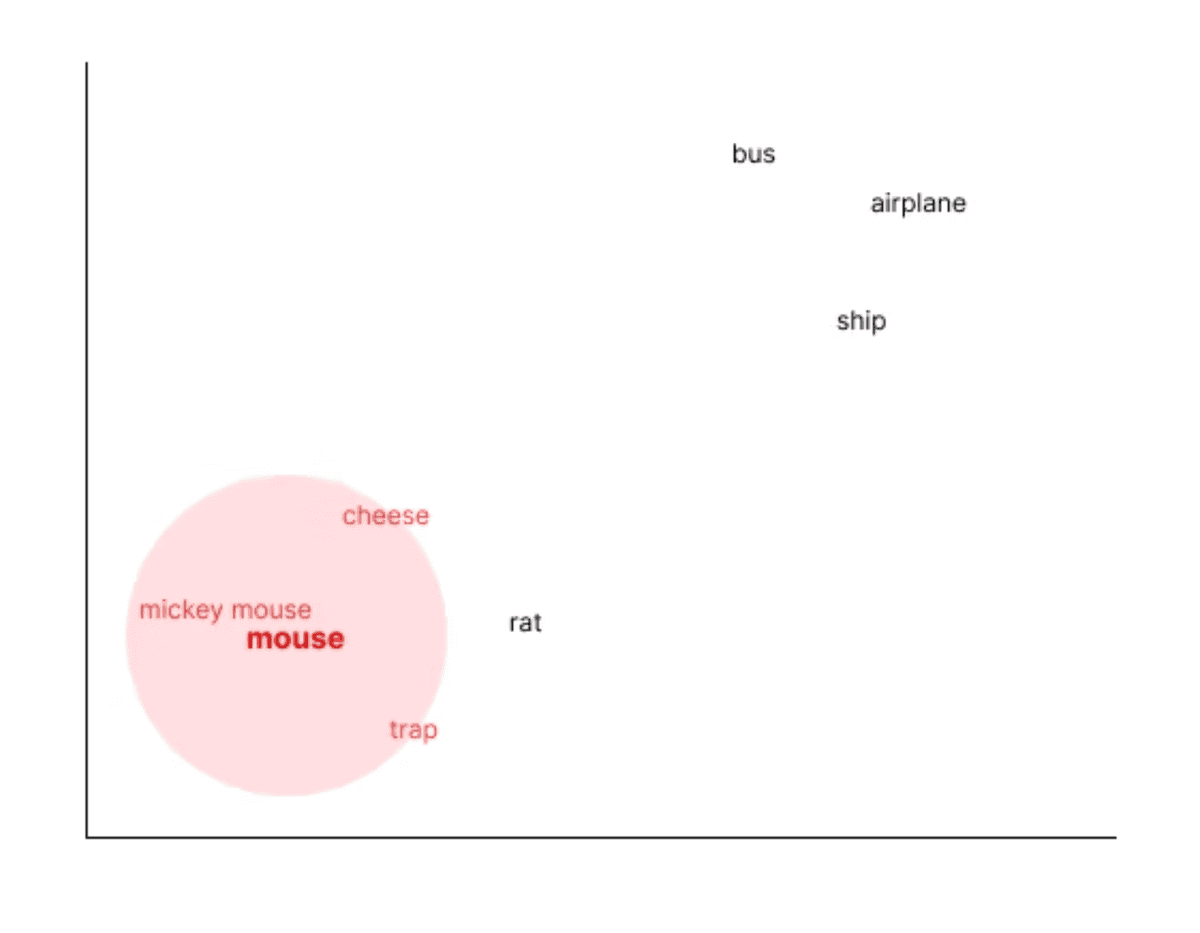
Function calling lets the model reach out to external systems at runtime. But what if you want the model to reason over your own documents, ones that were never part of its training data? That requires a different mechanism entirely: embeddings. An embedding is a numerical representation of a piece of text, expressed as a long list of floating-point numbers. Text that is semantically similar will produce vectors that are numerically close to each other, while unrelated text will produce vectors that are far apart.
A concrete example makes this clearer. Generate an embedding for the word “mouse” and then run a cosine similarity search across a large vocabulary. The nearest results will include terms like Mickey Mouse, cheese, trap, and rat. Words like bus, airplane, and ship will land much further away. The model has learned these relationships from the text it was trained on, where mouse and cheese appear together far more often than mouse and airplane.
Available Embedding Models
OpenAI provides several embedding models. The two current options are text-embedding-3-small and text-embedding-3-large. There are also legacy models under the text-embedding-ada name. The critical rule is consistency: every document you store and every query you run must use the same embedding model. Mixing models, for example storing documents with text-embedding-3-small and querying with text-embedding-3-large, will produce incompatible vectors and break your search entirely.
Common Use Cases
Search: find the most semantically relevant documents for a given query
Clustering: group similar pieces of text together automatically
Recommendations: surface items with similar meaning or context, such as movies with similar plot summaries
Anomaly detection: identify transactions or records that sit far from the expected cluster
Diversity measurement: assess how varied a set of items is
Classification: assign text to categories based on vector proximity
Generating a Single Embedding
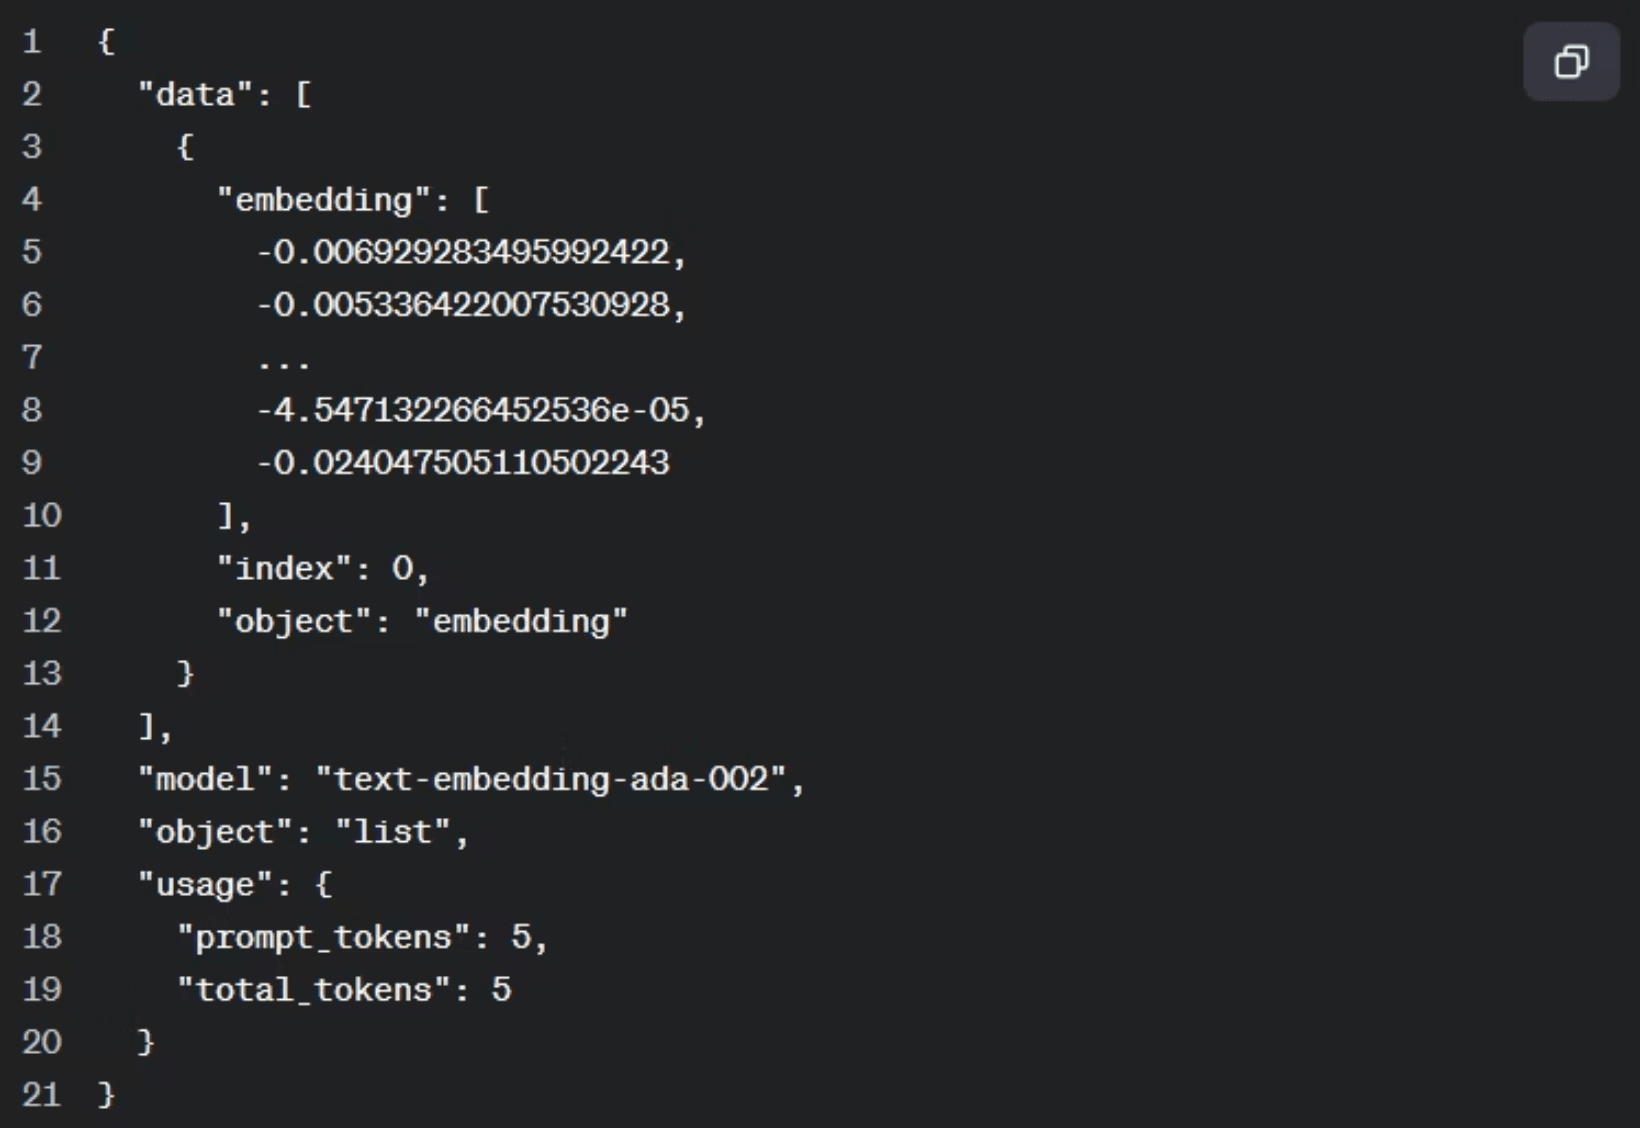
Generating an embedding is a single API call. You provide the input text and specify the model. The response contains a data array; the embedding itself lives at data[0].embedding and is a long list of numbers. Running the same call twice on the same input always produces the same list: the output is deterministic.
The printed output is a large array of floating-point numbers representing the semantic position of “The Godfather” in the model’s vector space. Once you have embeddings for a collection of documents, you can store them and run similarity searches to find the most relevant content for any query. That stored collection is known as a vector store.
Vector Stores: Uploading and Indexing Your Documents
Once you can generate embeddings, the next problem is storage. A vector store holds your documents as embeddings so you can run semantic searches against them later. OpenAI manages the chunking and embedding conversion automatically; you only need to upload a file and link it to a named store.
Step 1: Upload the Document
The first step is getting your file into OpenAI’s file storage. You can provide either a remote URL or a local file path. The code below handles both cases: if the path starts with http:// or https://, it downloads the file content first; otherwise, it opens the file directly from disk. The purpose is set to “assistants” at this stage.
The function returns a file ID. Save this value; you need it in the next step to link the file to the vector store. In practice, uploading from a local path tends to be more reliable than fetching via URL.
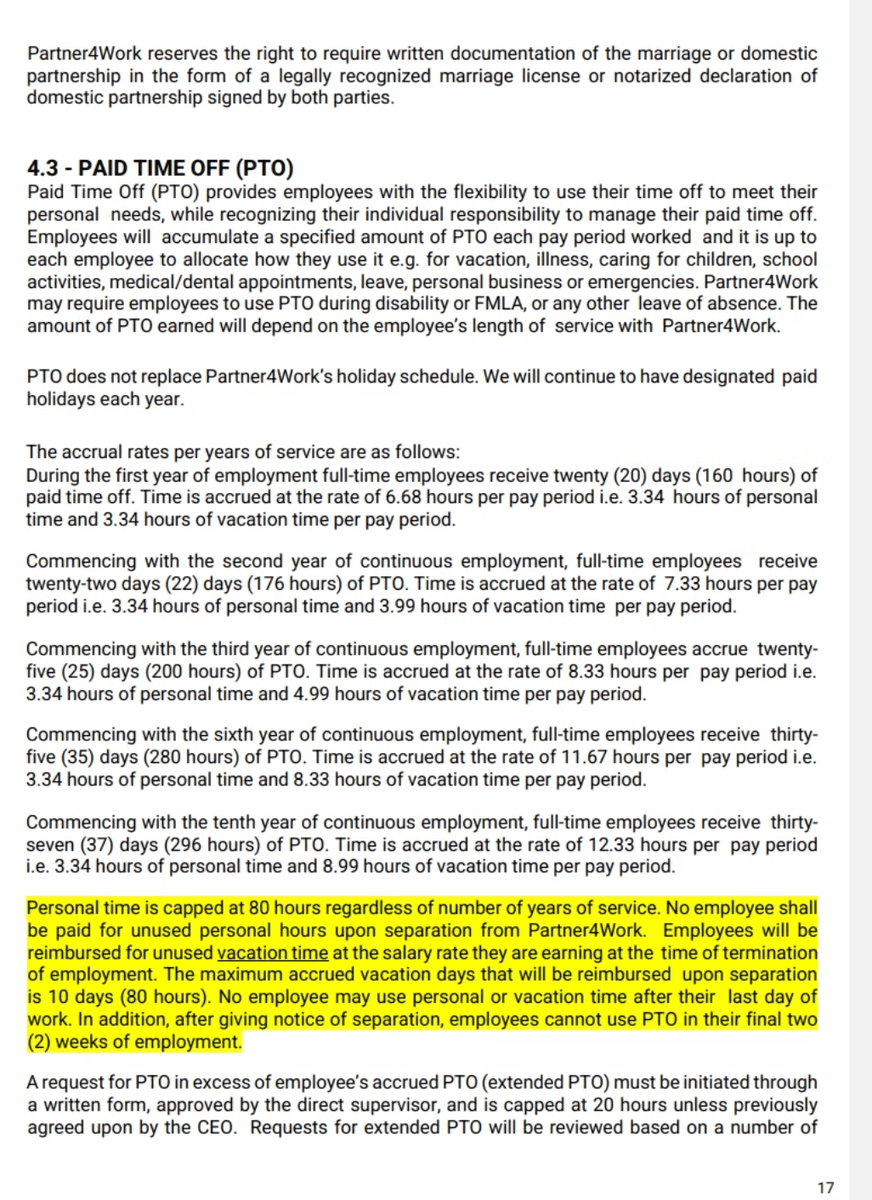
We’re using a random policy document page found on the web detailing Paid Time Off (PTO) accrual rates and guidelines for full-time employees based on years of service.
Step 2: Create the Vector Store
With the file uploaded, create a named vector store using client.vector_stores.create. This returns a vector store object with its own ID. Like the file ID, this store ID is what you will reference in every RAG query, so record it.
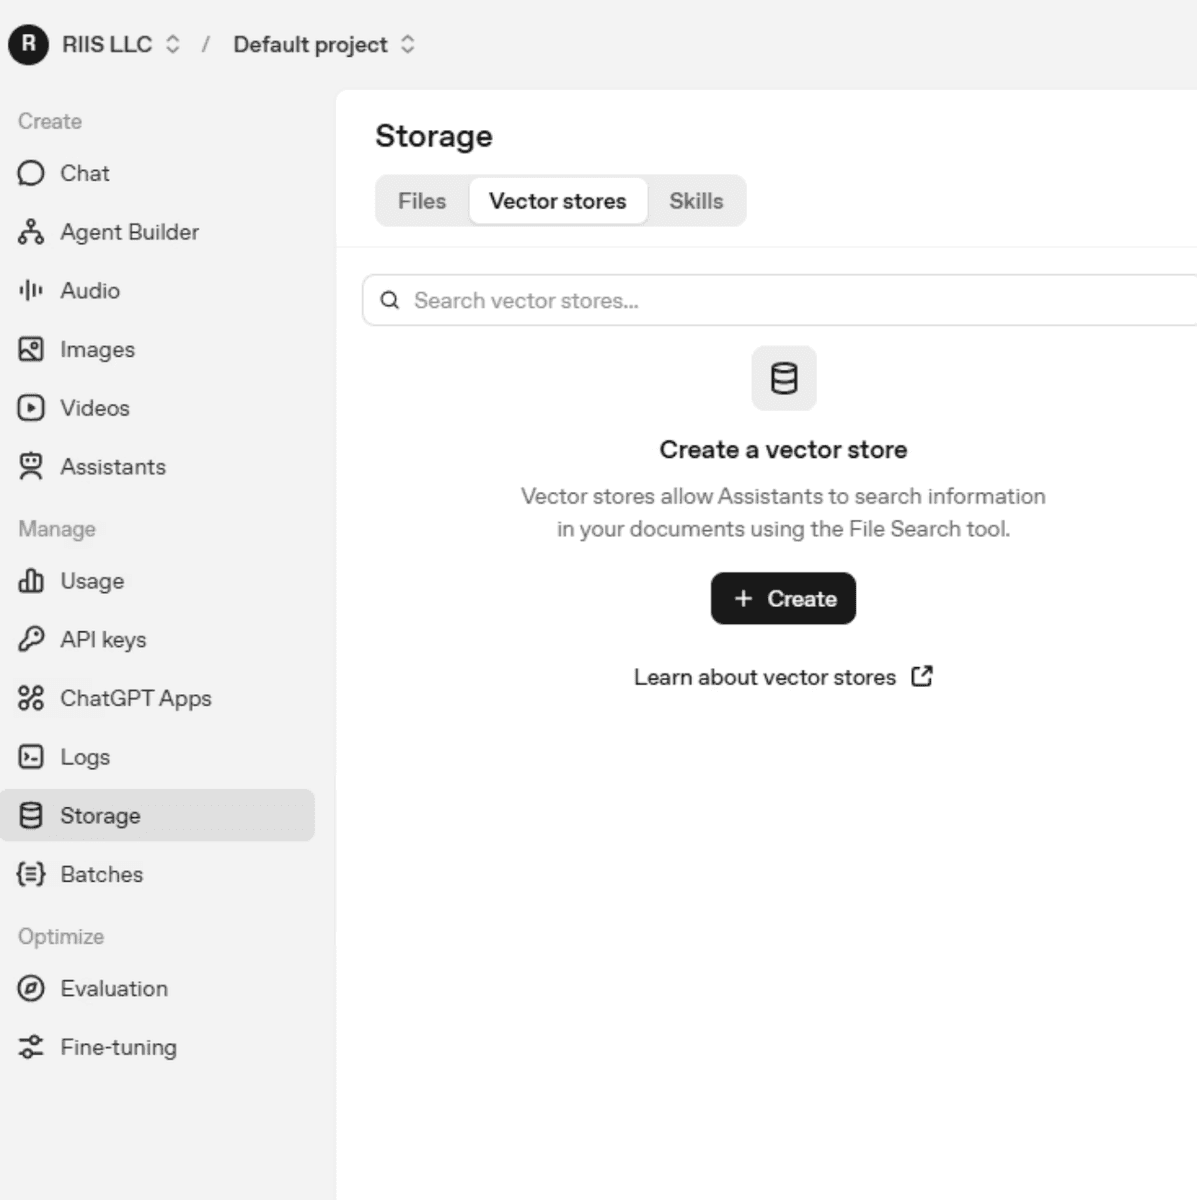
You can see your vector stores by logging into the OpenAI Playground.
Step 3: Link the File to the Store
Uploading a file and creating a vector store are two separate operations. To connect them, call client.vector_stores.files.create with both IDs. This is the step that triggers chunking and embedding conversion. OpenAI handles all of that automatically.
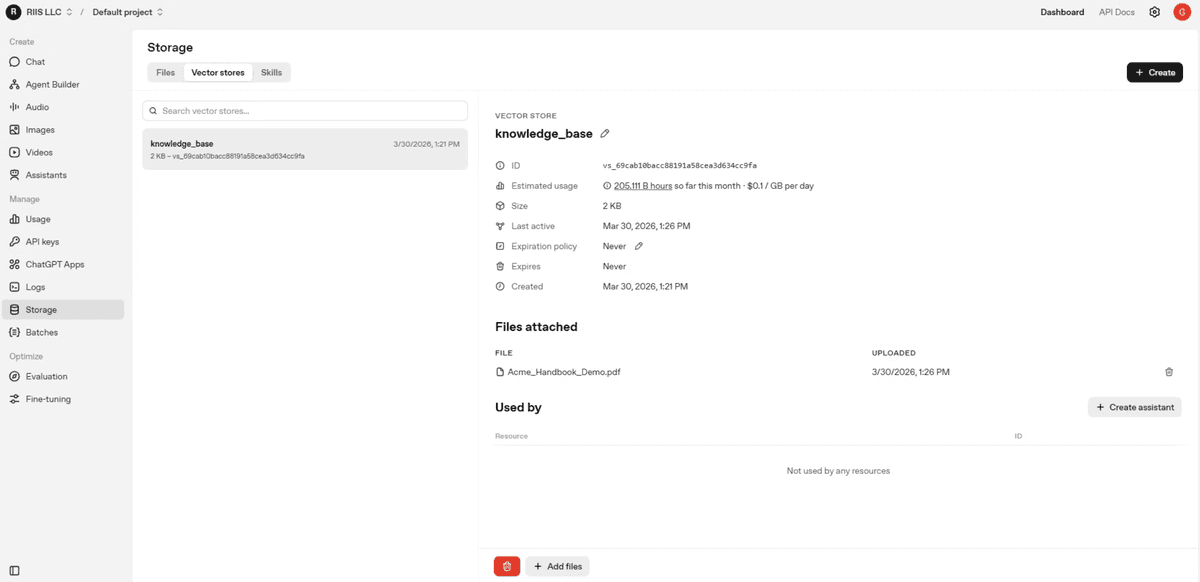
Once this call returns, the document is indexed and ready to query. You can verify the contents of the store at any time by calling client.vector_stores.files.list with the store ID. You should now see the vector store ‘knowledge_base’ embedding storage with attached files and usage information on the Playgrond.
What Happens Under the Hood
Before OpenAI provided this managed workflow, setting up a vector store meant chunking text into segments of roughly 100 characters with overlap, running each chunk through an embedding model, and loading the results into a separate online database such as Pinecone. Now those steps are handled for you. The entire three-step process above replaces what used to be a multi-tool pipeline.
Two IDs to save: the file ID returned by create_file and the vector store ID returned by vector_stores.create
The vector store ID is what you pass into RAG queries in the next step
Both IDs are visible in the OpenAI platform under Storage if you need to retrieve them later
With the handbook indexed in the vector store, you have everything in place to run a retrieval-augmented generation query. The next section covers how to take a natural language question, search the store for relevant context, and feed that context directly into the model’s prompt.
Retrieval-Augmented Generation: Grounding Responses in Your Data
With your handbook indexed in the vector store, you have the raw material for RAG. The core idea is straightforward: instead of sending a user question directly to the model, you first search the vector store for the most relevant chunks of your document, then inject that context into the prompt. The model receives the enriched prompt and generates a response grounded in your data rather than its training alone.
How the RAG Flow Works
The full pipeline moves through five stages.
User submits a natural language query
Query is embedded using the embedding model
Semantic search retrieves the top matching chunks from the vector store
Retrieved chunks are injected into the prompt as context
The LLM generates a grounded, accurate response
Consider a concrete example. If someone asks “What is my name?” and the vector store contains a chunk that reads “My name is Mike”, the relevant chunk is injected just before the model sees the question. The model reads the context and answers correctly: “Your name is Mike.” Without that injected context, the model would have no basis for a correct answer.
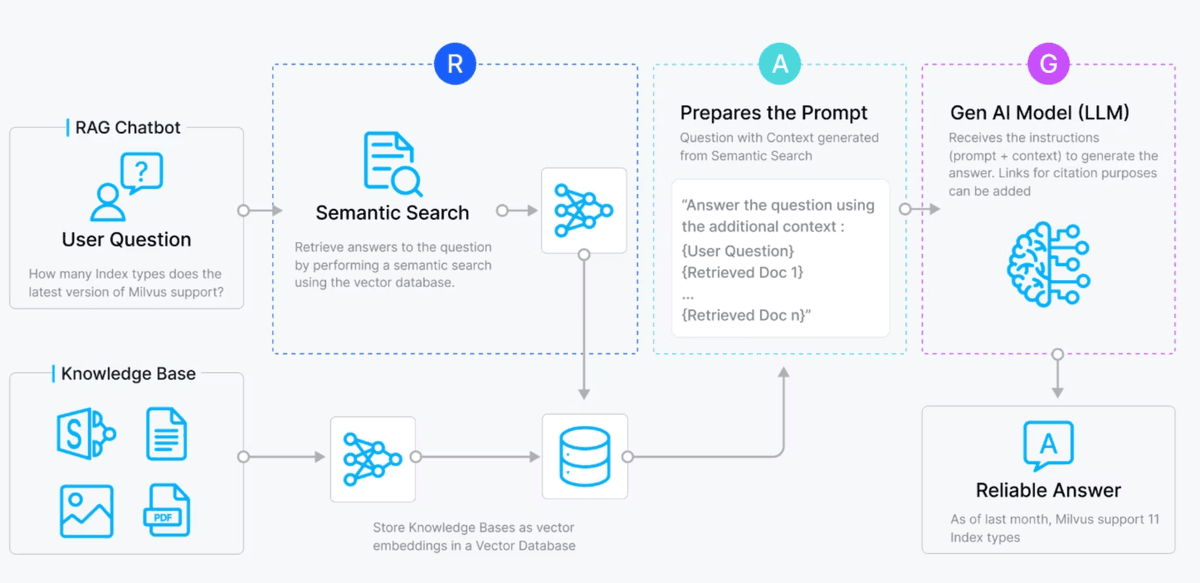
Here is a horizontal flow diagram showing the RAG (Retrieval-Augmented Generation) process from user query through embedding, retrieval, and prompt augmentation.
Retrieval Quality Matters More Than Model Size
A key principle of RAG is that retrieval quality matters more than model size. A smaller, cheaper model with well-retrieved context will outperform a larger model that lacks it. This means investing in good source documents, avoiding contradictory information across your files, and ensuring your uploaded data is accurate and complete.
RAG is well-suited for unstructured documents: company handbooks, product PDFs, policy files, or any content that changes over time. Because the vector store can be updated by simply adding new files, the model’s knowledge reflects your latest documents without any retraining.
Running a RAG Query with file_search
OpenAI exposes all of this through the file_search tool type. You pass the tool definition and your vector store ID directly into client.responses.create. OpenAI handles the embedding, retrieval, and prompt augmentation internally. The code from app3.py shows just how compact this has become:
The vector_store_ids value is the store ID you saved when building the vector store in the previous step. The model queries the handbook, finds the PTO section, and returns an answer like: “In your first year you receive 20 days of paid time off per year, which accrues monthly.” That matches the source document directly.
A few things to keep in mind when working with RAG in production:
Avoid uploading contradictory documents to the same vector store; conflicting information degrades answer quality
The vector store ID in your code must match the store that holds your indexed files
You can update your knowledge base at any time by uploading additional files to the same store, with no model retraining required
RAG is best suited for large, unstructured documents rather than short, repetitive Q&A pairs
RAG handles dynamic, document-heavy knowledge retrieval well. But for use cases built around consistent, short-form answers, like a customer support chatbot with hundreds of recurring questions, a different approach offers tighter control. That is where fine-tuning comes in.
Fine-Tuning: Teaching the Model to Answer Your Way
RAG excels at surfacing answers from large, unstructured documents. But what if your use case is a customer support chatbot with hundreds of recurring, short-form questions? For that pattern, fine-tuning is the better tool. Fine-tuning works by retraining the top layer of the neural network with domain-specific question-and-answer pairs, teaching the model to respond in exactly the style and format you specify.
The classic example is an ISP chatbot. Every time a customer calls, the first-tier support agent gives the same answer: restart your modem and router. Fine-tuning lets you encode hundreds of these recurring exchanges so the model handles them automatically, freeing your team from repetitive work.
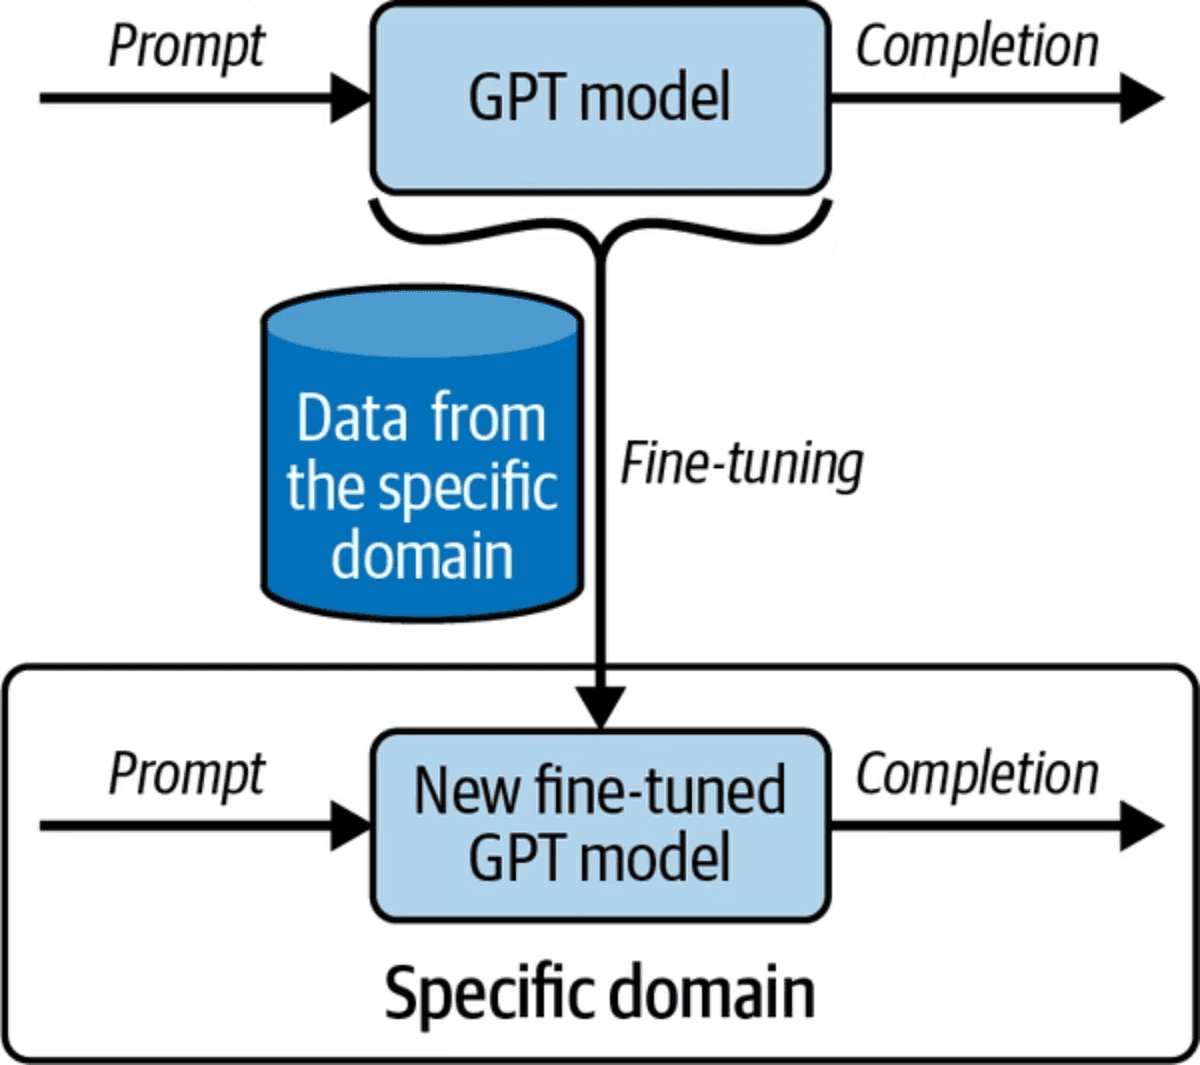
The diagram above shows how fine-tuning works by training a GPT model with domain-specific data to create a specialized model.
When to Use Fine-Tuning
Fine-tuning is best suited for specific scenarios. It is not the right choice for every problem.
Best for: controlling style, tone, and structured output formats
Best for: chatbot use cases with a fixed set of question-and-answer pairs
Not ideal for: dynamic knowledge that changes frequently
Requires: dataset curation, with a minimum of 15 training examples
Training time: approximately 30 minutes for a few hundred examples
Higher maintenance than RAG: adding new knowledge requires retraining the model
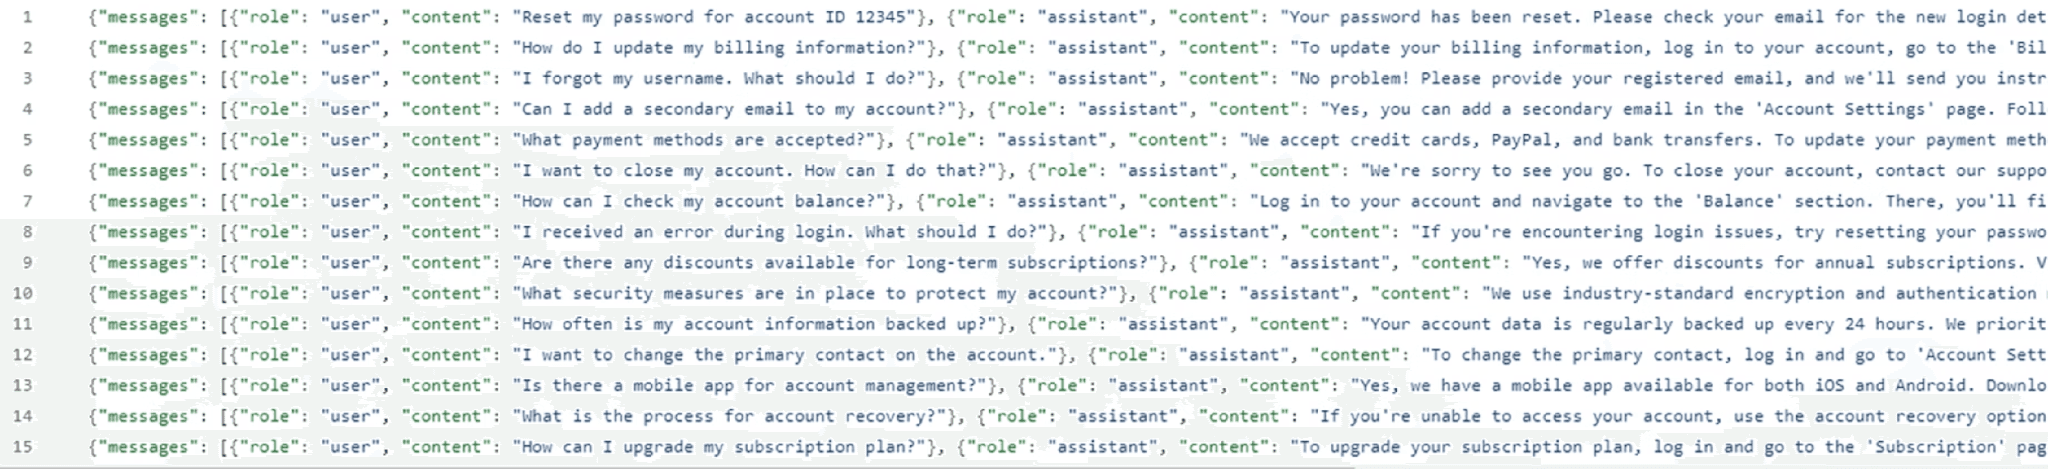
Preparing Your Training Data
Fine-tuning requires your data in JSONL format, where each line is a self-contained JSON object. Each object contains a messages array with two entries: a user role (the question) and an assistant role (the answer you want the model to give). Here is what a single training example looks like from the ISP dataset in the GitHub repo:
If your data starts as a standard JSON file, you need to convert it to JSONL before uploading. The create_jsonl.py script handles this: it opens the source JSON array, iterates over each entry, and writes each object as a single line to the output file.
Uploading the Training File
Once you have your JSONL file, upload it to OpenAI using client.files.create with the purpose set to “fine-tune”. Save the file ID that is returned; you will need it to start the training job.
Creating the Fine-Tuning Job
With the file uploaded, you create the fine-tuning job by passing the file ID and the base model you want to train. Note that GPT-5 cannot be fine-tuned at this time; the example below uses gpt-4.1-2025-04-14. The job runs asynchronously and takes around 30 minutes to complete.
You can monitor the job’s progress in the OpenAI Playground under the Fine-tuning section. The dashboard shows training loss metrics, step count, and status messages as the job runs. When it completes, the dashboard displays the name of your fine-tuned model: a long string starting with “ft:” that you will use in API calls.
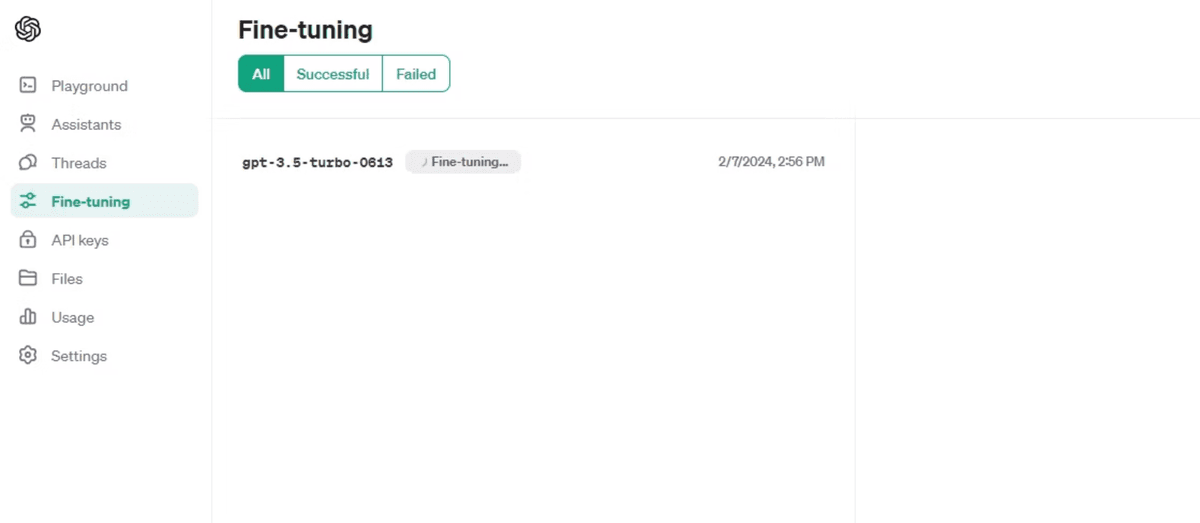
OpenAI fine-tuning interface showing a list of fine-tuning jobs with filtering options for All, Successful, and Failed statuses.
Calling Your Fine-Tuned Model
Calling a fine-tuned model works exactly like calling any other model. The only difference is that you pass your model’s full fine-tuned identifier as the model value. The example below uses the model trained in the source materials:
The model returns an answer drawn directly from the training data. In this case it responds with something close to: “We use advanced encryption, multi-factor authentication, and regular monitoring to protect your account.” The wording may not be identical to the training example, but the substance reflects what you taught it.
You can watch a full walkthrough of the workflow in this video:
One practical constraint to keep in mind: the JSONL file needs a minimum of 15 question-and-answer pairs before OpenAI will accept it. For a production chatbot, aim for at least 200 to 300 examples covering the full range of questions your users are likely to ask.
RAG vs. Fine-Tuning: Choosing the Right Tool
Now that you have seen both approaches in action, the natural question is: which one do you reach for? The answer depends on your data, your update frequency, and what you are trying to achieve with the model.
Side-by-Side Comparison
Dynamic knowledge: RAG wins here. You can add files to your vector store at any time and the model immediately has access to the new information. Fine-tuning requires a full retraining job every time your knowledge changes.
Cost: RAG is a lower cost to maintain. Fine-tuning is more expensive, especially with large datasets, and you pay the training cost again each time you retrain.
Update speed: RAG updates are nearly instantaneous. A fine-tuning job takes approximately 30 minutes for a few hundred examples.
Use case fit: Fine-tuning is best for controlling style, tone, and structured outputs, particularly for chatbot scenarios with a fixed set of question-and-answer pairs. RAG is best for large, unstructured documents like company handbooks or product catalogs.
Combining Both in Production
The two approaches are not mutually exclusive. In practice, production systems often use both together: fine-tuning controls how the model communicates, while RAG supplies the relevant facts from your document library. The key constraint is that the information they provide must be complementary, not contradictory.
A reasonable rule of thumb: reach for RAG when you have lots of unstructured documents and need answers grounded in their content. Reach for fine-tuning when you have a well-defined set of short questions and answers and want consistent, on-brand responses. When both conditions apply, combine them.
Conclusion
You now have the four building blocks that take an OpenAI integration from a prompt-and-response demo to a production application: function calling for live data and external APIs, embeddings and vector stores to make your own documents searchable, RAG to ground answers in those documents at query time, and fine-tuning for consistent voice and format. The real leverage comes from knowing which to reach for, and when to combine them. All the working code is on GitHub, and the OpenAI file search guide is a good next stop for going deeper on RAG. We can't wait to see what you build!
