
TAK is a powerful situational awareness platform, but it only becomes useful when you can feed it data. Out of the box, ATAK gives you a shared map and chat between connected clients. The real value comes when you start pushing external data into the system: drone positions, sensor readings, dispatch incidents, or anything else with a location and a timestamp. All of that data reaches the TAK server as Cursor on Target (CoT) XML messages.
This tutorial walks you through the full pipeline for publishing CoT events to a TAK server. You will expose a Raspberry Pi TAK server to the internet using Ngrok, configure ATAK with TLS client certificates, and publish events using both PyTak (a Python library) and Node-RED (a low-code visual editor). Three working examples build on each other: a static Hello World marker, a simulated Remote ID drone track that moves across the map, and a Computer Aided Dispatch feed that converts real-world JSON incident data into CoT events. By the end, you will understand the CoT message format and have the tools to push any data source you want onto the TAK common operating picture.
As usual, you can follow along with the written tutorial or the video from the official livestream.
TAK as a Data Hub
TAK (Team Awareness Kit) is built around a classic client-server architecture. The TAK server sits at the center, ingesting data from multiple sources and broadcasting it outward to every connected client. That means a first responder carrying an Android device running ATAK sees the same common operating picture as everyone else on the network, updated in real time.
The server accepts data from a wide range of inputs. On the client side, TAK-compatible applications such as ATAK and TAK-aware tools consume those updates and display them on a map.
What Can Feed the TAK Server
Computer Aided Dispatch (CAD) systems
IoT sensors
Remote ID drone broadcasts
Drone or other camera video feeds
Custom REST APIs and third-party data sources
The system is bidirectional. Data written inside ATAK, such as a note or a map marker, can travel back through the server to an originating CAD system. As new data sources come online, they can be plugged into the TAK server to update everyone’s information without requiring changes to the clients.
Exposing Your TAK Server with Ngrok
A TAK server installed on a Raspberry Pi sits behind your local network firewall. ATAK clients on the same Wi-Fi can reach it, but the moment a client is out in the field on a cellular connection, the server is invisible. You need a way to punch through that firewall without reconfiguring your router or setting up a VPN.
Ngrok solves this by creating a secure tunnel from a public internet address directly to a port on your local machine. When an ATAK client connects to the Ngrok-provided address, traffic is forwarded transparently to your Raspberry Pi. Two alternative hosting approaches exist if you prefer not to run a local server: deploying TAK directly on a cloud provider such as AWS, or using the hosted TAK server from Booz Allen Hamilton (SitX). For this tutorial, the focus is on the Raspberry Pi and Ngrok path.
Installing and Authenticating Ngrok
Ngrok is distributed as a snap package. On your Raspberry Pi, update your repositories, install the snap daemon, then install Ngrok itself. After installation, add your auth token so Ngrok knows who you are. The token comes from your account dashboard at ngrok.com.
After rebooting, Ngrok is ready to configure. The auth token is written into the default ngrok.yml file automatically by the config command.
Creating Fixed TCP Addresses in the Ngrok Dashboard
TAK requires two separate TCP tunnels: one for TAK signaling on port 8089 and one for certificate provisioning on port 8446. Log in to your Ngrok dashboard and create two fixed TCP addresses. The dashboard will assign you public hostnames and ports for each, for example tcp://5.tcp.ngrok.io:21824 for signaling and tcp://3.tcp.ngrok.io:22821 for certificate provisioning.
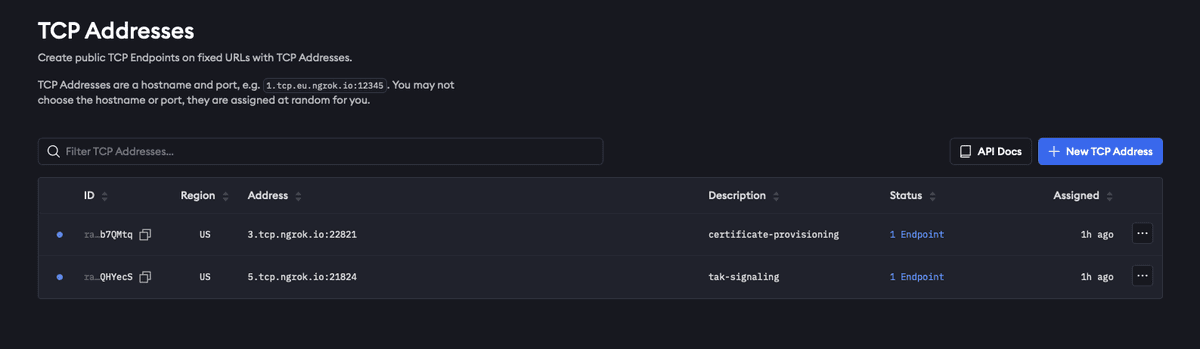
Ngrok dashboard showing TCP Addresses interface with a table displaying fixed URLs and ports for public TCP endpoints.
Take note of both addresses. You will need them in the Ngrok configuration file and later when setting up the ATAK server connection.
Editing ngrok.yml
Ngrok uses a YAML configuration file to define which tunnels to start. First, find the path to your configuration file, then open it in a text editor.
Replace the contents with your auth token and the two endpoints you created in the dashboard. Your auth token lets you access your Cloudflare Tunnel securely. The two endpoints are the routes you set up to direct traffic to different services on your local network. The upstream URL for each endpoint is the local TAK port on your Raspberry Pi where your TAK server runs. By setting these local addresses as your upstream URLs, you tell Cloudflare where to send traffic from the tunnel endpoints to your private services.
The free Ngrok tier does not guarantee a stable public address across restarts. If the address changes, you will need to update this file and reconfigure your ATAK server connection. A paid Ngrok plan lets you reserve a fixed address to avoid this.
Validating and Starting the Tunnels
Before sending any TAK traffic, confirm that your configuration file is valid. Then start all defined tunnels with a single command.
With both tunnels running, your Raspberry Pi TAK server is reachable from any internet-connected ATAK client. The next step is generating the TLS certificates that ATAK requires to authenticate the connection.
Generating and Importing ATAK Client Certificates
With the Ngrok tunnels running, ATAK can now reach your server over the internet. But TAK uses TLS for all client-server communication, which means every ATAK device needs a certificate that the server trusts before it can connect. You will generate that certificate on the server itself, copy the resulting files to your local machine, and then import them into ATAK.
Generating a Client Certificate on the Server
TAK stores its certificate tooling under /opt/tak/certs. You need to switch to the tak user to run the certificate generation script, then call makeCert.sh with the client argument and a name for the certificate. The name you choose becomes the filename for the output files.
The script produces several files. The two you need are atak.p12 (the client certificate) and truststore-TAK-ID-CA-01.p12 (the public CA certificate). Both are in /opt/tak/certs/files.
Copying Certificates to Your Local Machine
Exit the tak user account and return to your home directory. Copy both .p12 files there so they are accessible for transfer, then restore ownership of the home directory. From your local machine, use scp to pull the files down.
Then, from your local machine, transfer the files using scp. The exact command depends on your server address and key file.
Importing Certificates into ATAK
Transfer both .p12 files to your Android device, then open ATAK and navigate to the server connection settings from the hamburger menu. The path is: Settings, then Network Connection Preferences, then Linux server connections from the hamburger menu. Tap the three-dot menu to create a new server connection.
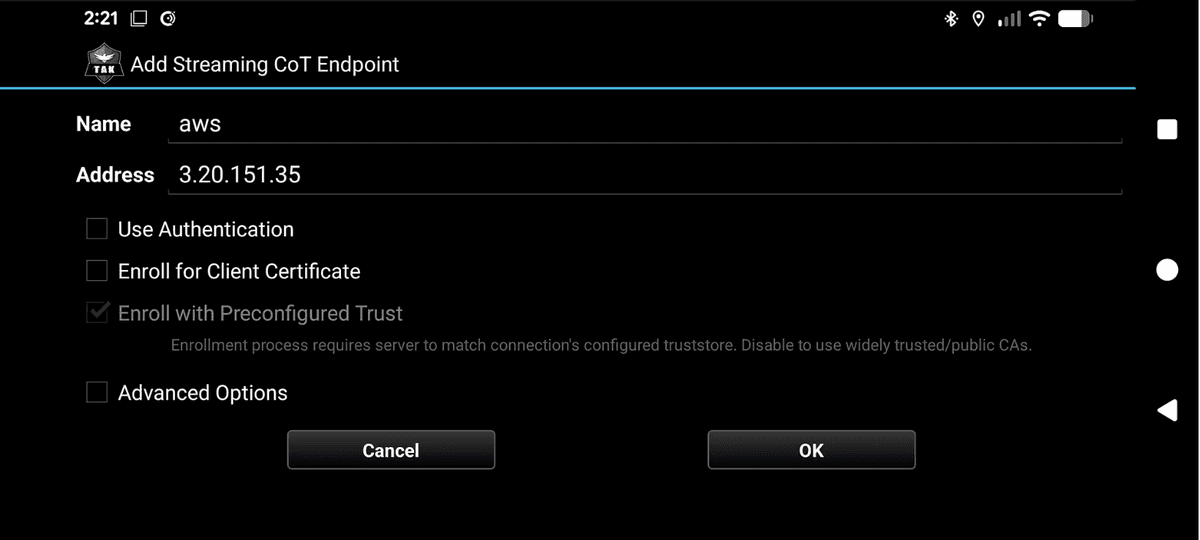
ATAK mobile app configuration screen for adding a Streaming CoT Endpoint with fields for name, address, and certificate enrollment options.
When creating the connection, enable the advanced options. This is where you import the two certificate files. Set the trust store to truststore-TAK-ID-CA-01.p12 and the client certificate to atak.p12.
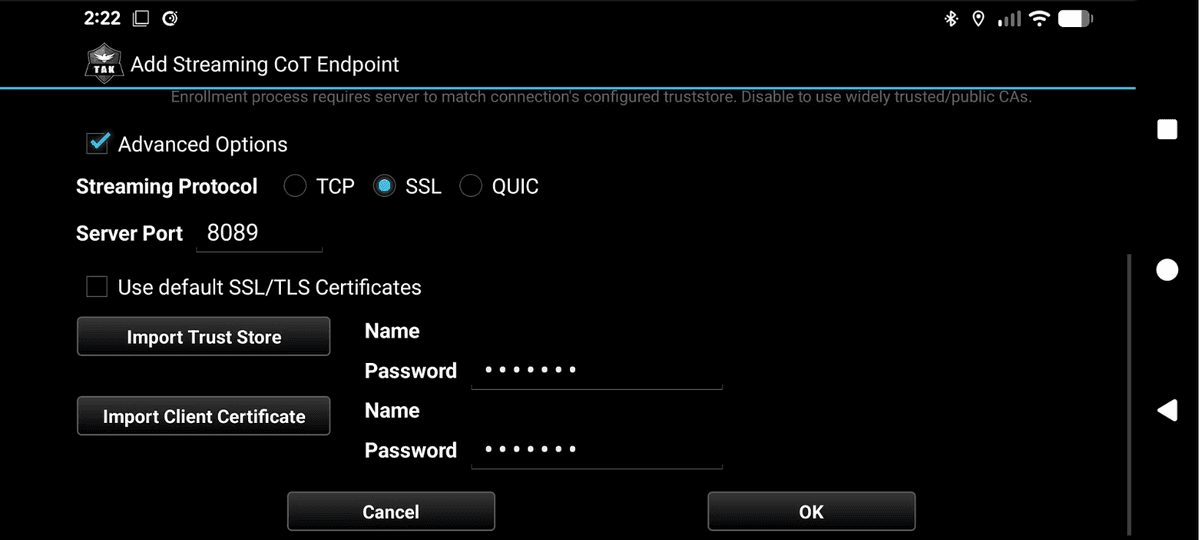
ATAK mobile app screenshot showing the Add Streaming CoT Endpoint configuration dialog with SSL protocol selected, server port 8089, and fields for importing trust store and client certificates.
The port setting depends on where your server is hosted. Use the following as a guide:
AWS or direct cloud server: use port 8089 with the server’s IP address or hostname
Ngrok-tunneled Raspberry Pi: use the public hostname and port assigned by Ngrok for the tak-signaling tunnel (for example, 5.tcp.ngrok.io on port 21824)
Once saved, ATAK will attempt to connect using the certificates for mutual TLS authentication. A successful connection means your client is ready to receive and display CoT events. The next step is actually publishing those events to the server.
Understanding Cursor on Target (CoT)
With ATAK connected to the server, the next question is: what exactly does TAK expect you to send? The answer is Cursor on Target, or CoT. CoT is an XML-based messaging standard that has been around since the early 2000s. Every piece of situational awareness data you publish to a TAK server takes the form of a CoT event.
The Structure of a CoT Event
A CoT event is an XML document with a root event element. At a minimum, the event element carries seven attributes that describe what is happening, who reported it, and when it expires.
version: the CoT schema version, typically 2.0
type: a dot-delimited code that classifies the event (covered in detail below)
uid: a globally unique identifier for the event; this can be any string you choose
how: indicates how the event was generated; m-g means machine generated
time: the UTC timestamp when the event was created
start: the UTC timestamp when the event becomes active
stale: the UTC timestamp after which the event should be removed from the map
The stale attribute is important for dynamic data. If you are tracking a moving drone, you set a short stale window of a few seconds so that old position markers disappear as new ones arrive, giving the impression of smooth movement. For a static marker you might set stale an hour or more in the future.
The Point and Detail Elements
Inside the event element, you add a point child element that places the event on the map. The detail element is optional and carries additional information that ATAK can display to the user.
point attributes: lat (latitude), lon (longitude), hae (height above ellipsoid in meters), ce (circular error in meters), le (linear error in meters)
detail children: any sub-elements you want to attach, such as contact (callsign), track (speed and course), remarks (free-text notes), or a usericon
Decoding the Type Field
ADD Table from what is COT slide
The type field is a period-separated string that classifies an event across four dimensions. Reading left to right, the segments describe the atom, the affiliation, the dimension, and a more specific designation.
First character: a for atom (the base event type)
Affiliation: f for friendly, h for hostile, u for unknown, and others such as suspect or faker
Dimension: A for airborne, G for ground
Further specifics: M for military, F for fixed wing, Q for unmanned (UAV)
Putting this together: the type a-f-A-M-F-Q describes a friendly, airborne, military, fixed-wing, unmanned aircraft. The type a-u-G describes an unknown ground event. The type a-h-A-M-A is used in the Hello World example below and represents a hostile, airborne, military atom. These type codes map directly to the NATO icon set that ATAK uses to render markers on the map.
The CoT specification is defined by a set of XML schemas (XSDs). The source for the civilian version is maintained on GitHub at the TAK Product Center repository. You can also feed the spec to a code generation tool to produce valid CoT XML for any event type you need. With this structure in mind, the three code examples that follow each build a different kind of CoT event and publish it to the server over the TLS connection you set up earlier.
Example 1: Hello World with PyTak
If you haven’t already, head on over to github.com/godfreynolan/tak_server for all the examples we are going to dive into now.
And now for the reason you all came here! PyTak is a Python library that handles the asyncio plumbing for publishing CoT events to a TAK server. Rather than managing raw sockets and XML serialization yourself, PyTak gives you a QueueWorker base class and a CLITool runner that takes care of the connection lifecycle, TLS negotiation, and message dispatch.
Generating the CoT Event
The first step is to build the CoT XML. The gen_cot() function in hello_world.py uses Python’s built-in xml.etree.ElementTree to construct the event element and set its attributes. The type is set to a-h-A-M-A, which as you saw in the previous section represents a hostile airborne military atom. The lat and lon point to Central Park in New York, and the stale window is 3600 seconds (one hour) from the current time.
pytak.cot_time() returns the current UTC time formatted for a CoT event. Passing an integer argument like cot_time(3600) adds that many seconds to the current time, which is how the stale timestamp is calculated. The function returns the event serialized as bytes, ready to be placed on the transmit queue. Now, that we’ve generated it, we need to send it. This is the AWS version.
Configuring and Running the Client
This main() function sets up and runs a PyTAK client that sends location and event data to a TAK server over an encrypted connection. It starts by creating a configuration with the server address and the TLS credentials you generated when setting up the ATAK client certificate, while also telling it to skip strict certificate checking. Five keys are required in the config block:
COT_URL: the TAK server address and port in the form tls://x.x.x.x:8089
PYTAK_TLS_CLIENT_CERT: path to the PEM-encoded client certificate
PYTAK_TLS_CLIENT_KEY: path to the corresponding private key
PYTAK_TLS_CLIENT_PASSWORD: the password set during certificate generation
PYTAK_TLS_DONT_VERIFY: set to 1 to skip server certificate verification
pytak.CLITool initializes the worker queues and the TLS-secured connection to the server. Calling add_tasks() registers your MySerializer instance so that its run loop is started alongside the internal transmit worker. Once you call clitool.run(), the process continuously generates and sends CoT events until you stop it.
If you want to verify what is being sent before connecting to a live server, you can redirect output to stdout instead of the TLS endpoint. This lets you inspect the raw XML and confirm that your event structure is valid before any data reaches the TAK server.
Example 2: Simulated Remote ID Drone Track
A static marker is useful for testing, but a drone moves. The Remote ID example builds on the same PyTak foundation to publish a CoT event that updates position on every loop iteration, making the icon travel eastward across the map rather than sitting at a fixed coordinate.
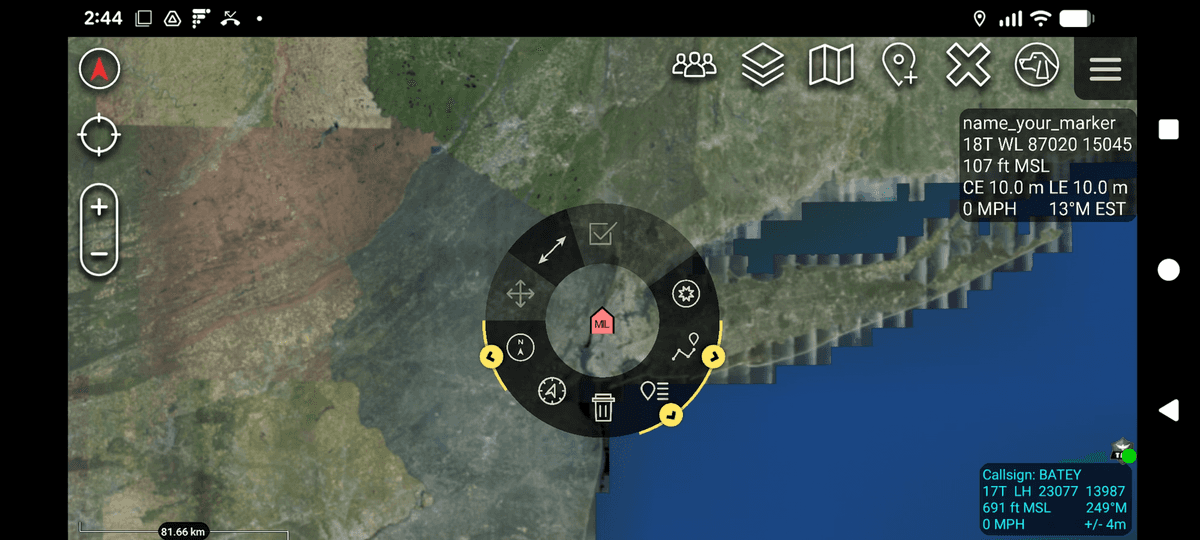
Here’s our example COT:
The outer <event> tag marks this as a friendly airborne UAV using code a-f-A-M-F-Q, with a six-second stale time (the server will treat the position as outdated if it doesn’t receive an update within six seconds). The <point> element shows the drone’s location near Rochester Hills, Michigan at 120 meters altitude. Inside <detail>, the <contact> tag sets the callsign displayed on the map, <track> shows its heading (90 degrees, due east) and speed (15 m/s), and <remoteid> contains the FAA Remote ID data including the serial number, location, altitude, speed, heading, and timestamp. The <remarks> field summarizes this information in plain language for quick reference.
Tracking Position Over Time
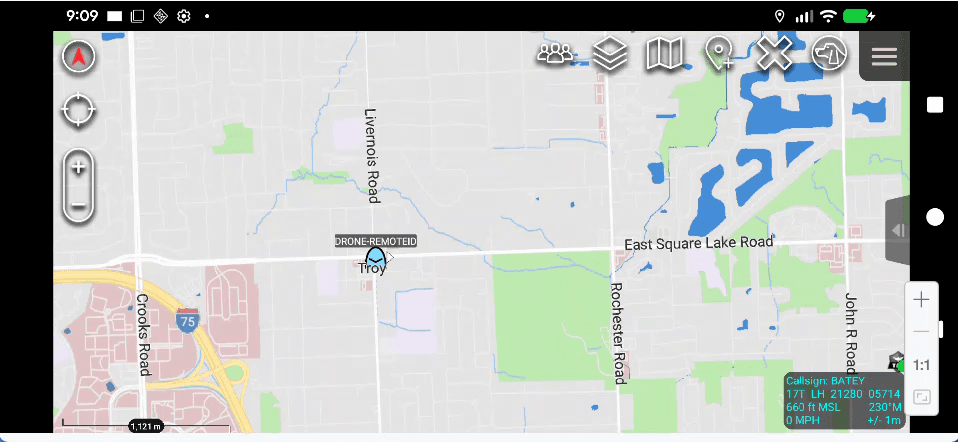
The simulation starts at a fixed origin in Troy, Michigan (START_LAT = 42.6064, START_LON = -83.1498) and moves east at 15 meters per second on a heading of 90 degrees. Each time the serializer runs, it calculates how far east the drone has traveled based on elapsed time and converts that distance to a longitude delta using the meters_to_deg_lon helper.
The DroneRemoteIDSerializer class subclasses pytak.QueueWorker, just like MySerializer in the Hello World example. Its run() method calls gen_cot_event() on each iteration, updates the drone’s longitude, puts the resulting bytes on the transmit queue, then sleeps for UPDATE_SECS (1.0 second) before repeating.
The Stale Window and Moving Tracks
The stale attribute is set to only a few update intervals into the future. If you set a long stale window, every position update would leave a lingering marker on the map. By keeping stale short, each old position disappears before the next one arrives, so the TAK client shows a single moving icon rather than a trail of accumulated markers.
Building the CoT Event for a UAS
The event type is a-f-A-M-F-Q, representing a friendly airborne military fixed-wing UAV. A stable UID derived from the drone’s serial number is used across all updates so that TAK treats the events as a single continuous track rather than separate new contacts.
The Detail Block: Track, Remote ID, and Remarks
The detail element carries three subelements beyond the basic callsign contact. First, a track element provides the current course and speed so TAK can display the heading vector. Second, a custom remoteid element embeds a Remote ID-style payload with the UAS serial number, a nested location element, and a timestamp. Third, a remarks element adds a human-readable summary of the drone’s current state.
The TAK server carries the remoteid element through to connected clients even if the core ATAK app does not natively render it. The configuration in main() follows the same pattern as the Hello World example: the same five TLS config keys, pytak.CLITool setup, and add_tasks() registration, with the config section renamed to drone_remoteid.
With a live drone position stream, the next logical step is ingesting structured data from an external system rather than generating it in code. The CAD data example shows how to convert an incoming JSON payload from a Computer Aided Dispatch system into a CoT event and push it to the TAK server.
Example 3: Computer Aided Dispatch Data
The Remote ID example generated all its data internally. Real operational use cases pull data from external systems. Computer Aided Dispatch (CAD) systems track incidents in the field and typically expose a REST API that returns JSON. The pattern here is: fetch that JSON, convert it to a CoT XML event, and push it to the TAK server so responders see incident markers on their ATAK map.
The cad_data.py file in the GitHub repository contains the convert_incident_to_cot() function that performs this conversion. It accepts a single incident dictionary parsed from a JSON response and returns a complete CoT XML byte string ready to send.
Building the Event Element
Each incident becomes a CoT event with the type a-u-G, which represents an unknown ground event. The UID is built from the incident number to keep it stable across updates. Time fields use pytak.cot_time(), with a stale window of 3600 seconds, and the how attribute is set to m-g for machine generated.
The lat and lon coordinates are pulled directly from the incident dictionary and placed into the point subelement. The circular error (ce) and linear error (le) are both set to 9999999.0 to indicate low positional precision, which is common for address-based CAD data.
Populating the Detail Block
The detail element carries three key subelements for CAD incidents. First, a usericon element specifies a custom icon via its iconsetpath attribute. Second, a contact element provides the callsign, formatted as a pipe-delimited string combining the incident type code, status, and address. Third, a remarks element holds the full incident narrative, including dispatch time, arrival time, and any appended comments.
The remarks block is built by concatenating the incident description, status, dispatch date, arrival date, and each comment entry from the comments list. This gives a responder viewing the marker in ATAK the full incident history without having to access the CAD system directly.
Group Color by Incident Status
A __group subelement controls the marker color in ATAK. Active incidents are assigned the group name Orange, making them visually distinct on the map. You can extend this logic to assign different colors based on other status values as your workflow requires.
The Resulting CoT XML
After convert_incident_to_cot() assembles all the elements, it serializes the tree to bytes and prepends the XML declaration. The output for a warrant arrest incident looks like this:
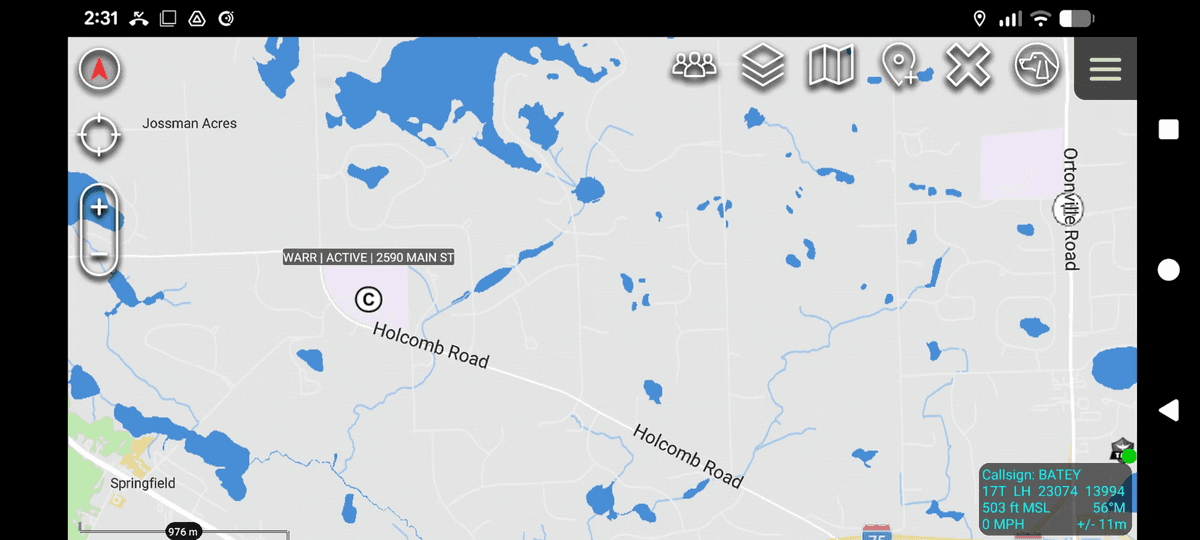
A mobile map application displaying CAD data with flood risk areas marked in blue across a landscape near Springfield and Otombie Road.
The main block in cad_data.py reads a sample.json file, iterates over the Incidents array, calls convert_incident_to_cot() for each entry, and prints the resulting XML to stdout. To send these events to the TAK server, you would wire the output into the same pytak.CLITool and QueueWorker pattern used in the Hello World and Remote ID examples, replacing the hard-coded data with values pulled from your CAD system’s REST API.
With three PyTak examples in hand, you have seen the full range from a static marker to a moving track to a structured external data feed. For teams that prefer a visual workflow editor over writing Python, Node-RED offers another path to the same outcome.
Alternative: Publishing CoT with Node-RED
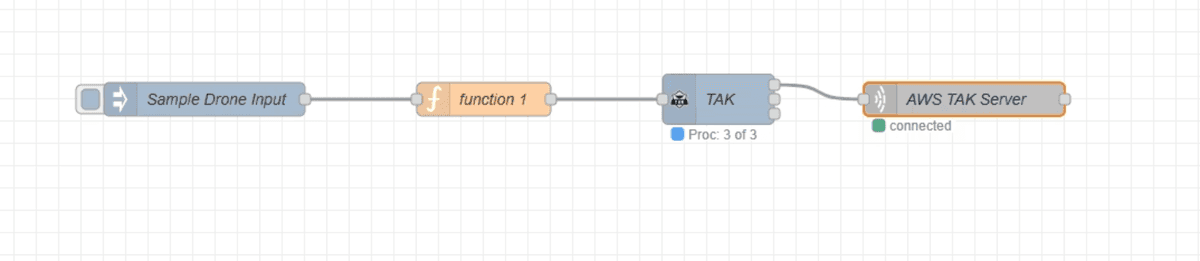
Node-RED flow diagram showing a sample drone input connected through function 1 to a TAK node and AWS TAK Server with connection status indicators.
Not every team wants to write Python. Node-RED is a low-code, browser-based workflow editor that lets you wire together data sources, transformation functions, and output nodes using a drag-and-drop canvas. You still need to write a small JavaScript function to build the CoT payload, but the overall plumbing is visual and the flow is easy to follow at a glance.
Installing Node-RED on Windows via WSL
Node-RED runs on Linux, so Windows users need the Windows Subsystem for Linux (WSL) first. Once WSL is running, install Node-RED via snap and start it on a port of your choice.
After Node-RED starts, open a browser and navigate to http://localhost:8080 to access the editor. From here you build the entire CoT publishing flow visually.
Step 1: Create an Inject Node
The flow starts with an Inject node that holds the sample drone payload. Drag an Inject node onto the canvas and set its payload to a JSON object, and set the msg:topic to drone-in. Click into the payload and add the following:
The structure mirrors what a real Remote ID source would send, with top-level keys for uas_id, operator_id, location, velocity, status, and control_station.
Step 2: Write the Function Node
Connect a Function node after the Inject node. This is where you parse the incoming payload and map each field to its CoT equivalent. Start by extracting the key variables from msg.payload.
With the variables defined, build the cot_payload JSON object. The event attributes, point element, and detail element follow the same CoT structure covered in the PyTak examples. The stale field here is set to 10 minutes from the current time.
The point and detail elements follow immediately. The detail block includes a usericon, a contact with the drone callsign, a track element carrying speed and course, and a remarks string identifying the operator.
At the end of the function, assign the completed object back to msg.payload and return it so the next node in the flow receives it.
Step 3: Install the TAK Palette Package
The Function node outputs a JSON object, but the TAK server expects CoT XML. The node-red-contrib-tak package handles this conversion automatically. Install it from within the editor itself.
Click the hamburger menu in the top-right corner of the Node-RED editor.
Select Manage Palette.
Click the Install tab.
Search for node-red-contrib-tak and click Install.
Once installed, a TAK node appears in the node palette. Drag it onto the canvas and connect it between the Function node and the TAK Server output node. It converts the incoming CoT JSON to the XML format the server requires.
Step 4: Configure the TAK Server Output Node
Drag a TAK Server node onto the canvas and connect it as the final step in the flow. Open its configuration dialog and set the server IP address and port 8089. The connection uses TCP with TLS enabled, which requires the same certificate files you generated earlier.

A configuration dialog for editing a TAK Server node with fields for server IP, port, TLS settings, and connection parameters.
Click the TLS configuration field to open the TLS properties panel. Upload your PEM file and key file, then enter the passphrase. This mirrors the PYTAK_TLS_CLIENT_CERT, PYTAK_TLS_CLIENT_KEY, and PYTAK_TLS_CLIENT_PASSWORD settings used in the PyTak examples.
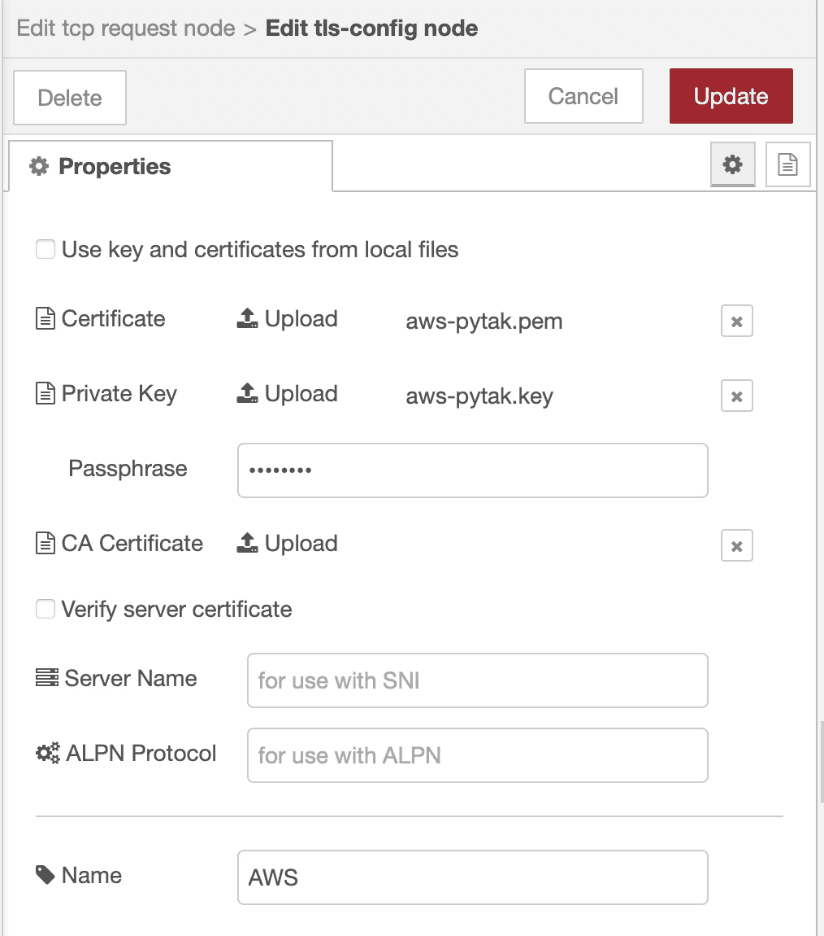
A configuration interface for editing TLS properties including certificate uploads, private key, passphrase, CA certificate, server name, and ALPN protocol settings.
Step 5: Deploy and Inject
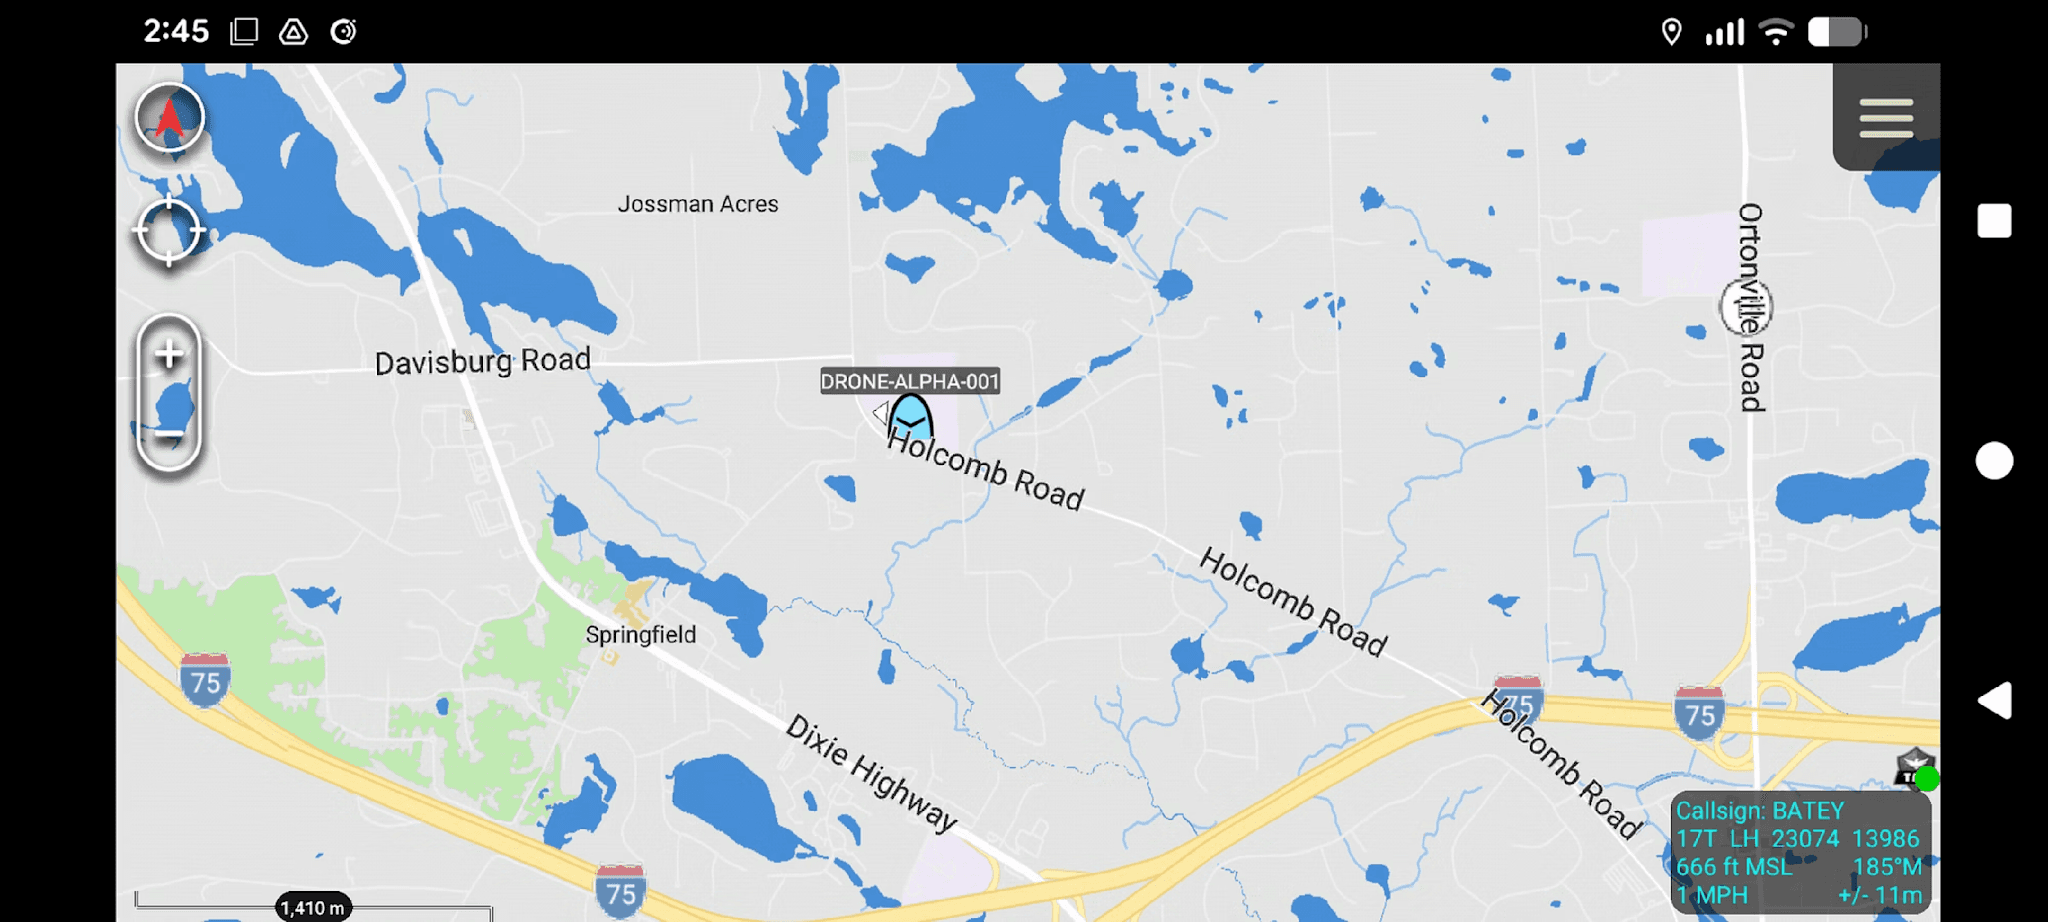
Click Deploy in the top-right corner of the editor to activate the flow. Then click the button on the left side of the Inject node to trigger it manually. If the TAK Server node shows a connected status, the CoT event is transmitted and the drone marker appears on the ATAK map, labeled with the uas_id and positioned at the coordinates from the payload. And if all goes well:
The complete flow is minimal: an Inject node feeds the drone JSON, the Function node builds the CoT structure, the TAK node converts it to XML, and the TAK Server node sends it over TLS. You can replace the static Inject node with any live data source, such as a MQTT input or an HTTP request node polling a Remote ID feed, and the rest of the flow stays the same.
Conclusion
With the flow deployed and data appearing on ATAK, you have a complete pipeline: an Ngrok tunnel exposes a Raspberry Pi TAK server to the internet, TLS certificates authenticate the ATAK client connection, and CoT XML events flow in via PyTak or Node-RED from sources ranging from a static Hello World marker to a moving Remote ID drone track to a Computer Aided Dispatch feed. To go further, the CoT specification is available from MITRE, the atak-civ source code lives at github.com/TAK-Product-Center/atak-civ, PyTak documentation is at pytak.readthedocs.io, and all three example scripts from this tutorial are in the companion GitHub repository at github.com/godfreynolan/tak_server.
